Arduino programming functions
The Arduino IDE makes available a whole raft of C functions and macros designed to give your programs access to additional functionality not built into the C programming language itself. You do not have to worry about including any specific library to access these resources as the IDE takes care of that for you.
Most of these functions are well documented on the Arduino web site and so the approach here has been to be succinct while ensuring that this book provides some useful documentation for each feature. A good percentage of the math functions, at least, get included into programs featured elsewhere in the book and the index will help you locate those worked examples.
Math Functions
Those inbuilt Arduino libraries include some useful functions under the broad heading of maths.
| Function | Description |
| min(x, y) | Returns the lower value of two numeric arguments x and y. The return type will vary. Integer values are “promoted” to a long before a comparison is made and a long returned although if either of the arguments is a float then the return type is a float. Warning min() is implemented using a macro and this can have unintended results if either or both of the arguments are expressions. The form min(a++, b) should be avoided (see section on macros for details). |
| max(x, y) | Returns the larger value of two numeric arguments x and y. Similar comments and warnings to min() as max() is also implemented as a macro. |
| abs(x) | Returns the absolute value of x. If x is zero or positive the function returns x. If x is negative then the function returns x multiplied by -1. Again, implemented as a macro so take precautions when passing an expression as an argument. |
| constrain(x, lw, up) | If x is greater than or equal to the specified lower bound lw and less than or equal to the upper bound up then returns x. If x is less than lw, returns lw otherwise if x is greater than up then returns up. A great way to ensure a value is within a range acceptable to (say) an Arduino analog pin. |
| map(v, fl, fh, tl, th) | Takes a value v that is within a range fl to fh and returns a new value calculated to be in a similar relative position within the range tl to th. There are a number of caveats. The function only works with integer values and can’t be used to return fractional equivalents even if the target range is thus constrained. Also, the value v is not constrained by this function to be in the range fl to fh. Works fine with ranges that are negative of start or end with a negative value. |
| pow(v, p) | Returns the value v raised to the power p. The power p can be a fraction. Both arguments can therefore be floats and the return type is double. |
| sqrt(x) | Returns the square root of x as a double. X may be any numeric type. |
| sq(x) | Returns the square of the argument x – equivalent to pow(x, 2) |
| sin(rad) | Returns a double value which is the sine of the angle rad expressed in radians. |
| cos(rad) | Returns a double value which is the cosine of the angle rad expressed in radians. |
| tan(rad) | Returns a double value which is the tangent of the angle rad expressed in radians. |
Just in case your memory of radians is a little hazy, here are a few lines of revision. A radian has a proper definition as a derived SI unit but for simplicity we can start with the fact that 2π radians is equivalent to 360 degrees. One radian is therefore approximately 57.3 degrees. Degrees can be converted to radians by multiplying the number of degrees by π (pi) and dividing by 180. Mathematicians apparently like radians because they are deemed to be more “natural”. If you feel that having to factor in an irrational number rather than use nice decimal numbers like degrees feels less than natural then I have some sympathy but suspect that calculating trigonometric functions proves simpler with radians.
A helper function to convert degrees to radians might look like this:
float radFromDeg(float deg) {
  float const pi = 3.141593;
  return deg * pi / 180.0;
}
You could also try overloading a standard trig function to accept degrees. The problem here is precision. You might like to include a fractional part of a degree in the calculation but we need a different parameter type (like integer) to overload the function. The following function overrides sin() and accepts an integer value that is minutes (60ths of a degree). This code could be shortened but the idea is a bit clumsy for real world use. Just remember that you can do things like this if you need to.
float sin(int mins) {
  float const pi = 3.141593;
  float degs = mins / (float)60; //would 60.0 be better than the cast?
  float rad = degs * pi / 180.0;
  return sin(rad);
}
Functions implemented as macros
Some of the functions above (min and max for instance) carry warnings on how values are passed as arguments. The following short program illustrates the potential for unexpected results. Well worth typing in and playing with.
#define max(a,b) ((a) > (b) ? (a) : (b))
#define square(x) x * x
template<class T> inline Print &operator <<(Print &obj, T arg) { obj.print(arg); return obj; }
                                                        #define dprint(expr) Serial << #expr " = " << expr << "\n";
void setup() {
  Serial.begin(115200);
  int x = 20;
  int y = 30;
  int z = 6;
  Serial << "max(x, y): " << max(x, y) << "\n";
  Serial << "max(x+, y++): " << max(x++, y++) << "\n"; // returns 31
  dprint(max(x, y));
  dprint(max(x++, y++)); // returns 33, K&R expected 32
  dprint(square(z));
  dprint(square(z+1)); // evaluates to 6 + 1 * 6 + 1 = 13
  dprint(square((z+1))); // returns 49 (note brackets)
}
I rather think some of those results were unexpected, despite the warnings. The macro process of a relatively simple code substitution is the source of these interesting results. You could re-write max() and square() as pure functions in just a (very) few lines of code and get a predictable result – otherwise proceed with caution.
I commend the dprint macro from the above program for use in debugging. If you have not realised why, then type in the code and run it and I am sure you will agree it is very handy. [Needs the operator overload for << as well.] If you can figure out what happens without running the code then you are already a true macro master.
Random numbers
There are many occasions when being able to get hold of a sequence of random numbers would prove desirable. You might want a set of numbers for testing a function or to randomise responses from a program. Most programming environments have access to a random number generator although strictly these should be thought of a pseudo-random numbers as they are produced by a computing process that can be induced to produce the same “random” sequence on successive occasions. True random numbers have to be derived from a source where there is no dependency between successive values. Random.org can supply true random numbers based upon atmospheric noise for instance. For most purposes, pseudo-random numbers are random enough.
The Arduino environment has two functions that together deliver a source of pseudo-random numbers.
random()
randomSeed()
The random() function has two forms. They are random(max) and random(min, max). Unlike most random number generators which return a floating point value between 0 and 1, the Arduino version returns an integer value (a long) between the minimum value (default zero) and one less than the maximum value.
If you need a repeatable random number sequence then you can specify a seed value that will be used to initialise the number generator. Use the randomSeed() function and supply the same long integer value before using random() to supply a sequence of numbers. Alternatively you can use the randomSeed() function together with a number that is reasonably unique to make it unlikely that a given sequence will be repeated. On PCs it is common to use the current time (typically as the number of milliseconds since a specified date) as a seed value as that value continually advances and is unlikely to be precisely the same on any two machines. The Arduino documentation suggests a good alternative for this environment. The suggestion is to use analogRead() to obtain a value from a pin that is not connected to anything and thus likely to result in a reasonably random start point within the range of that function. Again, not perfect but probably good enough for most purposes.
Bit Manipulation
There is some overlap among these functions but it is likely that there is a one that best suits a given circumstance.
| Function | Description |
| lowByte(x) | Returns the low order (rightmost) byte from an integer value x – an int, word or long perhaps. [Implemented as a macro.] |
| highByte(x) | Returns the high order (leftmost) byte of a two byte integer value or the second rightmost (lowest) byte of a 4 or 8 byte integer value. Probably due a name change or a new function. |
| bitRead(x, b) | Returns the value (0 or 1) of the bit b in the integer value x. Bits are counted from 0 which is the rightmost bit. |
| bitWrite(x, b, v) | Sets the bit b in the integer value x to the value v (0 or 1) |
| bitSet(x, b) | Sets the bit b in the integer value x to 1 |
| bitClear(x, b) | The opposite of bitSet() as this sets the bit b in the integer x to 0 |
| bit(b) | I think that the Arduino documentation is a bit lacking for this one. The function bit() returns the value of a bit at a given position in an unsigned integer type. It returns 2 to the power of the argument b and might marginally reduce the code required for some comparison statements. |
Making a noise
The Arduino function set includes two related to generating a tone. These are tone() and noTone().
The tone() function can be used to generate a square wave on a pin with a selected frequency and duration. The functions are not available on some boards (for example the Arduino Due) that have a superior alternative mechanism for sound generation.
The tone() function is non-blocking in that any subsequent program statements are executed immediately after a tone has started to “play” rather than waiting until after the tone has completed. This needs to be taken into account when timing other output or (as in the program coming up) when inserting a short gap between notes of a tune.
The tone() function has two forms:
tone(pin, frequency);
tone(pin, frequency, duration);
The frequency value is the note frequency in hertz as an unsigned int and the optional duration is in milliseconds.
The noTone() function can be used to terminate a currently sounding tone and must be used before a tone is generated on an alternate pin.
Trying this out, requires no more than a miniature 8 ohm speaker and a couple of connecting jumpers.
Breadboard layout
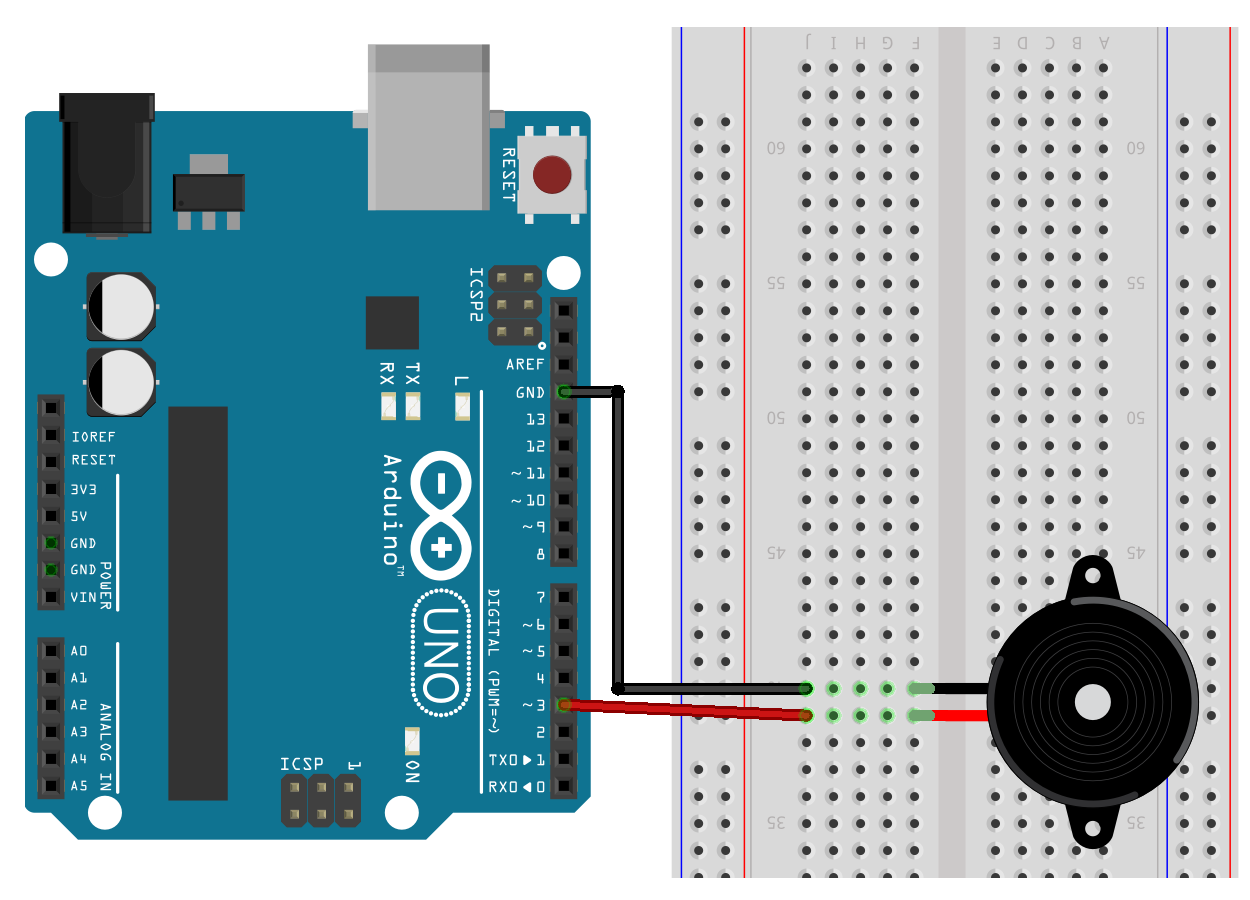
If you are the least bit unsure about your speaker type then you should also include a resistor (perhaps 1K ohm) in series. You can always discard it if the volume is too low.
#include "pitches.h"
// notes of the tune as frequencies:
const unsigned int tune[] = {
  C4, C4, C4, D4, D4, D4, E4, F4, G4, C4, B3, C4, D4, A3,
  C4, C4, C4, D4, D4, D4, E4, F4, G4, C4, D4, B3, C4,
  C4, C4, C4, C4, C4, D4, C4, C5, C5, C5, C5, C5, D5, C5
};
const int notes[] = {
  4, 4, 2, 4, 4, 2, 4, 4, 4, 4, 4, 4, 4, 4,
  4, 4, 2, 4, 4, 2, 4, 4, 4, 4, 4, 4, 2,
  4, 8, 8, 4, 4, 1, 1, 4, 8, 8, 4, 4, 1, 1
};
// note = duration: 4 crotchet, 2 minim, 1 semibreve, 8 quaver
const byte tonePin = 3;
const int timeSig = 1000; // initial value based on 1 second

void setup() {
  for (int i = 0, j = sizeof(tune) / sizeof(int); i < j; i++) {

    int duration = timeSig / notes[i];
    int space = duration * 1.3;

    tone(tonePin, tune[i], duration);
    delay(space); // delay starts aprox at tone start
  }
  noTone(tonePin);
}
A short search of the Arduino web site or the Internet in general will quickly provide a version of pitches.h ready to append to this program. Alternately, you can download a commented version from the book website. Trust me when I say that you do not want to type it all in just to play with the tone() function. But what do you do with the pitches.h header file content when you have found a copy?
Click the down arrow button to the right of the IDE tab that features the tone test program code and select the “New Tab” option from the drop down menu. You will then be invited to enter the new file name – so choose pitches.h and this will create a new empty code window in the IDE. Paste the code from the source you have found into that window and save. Header files get a bit more coverage in later chapters in this book.
Adapting the program to play an alternate tune is just a matter of adding the required note frequencies to the tune[] array and the note lengths to the notes[] array. You can find the melodies of a great many popular and traditional songs on-line although if you have never learned a musical instrument you might also need to look up the basics on reading sheet music to identify the needed values.
Pin Event Monitoring
There is one more Arduino function I would like to mention here and that is one related to interrupts and timers which we will get to later.
The pulseIn() function has two overloaded formats that are used to return the length of a signal pulse detected on a digital pin. In general, the function waits for a state change on a pin (LOW to HIGH or vice versa) starts timing and waits for the pulse to end. When the pin state reverts, the timing stops and the function returns the pulse elapsed time in microseconds.
Interrupts have to be enabled for this function, which is the default state. The two formats are:
pulseIn(pin, state);
pulseIn(pin, state, timeout);
The arguments identify the pin number, the state to monitor (HIGH or LOW) and the option to supply a timeout value in microseconds to wait for a pulse to be completed. The timeout defaults to one second if not specified.
Returned times can be in the range 10 microseconds to 3 minutes although generally shorter pulse lengths are handled with greater fidelity. This function is explained further later in the book.
Code downloads for this chapter are available here.