
Learn to Program
Gamepad Programming
The first edition of my book, introducing programming by writing games in JavaScript, included a section on incorporating gamepad input. As this was probably only of direct interest to a minority of readers this section will be replaced in the second edition by a more rigorous look at incorporating “touch”. That also provided an opportunity to include some in depth looks at a range of JavaScript objects and explore potential snags with "this". The gamepad demonstration project has been revised and is available here together with this commentary.
A quick word of warning, gamepad support for Chromebooks has been patchy and, in the past, often only worked with Android apps. This is likely to change so the best advice for Chromebook developers with an interest in this topic is to do some Internet research before buying any new hardware.
For other PC types, a cheap wired USB gamepad should work just fine and could well add a new dimension to future game projects.
I wanted to create a demonstration project that could be kept as a form of documentation as it explores button access and the vagaries of joystick analogue input. I also wanted to create a “core” object to act as a potential foundation for any Browser/JavaScript project looking to include gamepad input. The project files can be downloaded as a zip ready to extract and run.
The rest of this post acts as a short commentary on the code with explanations for some of the less obvious elements.
The demonstration project makes use of jQuery to add and manipulate HTML elements displaying the status of the various gamepad switches and the values that can be read from the joysticks. The interaction with the joysticks does not require the inclusion of jQuery.
[Note: The latest compressed production version of jQuery can be downloaded from https://jquery.com/download/ where there are also details of the available CDNs. The download package for this demonstration project includes a recent (Autumn 2021) version of jQuery.]
The project includes an HTML file, CSS file and four JavaScript files in addition to the jQuery file. The intention is to separate the various JavaScript objects as an aid to clarity.
The ball.js file contains a simple class for an object representing a ball that can be manoeuvred around the main area of the web page using a gamepad’s joysticks. The keyboard.js file provides an alternate way of moving the “balls” around the screen and is included as a base for any experimentation you might like to do using a keyboard. It is currently set so that the keyboard <shift> key can be used to switch between the balls being ushered around using the arrow keys. The fundamental difference that the gamepad control can demonstrate is the ability to vary the movement speed and to demonstrate the enhancerd accuracy of angular motion.
The gamepad.js file contains a lot of the “action” while the main.js file manages the keyboard and gamepad setup and then uses setInterval() to refresh the screen and (indirectly) pole any attached gamepad.
The main.js file init() function attaches a handler for gamepad connection and disconnection. The handler is one of the methods of a Gamepad object to be found in the gamepad.js file. Note: some browsers might not fire the gamepadconnected event until a button is pressed on an attached gamepad.
The main.js file reDraw() function demonstrates two ways of extracting data from the Gamepad object. Both methods are “safe” and the code will run without error if no gamepad is available or if an attached gamepad is disconnected while the code is running. The line:
let bVals = Gamepad.getGamepadInput();demonstrates an approach used to move the Ball objects (created in init()) around the screen in response to joystick movements. Note: the gamepad analog (sic) button may need to be activated for the best response.
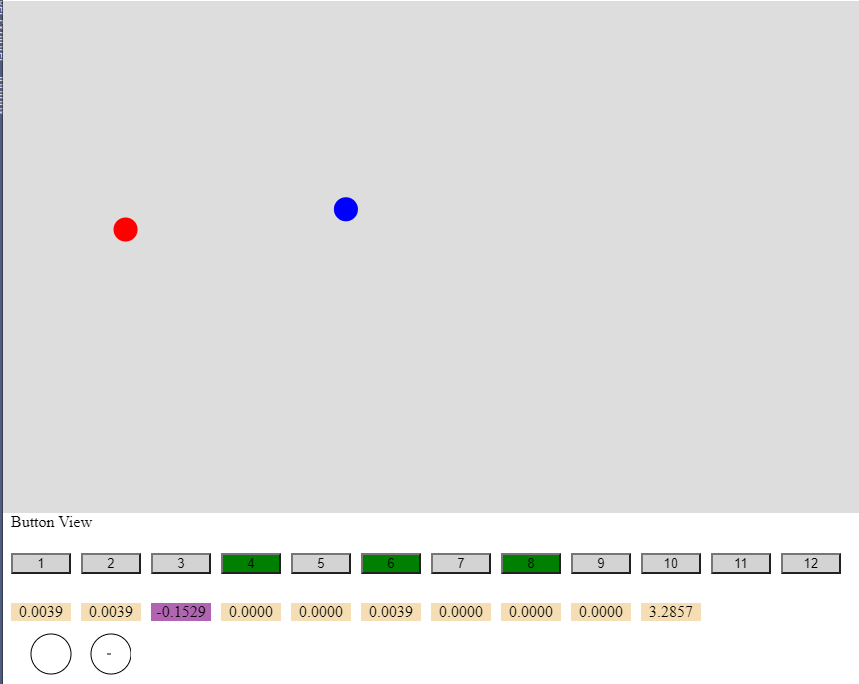
The call to the Gamepad.updateView() method is another way that data is extracted from the gamepad – this time being used to display the current state of all gamepad buttons as well as positional data from the gamepad joysticks.
The gamepad.js file includes three objects. The first is called Joystick and is created using a constructor. It is used by the Gamepad object to store a base of data for the 2 (?) joysticks attached to a gamepad.
The second object is called Vue and this object manages the display of gamepad button status and joystick values. It demonstrates how to extract those values from a gamepad.
The Gamepad object is key. The gamepadconnected event (and gamepaddisconnected) triggers the gamepadEvent() method. The gamepad reference is stored in the object’s gamepads object using the unique gamepad.id as the attribute name. This approach makes provision for multiple connected gamepads although only the first (or only) gamepad connected interaction is demonstrated. If the new gamepad is the only one in the gamepads object then joystick data is collected using the addJoysticks() method. If this is also the first gamepad to be connected (you might have disconnected and reconnected) then the dvButtonView HTML <div> is laid out ready to display button and joystick data. That process is managed by the View object initView() method.
Some browsers maintain a variable storing any connected gamepad’s ongoing state but Chrome (for one) does not and so we need to poll regularly. As the getGamePadInput() method is called every small fraction of a second from the reDraw() function we can call scanGamepads() from that method to refresh the gamepad status in the gamapads object. The method also returns the x/y values of the first gamepad’s joysticks after taking into account any “resting state” values stored for either directional axes.
The updateView() method is also called from reDraw() and passes gamepad values to the three View object methods that manage the display. This method could have been called from getGamepadInput() but here demonstrates that a second call to the Gamepad object could be used to get additional input from another area of a project's' code.
I hope that running this demo, with a gamepad connected, will provide all of the feedback needed to incorporate the buttons and joysticks (in both modes) into your future JavaScript projects.
Once again, the complete project can be downloaded as a zip file.
Read more on JavaScript in my book Learn to Program with Games and JavaScript