
Learn to Program
Basic Image Editing
Image Editors Are Great Tools
Image editing skills are not fundamental for programmers but are just about a requirement for even an amateur game developer and they are arguably a useful skill for any computer user. As a very simple example, you might want to take a screen shot and save the image or send the image to others. If you include an image editor in the process you can take complete control of the image size, scope and even the file format used to store the final result.
Image editing felt so important that I included an introduction to using Paint.net and Pinta as a chapter in the first edition of my JavaScript programming book. When reviewing the book content for the second edition I decided that while this was a useful feature it was better added to the supporting web pages as it was not directly focused on the task of learning JavaScript. This guide is available in advance of the publication of the second edition in the hope that it proves valuable.
For a brief history of the two projects you could take a look at Wikipedia Here for Paint.net and Here for Pinta.
The Pinta User Guide
Great news for Pinta users. The team at Pinta have now produced an excellent on-line user guide. Check it out here. Given that the Pinta project is designed to build an equivalent tool to Paint.net but for Linux and Mac platforms, Windows users running Paint.net might also like to review the Pinta user guide as there is no equivalent resource for them. well, except for my oh so basic intro here.
A brief introduction to Paint.net
We should start with the most important icon on the menu ribbon / tool bar. It is the “Undo” button. This button means that you can try any of the features or tools on offer and if things go wrong or you just don’t like the result you can click “Undo” as many times as you need to get back to a better place. There is also a “Redo” button in case you back too far out. I hope that these encourage you to be adventurous.
You can work on image files in a wide range of popular formats. There is PNG, JPEG, BMP, and TIFF among others. Pinta also has ICO but there is a plugin for Paint.net if you want to add a favicon to your game folders or web projects.
Image Size
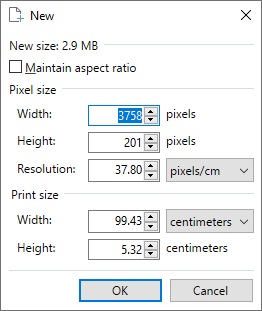
The programs starts with a default sized white image displayed. This may not be the size that you want though. You can select the “New” toolbar icon or “New” from the “File” menu. This will present you with a dialog box. You can use this box to set the desired image size. The paint.NET dialogue gives you the option to set the size in centimeters or inches as well as pixels. You can also set the resolution to a value that differs to the “default” of 96 pixels per inch. You can then set the initial Paint.NET image background to transparent if you wnat by using the Edit menu and Select All then Cut.
If your PC clipboard currently contains an image when you open the new image dialogue then the new image dimensions will be pre-set to the size of the image on the clipboard although you can, of course, press on and set any values you want.
Resize
You can use the “Resize…” option from the “Image” menu to resize the current image. This can be used to expand or reduce the image size. The programs will calculate how to merge or expand individual pixels in the original image. The dialogue defaults to maintaining the current image aspect ratio although you can set new values for both the width and height. Making large changes to the image size will inevitably degrade the image quality but that might be just the effect you are looking for.
Rotate
This option can be used to flip or rotate an image.
The Clipboard
As you would expect, Paint.net provides the normal GUI facilities to select, crop, cut and paste parts of images. As you can have multiple images open at any one time then moving selected portions of one image into another is easy. You might also select part of an image and paste it into a new image ready to edit. After making changes you might then copy and paste the revised image portion back into the original.
If an image is pasted into the current editing area then it can be positioned using the mouse (or keyboard arrow keys on Windows). Changing tools from the “Move Selected Pixels” tool will fix the pasted image into the current layer (or background).
Now “Layers” have been mentioned. If you use the “Edit” menu then you can paste into a new layer which brings us nicely to image layers.
Layers
The layers facility allows you to build an image out of a stack of images blended together. Layers have a transparent background and are stacked in top of the original background. Layers can be re-ordered if required. By clicking the checkboxes next to individual layers in the layers window you can add or remove them from the view in the editing window. You can select the layer that you want to edit by clicking the relevant layer – again in the layers window. Any individual layer can be duplicated or deleted. You can also copy all or part of a layer’s image ready to be pasted elsewhere.
The “layer” “Properties” menu item pops up a dialogue where you can set how a layer is blended into the lower layers. The order of the layers will affect the results of a blend. Experimentation is advised if you want to take advantage of this feature.
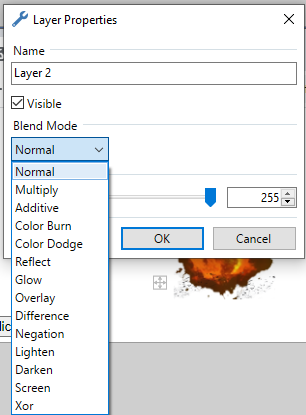
Many of the other tools allow you to apply similar blending modes.
Layers can be merged down into the background image and indeed this has to be done if you want to save the completed image including all of the layers in a standard image file format such as PNG.
Saving Image Files
When an image is being displayed on a PC screen then it is in the form of a bitmap. An 800 by 600 pixel full colour image being edited would have a size of over 16 megabytes. Handling images of that size would be something of a burden for network traffic and the Internet in general. We therefore normally use a file format that applies compression to the image size. Image files can though be saved as bitmaps and that could be a good option if you are part way through working on a complex image.
The JPEG formatThe best known compressed image file format is JPEG (Joint Photographic Experts Group). This file format uses a “lossy” algorithm where some of the detail in the image is lost when the file is saved. This works in a similar manner to the way the music MP3 file compression works by eliminating sound data that should be undetectable by human ears. The JPEG compression technique attempts to lose data while maintaining an acceptable image. Problems can arise if a given image is repeatedly opened and then saved. The image may become perceptibly degraded after a time.
One work around for image degradation when an image may need to be repeatedly edited is to save the image as a bitmap until you are satisfied that it is complete and then save it as a JPEG to take advantage of the small compressed file size.
The PNG formatThe PNG (Portable Network Graphics) file format uses a lossless compression technique that does result in file sizes that are a bit larger than the equivalent JPEG. However no image data is lost and this can result in more vibrant colours, particularly for large single colour areas. The PNG file format is designed to work well with web applications.
The PNG file format is preferred for the projects in this book.
Colours
You can work with two selected colours at any one time. Left click to select the primary colour and right click to select the secondary.
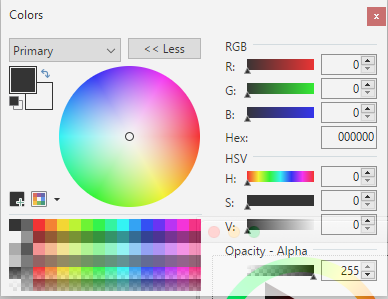
Screen colours are made up of three colour elements; Red, Green and Blue (RGB). You can pick a colour by clicking within the circle when it is oriented towards the general colour area you want. Or you can enter or adjust the RGB, Hue, Saturation and Value (HSV) numbers. The result of any selection and adjustments will be displayed.
You can build up a “pallet” of colours for use during an image editing session. You can even save your custom colour pallet for future use. The pallet save menu item is on the paint.NET colour picker dialogue.
One helpful dialog feature is displaying the colour value in hexadecimal format suitable for use with HTML tags and CSS (although CSS has a large number of predefined colour names available).
Hexadecimal numbers are numbers with a base of 16 rather than 10. Base 16 is useful to computer programmers because two hexadecimal numbers can describe a byte (8 bits) of data. When it comes to colours, hexadecimal is useful because two hexadecimal characters can define a number in the range 0 to 255. As the colour picker dialogue showed, the colours we work with have a red, green and blue element and the individual colour component values vary from 0 to 255. So a colour can be precisely defined in 6 characters using hexadecimal. Hexadecimal values are marked with a leading # symbol for HTML and CSS.
Hexadecimal values from 0 to 9 use the normal (base 10) number system. However they also need characters for the numbers 10 to 15 so the hexadecimal system borrows the letters a to f (or A to F) to fill in for those. So zero in hexadecimal is 0 and 15 (base 10) is f, base 16.
A hexadecimal colour value that was all red with no green or blue element would be #ff0000. That would identify a red value of 255, green zero and blue zero.
Image files store a rectangular image. We were able to draw a round ball in the Breakout game but if we had wanted to save the ball as an image file we would have had to save a rectangle containing the circular ball image. What we would probably do in such a situation would be to set the rectangle pixels that surrounded the ball to be transparent. That way, if we retrieved the image and displayed it within an HTML page then the ball would be visible but the surrounding rectangle would not. We would see any background image through those transparent pixels. So where do we get the transparent pixels?
The colour picker dialogue has an Opacity spinner or slider. We can adjust the opacity from 255 (opaque) to 0 (transparent) which means that we can create a transparent “colour” to apply to an image using the drawing tools. We can also set semi-transparent colours for some very nice effects.
The Drawing Tools

It would be quite easy to fill a complete book with a full tutorial on using each of the drawing tools and the visual effects. Reading such a book would probably be less effective than spending half an hour just trying things out.
There are just one or two features that are less obvious to use and so these pages have concentrated on those and have left you, the reader, to do what you will do best.
Flood Fills
While you can use any of the drawing tools to apply a transparent colour, the most common tool to use for that task is the “Paint Bucket” tool. Using this tool may require tweaking related controls to get the result you want.
Start by selecting a colour with a zero opacity setting (this is a handy one to keep in your colour pallet). Then click the “paint Bucket” tool and you will see changes to the ribbon bar at the top of the window.

The tool is used to replace the colour in the image you are working on that you then click with the current working colour from the colour window. The intention is to replace an area of one colour with another with the tool finding the edges of the area to be filled.
The most important adjustments come from the “Flood Mode” and “Tolerance” settings.
The Flood Mode you want is usually the Contiguous setting. This allows the colour fill to expand from the Paint Bucket tool click point until it runs into pixels that fail the Tolerance setting test. The alternative is the Global mode that will fill all of the pixels (in the current layer) that are not protected by the Tolerance setting.
The Tolerance setting specifies how close to the clicked colour other pixels need to be to have their colour replaced by the flood fill process. A low tolerance means that pixels colours must be very close to the clicked colour. A high tolerance will continue to expand the fill until pixels with a large colour difference are met. It is not uncommon to find that the “border” between colour areas is a bit “fuzzy” and this can mean that a fill will “escape” the confines of one area into another. If this happens, hit “Undo”, reduce the Tolerance and then try again. Conversely, if the Tolerance is too low your fill may not extend as far as you intended.
I find I also have to set the Blending Mode to “Overwrite” to achieve an effective fill particularly with a transparent colour. You can also play with the Fill Mode although probably not with a transparent colour selected.
Drawing Straight Lines
Sometimes you need to draw a straight line on an image. If you are using the pencil tool and the line you want is perfectly vertical or horizontal then just holding down the <Shift> key will keep the tool moving in a straight line.
The best tool for drawing straight lines is the line drawing tool  . Selecting this tool will bring up a host of additional options in the tool ribbon.
The key feature is that the tool will draw a straight line from the position of the mouse cursor where you start a left click to the position where you release the mouse button. If you also
hold down the <shift> key then the line will adjust to a sequence of pre-set angles (including horizontal and vertical). Once you have released the mouse button you can still adjust the
position of the end points. Paint.NET also allows you to adjust points along a line to a spline or Bézier curve.
. Selecting this tool will bring up a host of additional options in the tool ribbon.
The key feature is that the tool will draw a straight line from the position of the mouse cursor where you start a left click to the position where you release the mouse button. If you also
hold down the <shift> key then the line will adjust to a sequence of pre-set angles (including horizontal and vertical). Once you have released the mouse button you can still adjust the
position of the end points. Paint.NET also allows you to adjust points along a line to a spline or Bézier curve.
You can also set the brush width to be used, the line style and even automatically add arrow heads.
The Text Tool
One feature that can be tricky to use is the tool that can be used to add text to an image (strictly, add an image of the text). The best advice is to always add any text to a new layer. That way the text can be selected, copied and then pasted back to the main image in exactly the position you require. The extra layer used can be deleted. You can select a font and font size and adjust these settings while adding any new text. This is particularly helpful as it is not obvious before you start entering text just how a particular combination of font and size will look.
Colour Gradients
There is a tool to create gradients from one colour to another. This offers several gradient shapes. The process is first to select the two colours with right and left hand clicks in the colour picker window.
Then select the gradient tool  and click onto the surface of the drawing area. This is another tool where a little practice and perhaps frequent use of the Undo option helps a lot.
Web pages often use background images with graduated colour changes. HTML objects can have a background image set instead of a background colour. As an example, you might want to create a background that suggests a darkening sky when it is presented behind some foreground objects. This is just the tool to create what you want. If your gradient flows from top to bottom then you can select and save a slice from the image just a single pixel wide. A web browser will happily “repeat” a background image across the window and resize the height if required.
Zoom
The zoom feature can be very helpful when you want to concentrate on a particular portion of an image. If you want to work with individual pixels it will help to apply the “Pixel Grid” when you have zoomed in far enough. This is available under the “View” menu and from a tool ribbon icon.
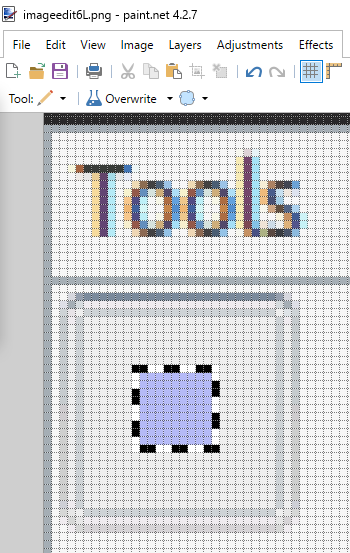
In the above image, the pencil tool is being used to reset individual pixels with the pixel grid set on to assist. The pixel grid is not part of the image and will not be saved to an image file.
Loading Plugins
Select the “Plugins” option from the “help” menu. That will open a browser tab and the plugins publishing web page. Take the time to review the page on installing plugins. Then you might like to visit the Index page where there is a good search facility to allow you to look for and download individual plugins and bundles of associated plugins.
The “Animation Helper” is great for game development and one of the Grid Maker options available would be useful. Plus anything else that takes your fancy although you can always revisit when you are looking to do something in particular and you think there might be help here (there often is).
Download the selected plugin zip file(s). Open the zip file in your downloads folder and copy the .dll it contains to your Paint.NET installation Effects folder. Mine is at C:\Program Files\Paint.NET\Effects. You will probably be asked to provide administrator permission by a pop-up window from the operating system. Click “Continue” and the new plugin will be available the next time you start Paint.net.
Final Thought
A lot of other programs offer at least some limited facilities to create images. As an example, the main tile images I used for the Minesweeper program in the book were first created using Microsoft Word “SmartArt”
and then completed using paint.NET to provide a transparent edge. I liked the three dimensional effect and the nicely curved corners. There are a lot of drawing programs about (including some web apps) and any one of
them might provide a unique touch to deliver just the result you want.

Read the book Learn to Program with Games and JavaScript