Chapter 11: Ray Casting and First Person Shooters
Not to worry if you don’t have an ambition to stalk around dark passages dealing out mayhem to all you meet; this game format is fundamentally about exploring a three-dimensional space and the exact form of any interaction with the environment is completely under the programmer’s control. You can be as nasty or nice as you like although, one suspects, that a deal of game violence is just about inevitable in most instances.
Ray casting is a technique used to generate a visual representation of a simplified three-dimensional world. The game displays what the player sees in front of him or her.
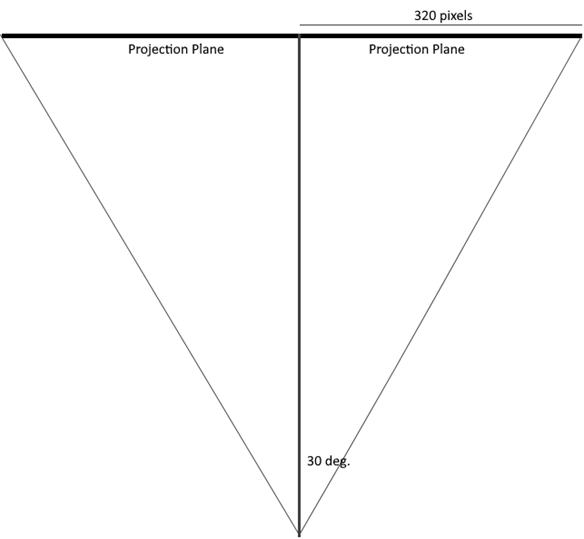
Most humans have a field of view (the angular width of the area that can be seen looking forward) of around 114 degrees but game play works better with a value of just 60 degrees. The technique simulates casting rays out from the eyes of the player at steps through the arc of the field of view (FOV) and drawing a slice of the scene for each ray onto a “projection plane” scaled and shaded to simulate perspective.
Let’s take that one step at a time. Starting with a “map” for the game area marked out on a rectangular grid of squares. Walls are drawn on the grid as a sequence of blocks. All walls run vertically or horizontally and are one or more complete blocks long. I used a grid creating extension with my image editing program to create and shade the walls for a map.
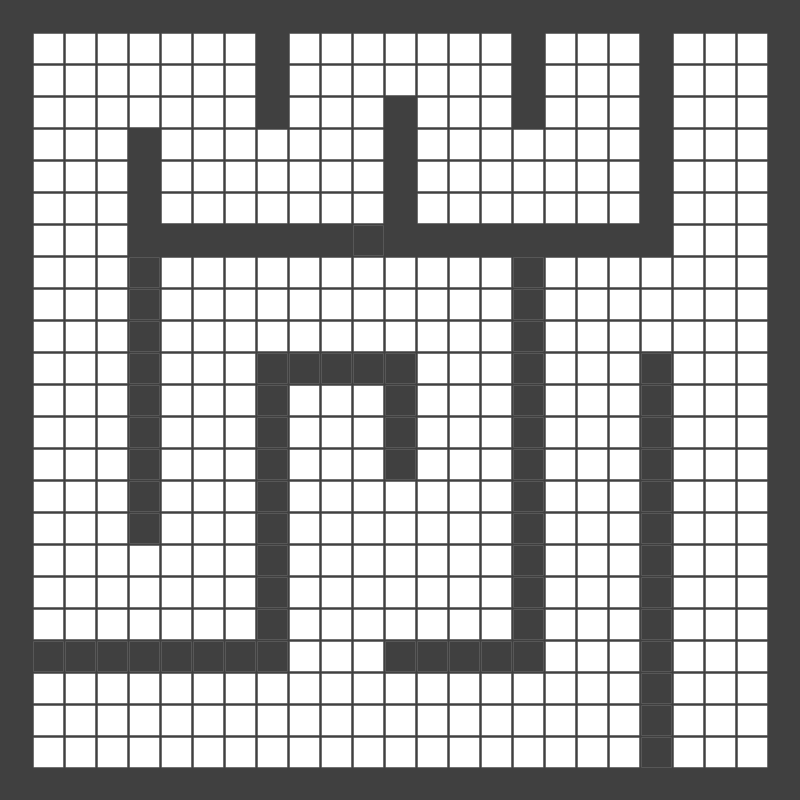
The map needs to be rectangular but there is no reason why the game bounding walls need to stick to the edge of that rectangle. A very large game could make use of multiple areas each represented by a similarly constructed map and interconnected at some point along the bounding edges.
Now imagine that the player is located somewhere within the map. We could draw lines from the player’s location towards the game walls in steps through the arc of the player’s Field Of View (FOV).
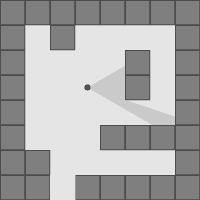
If we project what the player sees above onto a projection plane then we would expect to see a section of wall close by and starting slightly to the right of the player. We should also want to see a section of wall down the gap to the right of the player with a small slice of the back wall.
Without any textures or other features, the projection plane might look something like:
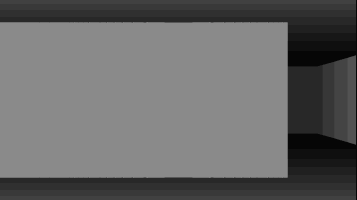
This projection plane view is drawn with the assumptions that the walls are almost twice the height of the player and that the player’s eye line is half way up the projection plane.
We can start programming the game with some code to support the map. The map can have a permanent place in the game as it can be used by the game players to keep track of their location and maybe the location of other game elements. We will make use of the map during the development to help with testing and visualising the game progress.
Start with a new game folder and then maybe add subfolders for images and audio files. Like all our games, the foundation is a short HTML file. Create a new HTML file in the game folder (maybe called index.html). The file needs just enough HTML to provide some visual structure and include some JavaScript files, something like:
<!DOCTYPE html>
<html>
<head>
   <meta charset="utf-8" />
   <meta http-equiv="X-UA-Compatible">
   <title>FPS Adventure</title>
   <meta name="viewport" content="width=device-width, initial-scale=1">
   <link rel="stylesheet" type="text/css" media="screen" href="main.css" />
   <script src="game.js"></script>
   <script src="map.js"></script>
   <script src="player.js"></script>
</head>
<body>
    <div id="dvViewer">
        <canvas id="cvView"></canvas>
    </div>
    <div id="dvMaps">
        <canvas id="devMap"></canvas>
        <canvas id="mapEntities"></canvas>
    </div>
    <script src="main.js"></script>
</body>
</html>
Before the JavaScript, we should create a CSS file (main.css) and place it in the game folder with the following content:
html { padding: 0; margin: 0; border: 0;}
#dvViewer {
    width: 640px;
    height: 400px;
    top: 20px;
    left: 0;
    border : 1px solid black;
}
#dvMaps {
    position: relative;
    top: 40px;
    left: 0;
}
canvas {
    position: absolute;
}
That CSS is enough to position both the <canvas> elements within the dvMaps <div> in the same fixed position with the second on top of the first.
Now for some JavaScript. To help with understanding the progress of this project’s development it makes sense to use multiple JavaScript files. Make a start by creating JavaScript files called main.js, game.js, player.js and map.js in the game folder.
The game map (or at least the first map) can be transcribed as an array of rows where each row is an array of values. The value 1 represents a wall and the value 0 represents a space between walls. We can place the grid within an object to represent a game level and later on we can add some other elements to that.
Typing in the grid would be time consuming so, even though you are encouraged to type in the code as we work through the chapter, it might be a good idea to download just the grid from the website. Check the support for this chapter. At the same time, you could also download the zip file containing the images and extract the files to the images subfolder you created for this project. Place the Level object code in the game.js file.
var Level = {
    grid: [
        [1,1,1,1,1,1,1,1,1,1,1,1,1,1,1,1,1,1,1,1,1,1,1,1,1],
        [1,0,0,0,0,0,0,0,1,0,0,0,0,0,0,0,1,0,0,0,1,0,0,0,1],
        [1,0,0,0,0,0,0,0,1,0,0,0,0,0,0,0,1,0,0,0,1,0,0,0,1],
        [1,0,0,0,0,0,0,0,1,0,0,0,1,0,0,0,1,0,0,0,1,0,0,0,1],
        [1,0,0,0,1,0,0,0,0,0,0,0,1,0,0,0,0,0,0,0,1,0,0,0,1],
        [1,0,0,0,1,0,0,0,0,0,0,0,1,0,0,0,0,0,0,0,1,0,0,0,1],
        [1,0,0,0,1,0,0,0,0,0,0,0,1,0,0,0,0,0,0,0,1,0,0,0,1],
        [1,0,0,0,1,1,1,1,1,1,1,1,1,1,1,1,1,1,1,1,1,0,0,0,1],
        [1,0,0,0,1,0,0,0,0,0,0,0,0,0,0,0,1,0,0,0,0,0,0,0,1],
        [1,0,0,0,1,0,0,0,0,0,0,0,0,0,0,0,1,0,0,0,0,0,0,0,1],
        [1,0,0,0,1,0,0,0,0,0,0,0,0,0,0,0,1,0,0,0,0,0,0,0,1],
        [1,0,0,0,1,0,0,0,1,1,1,1,1,0,0,0,1,0,0,0,1,0,0,0,1],
        [1,0,0,0,1,0,0,0,1,0,0,0,1,0,0,0,1,0,0,0,1,0,0,0,1],
        [1,0,0,0,1,0,0,0,1,0,0,0,1,0,0,0,1,0,0,0,1,0,0,0,1],
        [1,0,0,0,1,0,0,0,1,0,0,0,1,0,0,0,1,0,0,0,1,0,0,0,1],
        [1,0,0,0,1,0,0,0,1,0,0,0,0,0,0,0,1,0,0,0,1,0,0,0,1],
        [1,0,0,0,1,0,0,0,1,0,0,0,0,0,0,0,1,0,0,0,1,0,0,0,1],
        [1,0,0,0,0,0,0,0,1,0,0,0,0,0,0,0,1,0,0,0,1,0,0,0,1],
        [1,0,0,0,0,0,0,0,1,0,0,0,0,0,0,0,1,0,0,0,1,0,0,0,1],
        [1,0,0,0,0,0,0,0,1,0,0,0,0,0,0,0,1,0,0,0,1,0,0,0,1],
        [1,1,1,1,1,1,1,1,1,0,0,0,1,1,1,1,1,0,0,0,1,0,0,0,1],
        [1,0,0,0,0,0,0,0,0,0,0,0,0,0,0,0,0,0,0,0,1,0,0,0,1],
        [1,0,0,0,0,0,0,0,0,0,0,0,0,0,0,0,0,0,0,0,1,0,0,0,1],
        [1,0,0,0,0,0,0,0,0,0,0,0,0,0,0,0,0,0,0,0,1,0,0,0,1],
        [1,1,1,1,1,1,1,1,1,1,1,1,1,1,1,1,1,1,1,1,1,1,1,1,1]
    ]
};
We can also add an object to that same file to hold some game level values:
var Game = {
    gameScale: 128,
    projectionWidth: 640,
    projectionHeight: 400,
    fov: 60 * Math.PI / 180,
    sectWidth: 2,
    playerDistance:0,
    timer: null,
    speed: 10,
    twoPi: Math.PI * 2,
    map: null,
    walls: []
};
Next two familiar functions for the main.js file to handle arrow key strokes. The arrow keys are used to signal turns and directions (forward and back) to a player object we have not yet created.
function keyDown(e) {
    switch(e.keyCode){
        case 38: player.direction = 1; break; // up
        case 40: player.direction = -1; break; // down
        case 37: player.turn = -1; break; //left
        case 39: player.turn = 1; break; // right
    }
}
And
function keyUp(e) {
    switch(e.keyCode){
        case 38:
        case 40: player.direction = 0; break;
        case 37:
        case 39: player.turn = 0; break;
    }
}
A map object for the game would be useful next. Planning for the future, we might envisage multiple maps based upon a range of grids to build a great game. This is an instance where the clear syntax of a JavaScript class could be a good choice. Start a class definition in the map.js file with a constructor to lay out and draw on the map canvas elements. We can’t call our new class “Map”, by the way, because that is a built in JavaScript data type.
class FPSMap {
    constructor(mapCanvasId, thingsCanvasId, grid) {
        this.dMap = document.getElementById(mapCanvasId);
        this.tMap = document.getElementById(thingsCanvasId);
        this.mctx = this.dMap.getContext('2d');
        this.tctx = this.tMap.getContext('2d');
        this.scale = 16;
        this.grid = grid;
        let height = grid.length;
        let width = grid[0].length;
        this.dMap.height = this.tMap.height = height * this.scale;
        this.dMap.width = this.tMap.width = width * this.scale;
        this.tctx.clearRect(0,0,width,height);
        this.mctx.fillStyle = "white";
        this.mctx.fillRect(0,0,width,height);
        for(let h = 0; h < height; h++){
            for(let w = 0; w < width; w++){
                if(grid[h][w] !== 0){
                    this.mctx.fillStyle = "grey";
                    this.mctx.fillRect(w * this.scale,
                          h * this.scale, this.scale, this.scale);
                }
            }
        }
    }
}
You will have noticed that the constructor filled the main <canvas> map element with a white rectangle and then drew grey squares on top of that to represent the walls. The map being drawn to the scale set by the map scale value. The method also cleared the other <canvas> element. We will be drawing onto that second element to show the position of our player in the game. As the background to that element is transparent, we do not have to keep redrawing the main map as that will always show through.
Next. we had better create a player object in the player.js file. As it is not clear yet what sort of object this one is or if it will share functionality with any other game elements; we should start with something simple.
The player is going to move around the game world and therefore needs an x/y position and an animate() method to adjust that position in response to keyboard input.
var player = {
    x: 0,
    y: 0,
    turn: 0, // adjust rotation
    rotation: 0, // current rotation
    rotRad: 2 * Math.PI / 180, // rotation steps
    direction: 0, // 1 forward, 0 still or -1 backwards
    speed: 2, // how far to move if direction !== 0
    mapRadius: 3, // draw radius on map
    radius: 15, // radius of player in game world
    weapons: null, // or wands and spells
    animate: function(){
        this.rotation += this.turn * this.rotRad; // new direction
        this.rotation = only360(this.rotation);
        let howFar = this.direction * this.speed; // move this far
        this.x += Math.cos(this.rotation) * howFar;
        this.y += Math.sin(this.rotation) * howFar;
        Game.map.showPlayer(this);
    }
};
Now it is time to return to the FPSMap class and add a showPlayer() method.
showPlayer(player) {
    this.tctx.clearRect(0,0,this.tMap.width,this.tMap.height);
    this.tctx.beginPath();
    let x = player.x * this.scale / Game.gameScale;
    let y = player.y * this.scale / Game.gameScale;
    this.tctx.arc(x, y, player.mapRadius, 0, Game.twoPi);
    this.tctx.fillStyle = "blue";
    this.tctx.fill();
    this.tctx.closePath();
    this.tctx.beginPath();
    this.tctx.moveTo(x,y);
    x += Math.cos(player.rotation) * player.mapRadius * 3;
    y += Math.sin(player.rotation) * player.mapRadius * 3;
    this.tctx.lineTo(x,y);
    this.tctx.strokeStyle = "red";
    this.tctx.stroke();
    this.tctx.closePath();
}
The method draws a marker for the player on the map at a scaled position and adds an indicator to show the direction the player is facing.
You probably spotted a function named only360() in the player.animate() method. That function guards against some potentially strange rotation values if the player is caused to rotate a couple of times. Add that utility function to the main.js file.
function only360(angle) {
    angle %= Game.twoPi;
    while(angle < 0) {angle += Game.twoPi;}
    return angle;
}
If we also add an initialise() function to the main.js file plus a function to act as a skeleton for scene rendering we can manage an initial game test run. The initialise() function sets up the keydown and keyup handlers, creates the map, sets the player position to somewhere sensible and then sets a timer to call the renderScene() function.
function renderScene() {
    player.animate();
}
function initialise() {
    window.addEventListener("keydown", keyDown);
    window.addEventListener("keyup", keyUp);
    Game.map = new FPSMap("devMap", "mapEntities", level.grid);
    player.x = player.y = 200;
    Game.timer = setInterval(renderScene, Game.speed);
}
Plus a final line at the bottom of the main.js JavaScript file is needed to call the initialise() function:
initialise();
At this point you should be able to test out all of that code. If all is well, then you should be able to drive the blue circle representing the game player around the map. At this early stage, walls are not yet an obstacle but you should be able to use the arrow keys to navigate around them if you are so minded.

Stage 2
To avoid running our player into and through walls we can add a short method to the map object to check to see if a given x/y position is within a wall. This is a little crude as it would allow the centre point of the player to mover right up to a wall (no body mass) but it will do very nicely for now. Add this method to the end of the map class.
    isWall(x,y){
        y = Math.floor(y/Game.gameScale);
        x = Math.floor(x/Game.gameScale);
        return this.grid[y][x] !== 0;
    }
We can make use of that new map method with an edit to the player.animate() method.
    animate: function(){
        this.rotation += this.turn * this.rotRad; // new direction
        this.rotation = only360(this.rotation);
        let howFar = this.direction * this.speed; // move this far
        let newx = this.x + Math.cos(this.rotation) * howFar;
        let newy = this.y + Math.sin(this.rotation) * howFar;
        if(!Game.map.isWall(newx, newy)){
            this.x = newx;
            this.y = newy;
        }
        Game.map.showPlayer(this);
    }
A new test of the code so far should now demonstrate that the player is confined to the open areas within the bounding walls.
Now the player is no longer likely to blunder through walls, we could add some code to show just which sections of the game area are in sight at any one time. The process is going to start casting rays from 30 degrees to one side of the player’s view through the 60 degree arc of the player’s FOV. The total number of rays to be cast within that range will be the width of the Projection Plane divided by the width of each slice we are proposing to draw on the projection plane. That slice width is stored in Game.sectWidth and can be adjusted. If we start with values of 640 for the projection plane width and 2 for the slice width then we will be casting 320 rays. That is a lot of very small steps through our FOV and we are at risk of running into issues with Floating Point arithmetic precision.
Having played with the options (so you don’t have to) it became clear that working out each relative ray angle individually produced better results than taking what looked like the most direct approach of just slicing 60 degrees in radians into 320 fractional parts. The additional overhead of the calculation only needs to be undertaken once, as we can store each of the 320 relative angles for use each time we need to refresh the player’s view.
The code can calculate the angle of each “slice” position on the projection plane based upon the plane width and a calculated distance for the player in front of the projection plane.
If the player’s FOV is 60 degrees then the notional distance from player to the projection plane is half the width of the plane divided by the tan() of 30 degrees (half the FOV). This works out at 554. For each slice across the projection plane, we can calculate the distance from the player using Pythagoras and, armed with that distance, we can calculate the angle to that slice using trigonometry.
I have to confess at this point that I could not decide if the ray casting should be a function of the player or map objects as the process involves both. In the end I plumped for a new object called camera in the hopes that this would turn out to be a good idea or that a better choice would become obvious as the development proceeded. So we have an object called camera with an init() method to calculate the angles from the player to each slice on the projection plane. The method can also set up the <canvas> element that will be used to project the player’s view of the game world. Start writing the camera object code in a new JavaScript file called camera.js.
The init() method also sets up an array to hold the length (in game units) of each ray from the player to the first wall it hits. This will prove useful later when we come to add some sprites to our world. The init() method will need to be called from the initialise() function in main.js. Just add the following line before the timer is started.
camera.init("cvView");
var camera = {
    canvas: null,
    ctx: null,
    steps: [],
    halfStep: 0,
    dist: [],
    sectionCount: Game.projectionWidth / Game.sectWidth,
    cast: function () {
       this.dist[this.sectionCount] = 0;
       for (let i = 0; i < this.sectionCount; i++) {
         this.dist[i] = this.trackRay(this.steps[i] + player.rotation, i);
         this.dist[this.sectionCount] = Math.max(this.dist[i],
                                        this.dist[this.sectionCount]);
       }
     },
    init: function(canvId){
      this.canvas = document.getElementById(canvId);
      this.canvas.width = Game.projectionWidth;
      this.canvas.height = Game.projectionHeight;
      this.ctx = this.canvas.getContext("2d");
      let startPos = -this.sectionCount / 2;
      for (let i = 0; i < this.sectionCount; i++) {
        let projectionPosition = (startPos + i) * Game.sectWidth;
        let viewDistance = Math.hypot(projectionPosition,
          Game.playerDistance);
        this.steps.push(Math.asin(projectionPosition / viewDistance));
        this.dist.push(0); // * initialise distance array elements
      }
      this.halfStep = (Game.fov / this.sectionCount)*0.51;
      this.dist.push(0); // one extra element for max distance
    }
}
On each call to camera.cast() another method (trackRay()) is called and passed the angle for each stop across the projection plane. The trackRay() method tracks the direction of each ray (offset from the direction the player is facing) until the ray hits a wall. The code could have bent the findPointOnCircle() function we have used in earlier games to the task but we can do better by taking advantage of the fact that the game walls all turn up on a grid boundary. So, instead of checking each pixel in the direction of the ray we can jump ahead by the width or height of a cell.
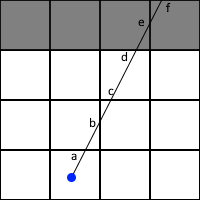
The illustration above shows a ray being traced from a dot representing the position of the player. The code only has to check the points where that ray intersects the grid and they are marked a through f. The code can easily check to see that point d intersects with a wall. In fact, the code checks for intersections with both horizontal and vertical walls. The distance to each wall can be compared and the shortest distance chosen as the point that one of our rays first hits a wall. The code can also take advantage of the fact that the horizontal distance from c to d is the same as the horizontal distance from a to c. While we end up with quite a lot of code lines, the code takes simple measured steps from the ray origin to the nearest intersection with a wall.
We are going to add a trackRay() method to the camera object. There are a lot of code lines so we will take them in chunks. Start by adding the method following a comma after the cast() method:
  ,
  trackRay: function(angle, strip){
  }
We can then start adding code lines to that new method in the camera object:
angle = only360(angle);
let isRight = angle > Game.twoPi * 0.75 || angle < Game.twoPi * 0.25;
let isUp = angle > Math.PI;
let distance = 0;
let hit = {x: 0, y: 0};
let playerX = player.x / Game.gameScale;
let playerY = player.y / Game.gameScale;
let wallType = 0; // future use
let textureX = 0; // future use
let mapWidth = Game.map.getWidth();
let mapHeight = Game.map.getHeight();
The next code section for this method checks to the left or right of the player for an intersection with a map wall.
let slope = Math.sin(angle)/Math.cos(angle);
let xChange = isRight ? 1 : -1; // xChange is in block steps
let yChange = xChange * slope;
// check left or right for ray collision with vertical wall
let x = isRight ? Math.ceil(playerX) : Math.floor(playerX);
let y = playerY + (x - playerX) * slope;
while(x >= 0 && x < mapWidth && y >= 0 && y < mapHeight){
  let wallX = Math.floor(x + (isRight ? 0 : -1));
  let wallY = Math.floor(y);
  if(Game.map.getGrid(wallX, wallY)){ // we have a hit so calc the distance
    distance = Math.hypot(x * Game.gameScale - player.x,
                          y * Game.gameScale - player.y);
    hit.x = x;
    hit.y = y;
    wallType = Game.map.getGrid(wallX, wallY); // for later
    break;
  }
  x += xChange;
  y += yChange;
}
The code uses a while loop to increment (or decrement) the x value in grid steps and the y value by the slope of the ray which was calculated first. If one of the steps is found to have intersected with a wall then the distance from the player to the intersection point is calculated and the intersection x/y position saved so we can draw it on the map.
The next code section does exactly the same thing but in a vertical direction. This time, when an intersection is detected then the calculated distance is checked against the previous value and the results for the shortest distance chosen.
// now check up and down the grid
slope = Math.cos(angle) / Math.sin(angle);
yChange = isUp ? -1 : 1;
xChange = yChange * slope;
y = isUp ? Math.floor(playerY) : Math.ceil(playerY);
x = playerX + (y - playerY) * slope;
while(x >= 0 && x < mapWidth && y >= 0 && y < mapHeight){
  wallY = Math.floor(y + (isUp ? -1 : 0));
  wallX = Math.floor(x);
  if(Game.map.getGrid(wallX, wallY)){
    let newDistance = Math.hypot(x * Game.gameScale - player.x,
                                  y * Game.gameScale - player.y);
    if(!distance || newDistance < distance){
      distance = newDistance;
      hit.x = x;
      hit.y = y;
      wallType = Game.map.getGrid(wallX, wallY);
    }
    break;
  }
  y += yChange;
  x += xChange;
}
Follow that code section with a line that we will use during the development process but would be commented out afterwards. Plus return the shortest distance value.
Game.map.drawRay(player, hit);
return distance;
That rather long function included four new methods to be added to the FPSMap class. You will have spotted that I was trying not to read class properties directly and preferred to implement methods to get values from the FPSMap instance.
Starting with the three short methods to return class member values:
    getGrid(x, y){ return this.grid[y][x];}
    getWidth() { return this.grid[0].length;}
    getHeight() { return this.grid.length;}
We can follow those with a method called drawRay().
    drawRay(player, pt){
        let x = player.x * this.scale / Game.gameScale;
        let y = player.y * this.scale / Game.gameScale;
        this.tctx.beginPath();
        this.tctx.moveTo(x,y);
        this.tctx.lineTo(pt.x * this.scale,pt.y * this.scale);
        this.tctx.strokeStyle = "aqua";
        this.tctx.lineWidth = 0.5;
        this.tctx.stroke();
        this.tctx.closePath();
    }
The camera.cast() method made use of a playerDistance value which we have not yet calculated. This can be added to the initialise() function.
Game.playerDistance = (Game.projectionWidth / 2) / Math.tan(Game.fov / 2);
Finally, for this stage, add a call to camera.cast() in the renderScene() function.
function renderScene() {
    player.animate();
    camera.cast();
}
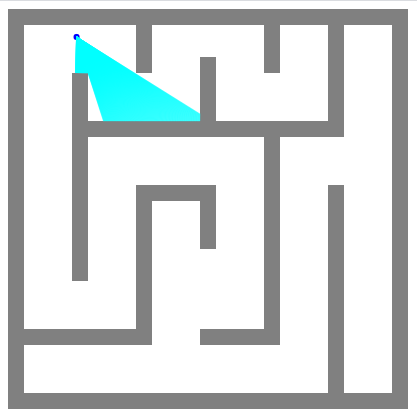
Add camera.js to the HTML <head> section and give the code a test. After eliminating any typos, you should be able to navigate the player around the map and see the player’s view of the map world illustrated by the aqua lines drawn for each ray cast.
Stage 3
The next stage is less demanding on typing skills and starts to project the game world as seen by our player.
We will be drawing the walls that the player can “see” scaled so that distant walls are smaller than those that are close by. Walls need to sit on a floor of some kind and above the walls we would expect to see a sky or ceiling. Floors and ceiling can be dealt with in a similar manner to the way we propose to draw the walls but a surprisingly effective solution can be created using graduated fills. Plus, this is an opportunity to introduce another feature for both JavaScript and <canvas> drawing.
Creating a linear colour gradient
The createLinearGradient() method can create a gradient along a line connecting two coordinates.
ctx.createLinearGradient(x1,y1,x2, y2);
The start and end point of the gradient can define a line that is vertical, horizontal or at any other angle. The length of the line defines the length of the gradient that can be used by both the fillStyle and strokeStyle properties. The colours to be applied to the gradient can be defined using the standard CSS colour names or hex colour codes. For a 45 degree gradient that changes from red to blue you might use code like:
let newGrad = ctx.createLinearGradient(0,0,200, 200);
newGrad.addColorStop(0, "Red");
newGrad.addColorStop(1, "Blue");
Or for a three colour gradient:
newGrad.addColorStop(0, "#101010");
newGrad.addColorStop(0.5, "#303030");
newGrad.addColorStop(1, "#A0A0A0");
On the basis that background colours could vary with different maps and levels, I plumped for adding two new members to the Level object.
 ,
bgTopGrad: null,
bgFloorGrad: null,
We can add a function to create a graduated fill to the main.js file which is a good place to include general purpose functions that may not belong to a specific object. However, this one could belong to the camera object if you were so minded.
function createGrad(ctx, x0, y0, x1, y1, colour0, colour1, colour2){
    let grad = ctx.createLinearGradient(x0,y0,x1, y1);
    grad.addColorStop(0, colour0);
    if(arguments.length === 8){
        grad.addColorStop(0.5, colour1);
        grad.addColorStop(1, colour2);
    } else {
        grad.addColorStop(1, colour1);
    }
    return grad;
}
The method checks to see how many colour arguments are passed to the method when it is called with the expectation that there will be two or three (therefore 7 or 8 arguments).
The arguments object
The arguments object is accessible within a function. It is similar to an array and contains the list of values passed to the function when it is invoked. The arguments object has a length property that returns the number of arguments. Individual arguments can be accessed using an array like notation. We could have written code like:
  if(arguments.length === 8){
    grad.addColorStop(0.5, arguments[7]);
    grad.addColorStop(1, arguments[8]);
  } else {
    grad.addColorStop(1, arguments[7]);
  }
We can now add another function to create those graduated fills and maybe manage some other settings that are notionally related to a game’s level.
function setLevel(){
    Level.bgTopGrad = createGrad(camera.ctx, 0, 0, 0,
                            Game.projectionHeight/2, "#FF7DE1", "#9B7DE1");
    Level.bgFloorGrad = createGrad(camera.ctx, 0, Game.projectionHeight/2,
               0, Game.projectionHeight,  "#101010", "#303030", "#A0A0A0");
    Game.map = new FPSMap("devMap", "mapEntities", Level.grid);
    player.x = player.y = 200;
}
Calling setLevel() from initialise() allows us to move “level” related values to that new function.
function initialise() {
 window.addEventListener("keydown", keyDown);
 window.addEventListener("keyup", keyUp);
 Game.playerDistance = (Game.projectionWidth / 2) / Math.tan(Game.fov / 2);
 camera.init("cvView");
 setLevel();
 Game.timer = setInterval(renderScene, Game.speed);
}
We can then add two lines to the top of the camera.cast() method that will clear the game projection canvas and then call a new camera method to draw the background.
this.ctx.clearRect(0,0,Game.projectionWidth,Game.projectionHeight);
this.drawBackground();
The drawBackground() method can then be added to the camera object. Check there is a comma after the definition of the trackRay method and before:
drawBackground: function() {
  this.ctx.beginPath();
  this.ctx.fillStyle = Level.bgTopGrad;
  this.ctx.rect(0,0,this.canvas.width, this.canvas.height);
  this.ctx.closePath();
  this.ctx.fill();
  this.ctx.beginPath();
  this.ctx.fillStyle = Level.bgFloorGrad;
  this.ctx.rect(0,this.canvas.height/2,this.canvas.width,
                                                  this.canvas.height);
  this.ctx.closePath();
  this.ctx.fill();
},
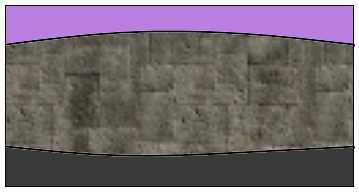
That method uses the two graduated fills to fill two rectangles. One rectangle is the top half of the game view and the other is the bottom half.
If you give the code a run, you should see a pretty vivid ceiling over a floor that darkens into the distance. We will be drawing walls over that background. The walls will be drawn using one (and later more) image so do make sure that you have downloaded the project image files from the book website and installed them in the images subfolder for this project.
We made provision in the Game object to store wall images in an array. If a game had multiple levels, then there is no reason why additional wall images should not be stored in the same array. We can create a new function to store our first three wall images ready for use.
function setwalls() {
    Game.walls.push(new Image());
    Game.walls[0].src = "images/stonewall.png";
    Game.walls.push(new Image());
    Game.walls[1].src = "images/stonebars.png";
    Game.walls.push(new Image());
    Game.walls[2].src = "images/stonecell.png";
}
If you add a call to that function to the initialise() function (maybe after the call to setLevel() then they will be ready when we need them.
The camera object included a member called texture, that we will also need to set, to decide which part of the image we want to use to draw a particular slice of the projection (one slice for each “ray”). We can set the value at the same point in camera.trackRay() that we set the wallType member value. That was in two places in that method the first of the lines should be added to the section checking left and right and the second in the section checking up and down. Take care as the new lines are not the same.
                textureX = isRight? 1 - y % 1 : y % 1;
                wallType = Game.map.getGrid(wallX, wallY);
            then later...
                textureX = isUp ? 1 - x % 1 : x % 1;
                wallType = Game.map.getGrid(wallX, wallY);
x % 1
What is that doing you might wonder? The Math object has a lot of methods for trimming the fractional parts from a number in helpful ways but does not have a method that takes a number and just returns the fractional part. This code uses the modulus operator to do just that. The reason the code is doing that is that we need to calculate where across the face of a wall texture image we want to take a slice to paint into the game view.
We are going to pass this value along with some others to a new camera method that will draw the walls. Before we do that we need to make an adjustment to the distance value that we calculated in the trackRay() method that will then be sent to the new camera method.
If we were standing in front or a wall running horizontally, we would expect that sections of the wall that were far to the left or the right would appear smaller than the wall directly in front of us. Our brain is used to this effect and still “sees” the wall as straight. The problem is that this looks wrong when projected onto a flat computer screen.
We need to correct this “fish eye lens” effect to treat the image of the wall as if each section in view was at a constant distance. To do this, add some code at the bottom of the trackRay() method to apply the correction and to call a new method to manage the wall drawing.
          Game.map.drawRay(player, hit);
          // correct distance for fish eye distortion
          let noFish = distance * Math.cos(player.rotation - angle);
          this.renderStrip(strip, wallType, noFish, textureX);
The new camera method called renderStrip() draws small sections of the walls into the viewer <canvas> element, one for each ray cast.
The first thing that the renderStrip() method needs to do is decide how high the wall section is going to be drawn. If the calculated distance to the wall was the same as the notional distance we calculated from the player to the projection plane, then the wall would be drawn 128 pixels high. This is because our game scale is 128 pixels for each block. If the distance to the wall is greater than the distance from player to the projection plane then the wall will be drawn proportionately smaller and if the wall distance is less, then the wall needs to be drawn larger.
    renderStrip: function(strip, wallType, distance, textureX) {
      let height = Game.playerDistance / distance;
           //correct lateral distortion
      let width = Math.round(Game.sectWidth * (1 / height));
      if(width < 1) {width = 1;}
      height = Math.round(height * Game.gameScale);
      textureX = Math.round(textureX * Game.gameScale);
      if (textureX > Game.gameScale - width) { //needs correcting
          textureX = Game.gameScale - width;
      }
      let top = Math.round((Game.projectionHeight - height) / 2);
      this.ctx.drawImage(Game.walls[wallType - 1], textureX, 0, width,
      Game.gameScale, strip * Game.sectWidth, top, Game.sectWidth, height);
    },
The last line takes a slice from the wall image and compresses or stretches it to fit the strip being drawn on the <canvas> element. The wall image is selected based upon the value set in the grid. If the value is 1 then we select the first image in the Game.walls[] array.
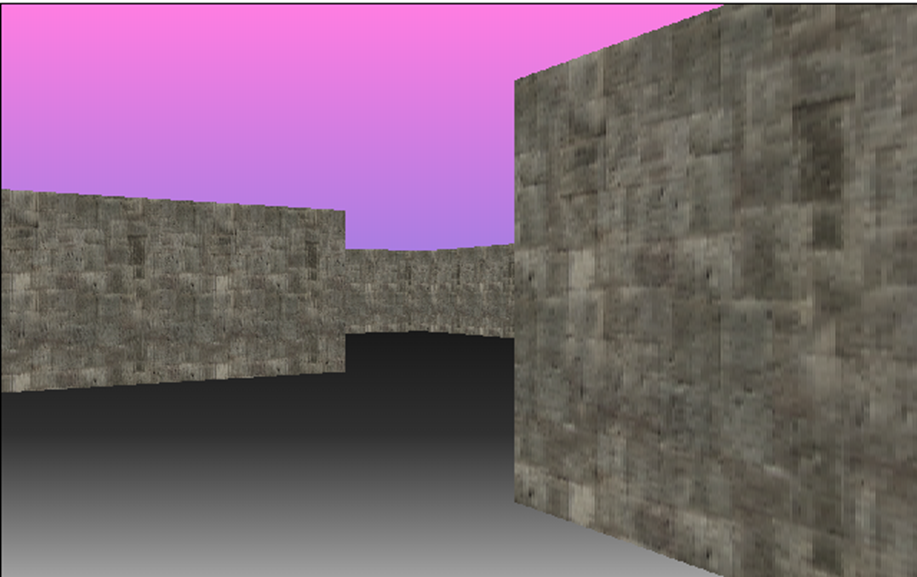
Time for a test. This time you should see the walls from the map being drawn on the view. The perspective creates a very nice 3D illusion that matches the map layout as you navigate the game area. Feel free to explore.
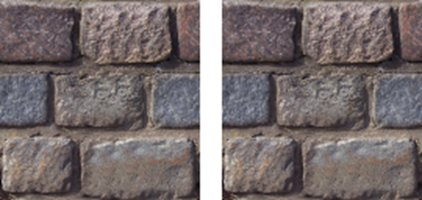
You can try out some alternate walls very easily. The only requirement for a wall image is that it should be 128 pixels square (that can be varied with the map scale) and the best results are obtained if the images are “seamless”.
Below is a seamless image from a stone wall. The two image copies could be pushed together and the wall would seamlessly continue from one image to the next.
The next image is not seamless. The two sections of brick wall would not merge perfectly and your eye would notice a faint line between the two. [The brick texture included in the game image download set is seamless by the way.]
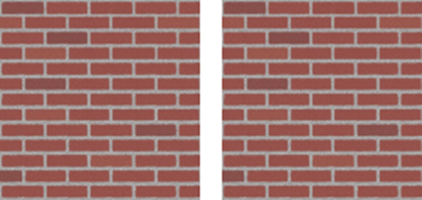
You can then use the other images for sections of the wall that we loaded, if you selectively change some of the values from 1 in the map grid to 2 or 3. Do take note though, that walls will have the same image presented on both sides so some variations are best added to double thicknesses of wall or to the outside walls of the map. Do take the opportunity to try out some images of your own. Seamless textures can be downloaded from the Internet and resized to suite your needs. Alternately you can create realistic images of your own from photographs if you take some care in selecting sections to copy and resize.
Stage 4
It is now time to introduce some sprites into our game world. There will be guns (or non-violent substitutes if you want to create some) but first we need to add artefacts and then some characters to make things interesting. Just as in the platform game development we will be using a mix of relatively static sprites plus some that are active with multiple behaviours. Things are a bit different in this game though, as sprites will have an x/y location on the game map as well as an x/y location on the projection plane when we come to draw them. We also have to deal with scale so that distant sprites are smaller than the same sprite close up. There is also the thorny issue of partial views as the player rounds a corner.
I have seen ray casting solutions that draw each wall strip on a separate HTML element. This allows sprites to be implemented using yet another HTML item and to then use the z index property to position the sprite image so that it can be overlapped by other sprites or walls. That approach has its attractions although in reality most on-line ray casting demonstration programs give up before this potentially tricky stage. We are made of sterner stuff. The maths required to position and select portions of a sprite to draw to the canvas is no more complex than what has gone before building this and other games. The solution becomes clear when you plot out just what we would expect to see when displaying a two-dimensional sprite image in a pseudo three-dimensional view.
The simplest sprites are all going to be drawn at right angles to the angle of view from the player. To work out how much of a sprite can be seen by the player we need to work out the x/y coordinates of the sprite on the ground in the game. The following diagram shows the player (marked P) and the angle to the centre of the sprite (marked S). Now imagine a circle around the sprite x/y position with a diameter equal to the width of the sprite. We can mark the start and end positions of the sprite image (x1 and x2) where a line perpendicular to the angle of view meets that circle.
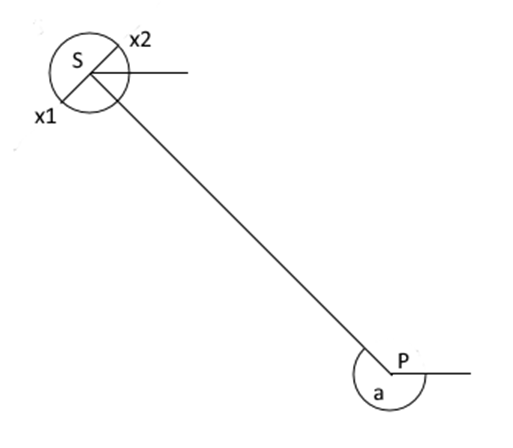
We can use a function we have met before (findPointOnCircle()) to calculate the coordinates of x1 and x2 from the angles of the lines S to x1 and S to x2. Those angles are the angle marked a in the diagram minus 90 degrees and plus 90 degrees respectively. Calculating the angle a, only requires some very straightforward trigonometry. That’s all of the theory right there.
This project is going to make use of objects similar to the Sprite and Actor objects developed for the platform games. Some modifications will be needed to suite the new requirements though and we might as well take the opportunity to look at JavaScript class inheritance. Add a new JavaScript file called sprites.js to the project and add a reference to it to the HTML <head> section. The Sprite class in the new code file starts with a constructor and has a single method.
class Sprite {
    constructor(imgSrc, x, y) {
        this.img = new Image();
        this.img.src = imgSrc;
        this.x = x;
        this.y = y;
        this.distance = 0;
        this.angle = 0;
        this.visible = true;
        this.solid = true; // allow for ghosts maybe
    }
    getDims() {
        return { width: this.img.width, height: this.img.height };
    }
}
This constructor includes x and y values as well as the image file name. These x and y values define the location within the game using the full grid scale where each cell is 128 units along each side. If you develop a game that allows the player to pick up and put down objects represented by sprites then you will have to remember to update those coordinate values. The visible property has been set true but it could be set false to handle objects that have been picked up by the player and thus will not be rendered. In the mean time we can add a useful method to return the dimensions of the sprite as and when they are required.
When developing this program, I did consider constructing some sort of filter to reduce the number of sprites that would need checking to see if they should be drawn in the player’s view. It turned out though, that the process for analysing a sprite to see if and where it should be drawn was fast enough to manage the sort of sprite numbers likely to be found within a game level. This avoided something that professional programmers call “premature optimization”. The idea is that you should only work to optimize a process when you are sure it is a true bottleneck (and also when you have come to understand all of the requirements).
We can store the sprites in use in a simple array added to the sprites.js file.
var sprites = [];
It seems right to store sprite data in the Level object and then add them to the game in the setLevel() function. For the moment though, we could just create this first test sprite by adding the following line to the setLevel() function.
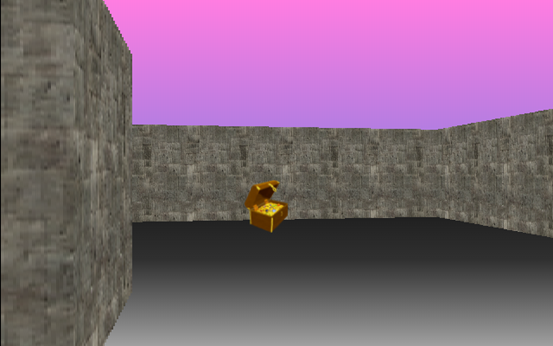
sprites.push(new Sprite("images/chest2.png", 270, 400));
The chest2.png image is a great one to start with as it illustrates perfectly what can go wrong in choosing sprites for this game. That might sound perverse but sometimes it is much easier to show than just tell.
We can now go back to the camera.cast() method and add a final line to the code there to call a new method we will use to render the sprites.
this.renderSprites();
We can then start writing the renderSprites() method, adding it to the camera object.
    renderSprites: function() {
      let dx = 0, dy = 0, da = 0, dd = 0, step = 0;
      for(let i = 0; i < sprites.length; i++){
        dx = sprites[i].x - player.x;
        dy = sprites[i].y - player.y;
        sprites[i].distance = Math.hypot(dx, dy);
        sprites[i].angle = this.frontAngle(dx, dy, 0); // true angle to x/y
      }
        },
The method starts by initialising a list of variables. The code then loops through the list of sprites and calculates the differences between the player and sprite x and y values. These differences are used to calculate a distance to the sprite and the angle from the player to the sprite. That final step is managed by another new camera object method called frontAngle() that also adjusts any angle calculated to ensure that if the sprite is in front of the player then the resulting angle will reflect that.
    frontAngle: function(dx, dy, rotation){
      let angle = Math.atan2(dy, dx) - rotation;
      // adjust angle to check it is front of player
      if(angle < -Math.PI){angle += Game.twoPi;}
      if(angle > Math.PI) {angle -= Game.twoPi;}
      return angle;
  }
The function will be used again to calculate relative angles from the player ready to be matched to the FOV angles we have stored in the camera.steps array. That is why a rotation value can be passed and used in the calculation. In this first instance we want the absolute angle (from the zero 3 o’clock position) so a zero value is passed as the rotation. Refer back to the diagram at the start of this stage to check why.
Now each sprite that is potentially in the player’s view has a distance and angle value set we can sort them into distance order as we will want to render the sprites furthest from the player first as they may overlap each other. We can use the built-in array sort method by passing it a compare function.
The array.sort() method will sort any array but it will treat the content of each element as if it were a string and strings are sorted in alphabetical order where the length of a string is less important than the first letter. When that gets “translated” to numbers the results can be a surprise at first.
let myNums = [1, 30, 4, 21, 100, 22];
myNums.sort();
// order now: [1, 100, 21, 22, 30, 4]
We can supply a function to help the sort() method get thing right. The function should accept two values and return zero (0) if the values are the same. Then -1 if the first is less than the second or 1 of the first is greater than the second. There is a convention that the returned values should be 1, 0 or -1 but in fact any positive or negative numeric value will work just as well as 1 and -1. This means that we could sort those numbers like this:
let myNums = [1, 30, 4, 21, 100, 22];
myNums.sort(function(a, b) {
  return a - b;
});
// order now: [1, 4, 21, 22, 30, 100]
Add the next lines to the renderSprites() method to manage the sort. The comparison function is defined in the same line that calls the sort as it is very short.
  // sort in descending order of distances to draw from furthest to nearest
    if(sprites.length > 1){
      sprites.sort(function(a,b){return b.distance - a.distance;});
    }
Once the sort has run, we can loop through the array of sprites and check if they are all or partly visible in the FOV before rendering what the player can see of them. Before doing that we had better add (or copy from an earlier game project) the findPointOnCircle() function to the main.js JavaScript file.
function findPointOnCircle(originX, originY, radius, angleRadians) {
    let circX = radius * Math.cos(angleRadians) + originX;
    let circY = radius * Math.sin(angleRadians) + originY;
    return {x: circX, y: circY};
}
Back with the renderSprites() method; our next loop through the sorted sprite list is going to start by calculating the start and end coordinates of the sprite presented at an angle horizontal to the angle from the player to the sprite. We will be adding quite a bit more code to the loop although it will be in nice logical chunks. The first line in the loop though, just makes a check on the sprite distance as a very simple filter. If the sprite is further away than the longest ray cast then it can’t be visible.
for(let i = 0; i < sprites.length; i++){
  if(sprites[i].distance > this.dist[this.sectionCount] ||
                           !sprites[i].visible){continue;} // too far away
  let dims = sprites[i].getDims(); // get height and width
  let lPoint = findPointOnCircle(sprites[i].x, sprites[i].y,
                              dims.width/2, sprites[i].angle - Math.PI/2);
  let rPoint = findPointOnCircle(sprites[i].x, sprites[i].y,
                              dims.width/2, sprites[i].angle + Math.PI/2);
}
We can now think of the sprite as residing on the line from lPoint to rPoint. The next step is to decide if all or part of that line is in the FOV. We can do that by checking the relative angle from the player to a sequence of points from lPoint to rPoint. We can use the width of the sprite image to decide the number of points to check. We therefore need to calculate how much the x and y values will change for each point along the line. Add the following lines to the code inside the loop.
let xStart = null, xEnd = null;
xStep = (rPoint.x - lPoint.x) / dims.width;
yStep = (rPoint.y - lPoint.y) / dims.width;
The next step in the code within the main loop is to start inspecting each point along the line from lPoint looking for the first that is within the FOV. To reduce the complexity of the code another new camera object method, getAnglePos(), is called.
  for(let s = 0; s < dims.width; s++){
    dx = (lPoint.x + s * xStep) - player.x; // x position of pixel
    dy = (lPoint.y + s * yStep) - player.y;
    da = this.frontAngle(dx, dy, player.rotation); // relative angle
    dd = Math.hypot(dx, dy); // distance to point on Sprite
    step = this.getAnglePos(da,dd); // is angle in FOV?
    if(step > -1){
        xStart = {x: s, step: step};
        break;
    }
  }
It will help to make what is happening clearer if we now add that getAnglePos() method to the camera object. Then we can come back and continue this method.
getAnglePos: function(da, dd){
  if(da >= this.steps[0]){
      // where is relative angle da in FOV?
      for(let a = 0; a < this.sectionCount-1; a++){
          if(da >= this.steps[a] - this.halfStep &&
                da < this.steps[a] + this.halfStep){
              if(dd <= this.dist[a]) {
                  return a;
              }
          }
      }
  }
  return -1; // angle not in FOV
},
That method will return the index of any closely matching angle in the steps[] array if the distance to the point on the sprite is less than the distance the matching array travelled to the nearest wall. If no match is found or if the sprite point is behind a wall, then the method returns -1. The check for a match of the sprite point angle and the values in the steps[] array is designed to allow for the fact that a perfect match is unlikely. Try using the developer tools to inspect the steps[] values and some of the values passed to this method and you will see that floating point precision could have been an issue here.
Back at that inner loop within the renderSprites() method; you can see that if a given point on the line from lPoint is matched by the getAnglePos() method then the point on the sprite and the index value from the steps[] array are recorded in the xStart object and the loop exited. It may be that the sprite is not in the FOV and that this loop completes without xStart being given a value. We can test this value to decide if we should start looking for a similar match working from rPoint back towards lPoint. The intention being to see where the “right” hand end of the visible sprite lies within the FOV. The code for this is almost the same as last loop. Continue with the method, as below:
if(xStart){
  for(let s = dims.width - 1; s > 0; s--){
      dx = (lPoint.x + s * xStep) - player.x;
      dy = (lPoint.y + s * yStep) - player.y;
      da = this.frontAngle(dx, dy, player.rotation); // relative angle
      dd = Math.hypot(dx, dy);
      step = this.getAnglePos(da,dd); // in FOV ?
      if(step > -1){
          xEnd = {x: s, step: step};
          break;
      }
  }
}
If xEnd is set then we know that at least part of the sprite is visible within the FOV. All we have to do is calculate the height and position to draw all or part of the sprite. The x values in the xStart and xEnd objects define the section of the sprite to draw. [This time the x is for the image and not the position on the game map.]
So, the method’s main loop ends (for now) with the following code.
if(xEnd){
  let distance = sprites[i].distance * (Math.cos(sprites[i].angle –
                             player.rotation)); // correct the distance
  let height = Game.playerDistance / distance;
  let wallHeight = Math.round(height * Game.gameScale); // height of notional wall at same position
  let spriteHeight = Math.round(height * dims.height);
  let width = Math.abs(xEnd.x - xStart.x);
  let spriteWidth = Math.round(width * height);
  let top = Math.round((Game.projectionHeight - wallHeight) / 2);
  top = top + wallHeight - spriteHeight;
  let xPos = xStart.step * Game.sectWidth;
  this.ctx.drawImage(sprites[i].img, xStart.x, 0, width, dims.height,
                                xPos, top, spriteWidth, spriteHeight);
}
That section of code is broadly the same as the code that draws the wall stripe. We pretend there is a wall at the same location as the sprite to help calculate the vertical position of the sprite in the view.
That is quite a lot of code to test in one go so it is to be hoped that any typos are quickly found and that you can admire the sprite image in all its glory. If you move the player past the sprite to a fair distance away you can then return towards the sprite and check that it is scaled appropriately as the distance changes. You should also be able to see what is wrong with the test sprite.
The issue is that the base of the object, as it is drawn, is not at the bottom of the image. This can mean that from certain positions the image looks like it is floating above the floor. The best sprites to use for objects would have square or round bases with the base at the bottom of the image. We can try some shortly. You might also have noticed that the player can move through the sprite and so we probably need to update the player collision detection.
First off, we can try out a set of sprites better suited to this game format. There are some in the downloadable images available for this project that are broadly similar to some found in the game “Doom” that was a ray casting smash hit. We could place some data to create sprites in the Level object ready to load. That data includes a type value as we will want to move on from just two-dimensional sprites. Add the following array to the Level object.
sprites: [
    {type: 1, image: "images/talllamp.png", x: 448, y:900},
    {type: 1, image: "images/talllamp.png", x: 448, y:1284},
    {type: 1, image: "images/talllamp.png", x: 448, y:1668},
    {type: 1, image: "images/pillar.png", x: 320, y:1216},
    {type: 1, image: "images/bollard.png", x: 306, y:2368},
    {type: 1, image: "images/sparehead.png", x: 150, y:2535},
    {type: 1, image: "images/pillar.png", x: 610, y:480},
    {type: 1, image: "images/talllamp.png", x: 704, y:1600},
]
Then we can add to the setLevel() function to load these sprites into the sprites array just like our first test sprite.
function setLevel(){
    Level.bgTopGrad = createGrad(camera.ctx, 0, 0, 0, Game.projectionHeight/2, "#FF7DE1", "#9B7DE1");
    Level.bgFloorGrad = createGrad(camera.ctx, 0, Game.projectionHeight/2, 0, Game.projectionHeight,  "#101010", "#303030", "#A0A0A0");
    Game.map = new FPSMap("devMap", "mapEntities", Level.grid);
    player.x = player.y = 200;
        for(let i = 0; i < Level.sprites.length; i++){
        let sp = Level.sprites[i];
        switch(sp.type){
            case 1:
                sprites.push(new Sprite(sp.image, sp.x, sp.y));
                break;
        }
    }
}
If you now run a test, you should see that these sprites look pretty good from any angle and (if you move the player around a bit) that the furthest sprites are drawn behind the nearer ones as planned.
It would help our player to walk around and inspect these sprites if we upgraded the collision detection. Might be an idea to write this so that it can be used by other game elements (thinking non player characters, a.k.a. bad guys).
Up until now we have treated the player and sprites as existing at a point (with x/y coordinates). It makes sense to imagine the player having some bulk and needing some personal space all around if only to accommodate a body. We can also consider the sprites as having a physical size that is the width of the image. Our revised collision detection could project an imaginary circle around the player and all sprites and detect collisions at the boundary of that circle. Fortunately, that is not as difficult as it sounds. If you think back to the first game project developed in this book you will recall that we implemented an effective collision detection for the game ball by testing just 8 points around the circumference.
The following pair of functions implement just such an approach.
function detectCollision(newX, newY, radius){
    let angle = 0, pos;
    while (angle < Game.twoPi){
      pos = findPointOnCircle(newX, newY, radius, angle);
      if(Game.map.isWall(pos.x, pos.y)) {return true;}
      angle += Math.PI / 4;
    }
    for(let i = 0; i < sprites.length; i++){
      if(!sprites[i].solid){continue;}
      let dim = sprites[i].getDims();
      if(circIntersect(newX, newY, radius, sprites[i].x,
                     sprites[i].y, dim.width/2)){return true;}
    }
    return false;
  }
and
function circIntersect(x1, y1, r1, x2, y2, r2){ //*
  let dist = Math.hypot(x1-x2,y1-y2);
  return dist <= r1+r2;
}
[The circIntersect() function does not strictly check for an intersection between the two circles as one could be inside the circumference of the other but this works for our purposes.]
As the walls of our game are vertical or horizontal only four positions around the circle are likely to intersect with a wall. It is only at outside the corners that other points might come into play so we could look at that later.
We could implement those functions by changing the if statement in the player.animate() method that reads “if(!Game.map.isWall(newX, newY)){“ to:
if(!detectCollision(newX, newY, this.radius)){
I set a value for player.radius of 15 to try things out. This can always be tweaked if it proves a little low. You should now be able to “walk” the player view right up to a sprite but be blocked and unable to walk through it.
Stage 5
Now that the sprites have a sort of physical dimension in our game world it might be nice to explore an approach that would make at least some of them a bit more 3D and a bit less 2D.
If you run an Internet search for sprites from games such as Doom or Wolfenstein you will find a wealth of art work generated by gamers with the intention of adding alternate monsters and characters to their favourite games. The Wolfenstein styled sprite sheets for guards and general bad guys are interesting because they most frequently show characters drawn from eight different angles (you can spot them easily because they have a purple (RGB #980088) background colour that was used in the game to denote transparent pixels). We could develop a variant of the sprite object that can take multiple images, displaying the most appropriate angle to the viewer. We could then take a stroll around the sprite and admire it from all angles.
We can start by creating a new class that inherits from the Sprite class and then adds some new members. Place the code for this new class in the sprites.js file.
class Sprite3D extends Sprite{
    constructor(imgSrc, x, y, frameWidth, rot, frames) {
        super(imgSrc, x, y);
        this.rotation = rot;
        this.frame = -1;
        this.frameWidth = frameWidth;
        this.canvas = document.createElement('canvas');
        this.ctx = null;
        this.frameCount = frames;
    }
}
This sprite class has a rotation value so that it can be orientated to the game layout. As there are multiple images involved the object “borrows” the terminology from some earlier sprites from this book; thus, we have frames and frame width. To reduce the complexity of the current sprite rendering code, the Sprite3D class includes an HTML canvas that can be used to draw the current frame ready for the sprite rendering to use that image in the player’s view.
This new sprite class will need a revised getDims() method which will override the parent class method with the same name.
    getDims() {
        return { width: this.frameWidth, height: this.img.height };
    }
Then we need that method to draw the current frame to the sprite’s own canvas. The first line of this method ensures that the image has loaded before any attempt is made to give the canvas dimensions and to draw on it.
drawFrame(newFrame) {
    if (!this.img.height) { return; } // image not loaded yet
    let width = this.frameWidth, height = this.img.height;
    if (!this.ctx) { // first use of method
        this.canvas.width = width;
        this.canvas.height = height;
        this.ctx = this.canvas.getContext("2d");
    }
    this.frame = newFrame;
    this.ctx.clearRect(0, 0, width, height);
    let imgX = this.frame * width;
    this.ctx.drawImage(this.img, imgX, 0, width, height, 0, 0,
                                                  width, height);
}
We can complete this new sprite by giving it a method to which we can send the current player coordinates when it is in view. The sprite method can then work out the angle that it is being viewed from (with a couple of very short helper functions).
    viewedFrom(x, y) {
        let dx = x - this.x; // offset from sprite
        let dy = y - this.y;
        let angle = Math.atan2(dy, dx); // angle from sprite to player
        angle = only360(this.rotation - angle);
        let ai = getAngleIndex(getNearestAngle(angle / Math.PI));
        if (this.frame !== ai) {
            this.drawFrame(ai); // redraw to image buffer
        }
    }
The first of the helper functions is called getNearestAngle() and is used to find the closest fraction of PI to the value passed as an argument. It does this by sorting an array of values in order of their difference to the argument value. The array value that has the smallest difference will end up in the first element and that is the one that will be returned by the function. This function also introduces a new way of describing a JavaScript function. Add it to the main.js file.
// get nearest fraction of PI
function getNearestAngle(val){
    let l2 = [0,0.25,0.5,0.75,1,1.25,1.5,1.75,2];
    return l2.sort( (a, b) => Math.abs(val - a) - Math.abs(val - b) )[0];
}
You are increasingly likely to run into the => arrow function expression when you come to look at recent code samples on line. All this one does is describe another comparison function for the array sort that checks the differences between the argument, val, and the fractions in the array elements. This function is a neat way of giving us a good match while avoiding issues with floating point number precision.
Arrow Functions
Arrow functions are a way of describing compact one line functions that do not need access to the arguments object or use any bindings to “this”. The basic format is a list of arguments followed by the arrow and then the function expression. There are several variants but they all follow this basic structure.
A function definition like:
var myFunc = function(a, b) {
  return a + b;
};
would become:
const myFunc = (a, b) => {return a + b};
The second helper function just returns the index for a match between the argument (which will be the fractional value returned by the getNearestAngle() function and the values in the array. Add this one to the main.js file as well.
// get index number of PI fraction
function getAngleIndex(angle) {
    const l1 = [0,0.25,0.5,0.75,1,1.25,1.5,1.75,2];
    return l1.indexOf(angle) % 8; // returns 0 to 7
}
We use the index of the matched angle value in the array as the index value of the frame from the sprite image to display to the player view. The modulus operator was used there because both 2 and 0 represent the same angle in radians (zero degrees).
All we have to do now is implement the new sprite type. We can add one for a rather monochrome uniformed character to the end of the sprites array in the levels object.
sprites: [
    {type: 1, image: "images/talllamp.png", x: 448, y:900},
    {type: 1, image: "images/talllamp.png", x: 448, y:1284},
    {type: 1, image: "images/talllamp.png", x: 448, y:1668},
    {type: 1, image: "images/pillar.png", x: 320, y:1216},
    {type: 1, image: "images/bollard.png", x: 306, y:2368},
    {type: 1, image: "images/sparehead.png", x: 150, y:2535},
    {type: 1, image: "images/pillar.png", x: 610, y:480},
    {type: 1, image: "images/talllamp.png", x: 704, y:1600},
    {type: 2, image: "images/guard3D.png", x: 960, y:704,
        fw: 32, rt: Math.PI, fc: 8}
]
Then add a case 2 to the inner switch statement in the setLevel() function:
switch(sp.type){
    case 1:
        sprites.push(new Sprite(sp.image, sp.x, sp.y));
        break;
    case 2:
        sprites.push(new Sprite3D(sp.image, sp.x, sp.y, sp.fw,
                                                       sp.rt, sp.fc));
        break;
}
Then two edits to the camera.renderSprites() method. The first is a new line to sit between the line that fetches a sprite’s dimensions and the one that calculates the lPoint.
let dims = sprites[i].getDims(); // get height and width
if(sprites[i].viewedFrom){ // has it got the method?
  sprites[i].viewedFrom(player.x, player.y); // 3D sprite
}
let lPoint = findPointOnCircle(sprites[i].x, sprites[i].y, dims.width/2,
                                           sprites[i].angle - Math.PI/2);
The second change is to the code that draws the sprite in the view. If this is a regular sprite, we will be using the image and if it is a Sprite3D instance then we will be using the sprite’s canvas as an image source.
if(sprites[i] instanceof Sprite3D){
  this.ctx.drawImage(sprites[i].canvas, xStart.x, 0, width, dims.height,
                                  xPos, top, spriteWidth, spriteHeight);
} else {
  this.ctx.drawImage(sprites[i].img, xStart.x, 0, width, dims.height,
                                  xPos, top, spriteWidth, spriteHeight);
}
That’s all that is required. If you give the code a run then you should be able to walk up to and around the new sprite and see a different image depending upon the view angle. You can also, of course, adjust the rotation of the new sprite.
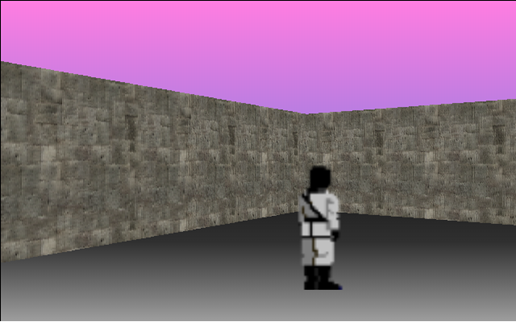
If you are working on a Windows 10 or 11 PC then you might find that Microsoft Paint3D is a good program to build or at least source some (semi) 3D images. You can save views from different angles and then combine them into an image file using the guard3D.png file as a guide for the image order although it is, in fact, just a clockwise rotation.
You might like to experiment with the table image from the web site download set (table8x130x48.png) in place of the guard image.
{type: 2, image: "images/table8x130x48.png", x: 960, y:704, fw: 130, rt: Math.PI, fc: 8},
With a few more sprites decorating the game play area you might be interested in an alternative collision detection function that would also allow the player to scrape down walls when running into them at an angle. This would enhance gameplay by also making it less likely the player will get tangled up on the edges of sprites.
The new collision detection function starts with some similar code to the first although there are more variables defined and the function takes an interest in the general direction taken by the player. The big difference is that this function returns x and y positions when called. If there is no collision detected then those positions will be the “new” x and y positions being tested. If there is a partial collision then the function will attempt to adjust the positions to avoid blocking forward progress (and that code will be added shortly). Keep the original function in your JavaScript file though, as you may want to use it again.
function detectCollision3(oldX, oldY, newX, newY, radius, rotation,direction){
    let retPos = {x: newX, y: newY}; // proposed new position
    let going = getAngleIndex4(rotation/Math.PI);
    if(direction < 0){ going = (going + 2) % 4;} // if reversing
    let angle = 0, hit = false, sHit = false, dim, s, pos;
    while(angle < Game.twoPi && !hit){
        pos = findPointOnCircle(newX, newY, radius, angle);
        if(Game.map.isWall(pos.x, pos.y)) {
            hit = true;}
        angle += Math.PI / 4;
    }
    if(!hit){
        for(let i= 0; i < sprites.length && !sHit; i++){
            s = sprites[i];
            if(!s.solid || !s.visible){continue;}
            dim = s.getDims().width;
            sHit = circIntersect(retPos.x, retPos.y, radius, s.x, s.y, dim/2);
            if(sHit){ // might be behind or to one side only
                angle = Math.atan2(s.y - retPos.y, s.x - retPos.x);
                if(getAngleIndex4(angle/Math.PI) !== going){
                    sHit = false; // brush past or going away
                }
            }
        }
    }
    if(!hit && !sHit){return retPos;}
We can now add some code to deal with the situation where a collision is detected. At worst, the function will return the oldX and oldY values to indicate that the player (or whatever) can’t proceed to the newX and newY location. The only adjustment made is to return a position that uses the oldX and newY OR oldY and newX values. Add the following code lines to the new function below the current last line.
if(hit){
    pos = findPointOnCircle(newX, newY, radius, going * Math.PI/2);
    switch(going){
        case 0: // right
        case 2: // left
            if(Game.map.isWall(pos.x, pos.y)){retPos.x = oldX;}
            retPos.y = oldY;
            break;
        case 1: // down
        case 3: // up
            if(Game.map.isWall(pos.x, pos.y)){retPos.y = oldY;}
            retPos.x = oldX;
            break;
    }
} else {
    retPos.x = oldX;
    retPos.y = oldY;
}
return retPos;
There was a call to a new function called getAngleIndex4() and we need to add that to the main.js file as well. It is a shortened version of getNearestAngle() and getAngleIndex() rolled into one.
function getAngleIndex4(val){
    const l1 = [0,0.5,1,1.5,2];
    let l2 = [0,0.5,1,1.5,2];
    let angle = l2.sort((a, b) => Math.abs(val-a) - Math.abs(val-b) )[0];
    return l1.indexOf(angle) % 4; // returns 0 to 3
}
Now to apply the new collision detection function to the player.animate() method to give it a trial run. Edit the if(howFar) code block to switch the new function for the original detectCollision().
if(howFar){
    let newX = this.x + Math.cos(this.rotation) * howFar;
    let newY = this.y + Math.sin(this.rotation) * howFar;
    let pos = detectCollision3(this.x, this.y, newX, newY, this.radius,
                                        this.rotation, this.direction);
    this.x = pos.x;
    this.y = pos.y;
}
Try the enhanced approach out and you should find that guiding the player around has been made easier. The new collision detection is also going to be available to any other entities that might inhabit this game world. However, if you are building this project on a low power device you may need to continue to use the original collision detection function with a small change. Please see the end of this chapter for tips on tuning this game to run on devices that favour battery life over processing power.
Stage 6
Now for some sprite action. We can make use of our previous Actor sprite type and its Anim image sequences as a foundation for the next set of sprite classes in our ray cast game world. We could start with the player’s weapons (OK – anything the player wants to brandish at any characters he or she meets).
There is one key difference that we have to take into account for the Anim objects we will be creating and that is that each is likely to have an inactive image as well as an action sequence. Think about “first person shooter” game guns. They are typically seen as being held in a static position relative to the view with an animation sequence only being triggered by the gun firing. In addition, if the non-player characters (NPCs) in the game are going to have animation sequences as seen from multiple viewpoints then provision also needs to be made for a static image associated with each of the eight viewpoints for when the NPC is not active.
Another new Anim feature, that is likely to prove useful on most PCs, is one that can slow an animation to a pre-set “frame rate”. This is being introduced up front rather than going ahead and building an animation and leaving many readers to discover that animations were running too quickly. It also seemed like a good idea, when drafting this object, to include some way of checking that the associated image has been loaded as the code can then avoid trying to render an image when the Anim is not yet ready.
class Anim {
    constructor(imgSrc, frames, frameWidth, height, repeat, rate) {
        this.loaded = false;
        this.img = new Image();
        let self = this;
        //inside img.onload this === img but self === Anim this
        this.img.onload = function () { self.loaded = true; };
        this.img.src = imgSrc;
        this.frames = frames;
        this.frameWidth = frameWidth;
        this.height = height;
        this.frame = -1;
        this.default = 0;
        this.repeat = repeat;
        this.frameRate = 1000 / rate;
        this.lastFrame = Date.now();
        this.action = false;
    }
}
There is quite a lot there that is very similar to the Anim object from the platform game project, plus some new things. Starting at the top we have a Boolean value (loaded) that can be set when the associated image file has been loaded into the Image object. There are two tricky bits to take note of here. If you are going to make use of the image onload event then it is important to set it before setting the source (src) value. If you set the onload event afterwards then it is just possible that the onload will not fire (because the image has already loaded from the browser cache). The next issue is that within the image onload event “this” will point to the image and not the new Anim class instance. We therefore create a variable called self to hold the Anim value of “this” and use that in the function.
Next there was the Anim.framerate value which is being set to the number of milliseconds that should elapse as a minimum between animation frames. There is also a lastFrame value set to the current time to help keep track of that.
The Anim object constructor includes a Boolean value (action) to allow the Anim instance to decide if it is expected to show a static image or run the animation sequence.
The Date object
JavaScript dates represent a specific moment in time and contain the number of milliseconds since the 1st January 1970 (GMT or, more properly, UTC) although “leap seconds” are ignored. The .now() method returns the current time based upon your PC’s clock and time zone. The Date object has many attributes and methods which are documented later in this book.
We can next add the first three methods to the Anim class definition.
activate(yesNo){ this.action = yesNo;}
reset() { this.frame = this.default; }
getDims() {
    return { width: this.frameWidth, height: this.height };
}
The first sets this.action. The second resets the Animation sequence (to the static image) and the third returns the width and height of the Anim frame to match the equivalent methods from the Sprite and Sprite3D classes.
Next we have the animate() method that is passed a <canvas> context and an x/y position to draw an image. The image drawn is either the static frame or one of the animation frames from the Anim image. Notice how the elapsed time since the last frame was shown is checked before an animation is progressed.
animate(ctx, x, y) {
    let now = Date.now();
    if (this.action) {
        if ((now - this.lastFrame) >= this.frameRate) {
            this.frame++;
            this.lastFrame = now;
            if (this.frame === this.frames) {
                if (this.repeat) {
                    this.frame = 1;
                } else {
                    this.frame = this.default;
                    this.action = false;
                }
            }
        }
    } else {
        this.frame = this.default;
    }
    let clipx = this.frame * this.frameWidth;
    ctx.drawImage(this.img, clipx, 0, this.frameWidth, this.height,
                                x, y, this.frameWidth, this.height);
}
At least some of our animations are likely to be associated with sound. It makes sense to package any associated sound with the animation so we could create a new class that extends the Anim class to include and play an Audio object.
class AnimAudio extends Anim {
    constructor(imgSrc, frames, frameWidth, height, repeat, rate, audSrc){
        super(imgSrc, frames, frameWidth, height, repeat, rate);
        this.sound = new Audio();
        this.sound.src = audSrc;
        this.sound.onended = function(){
            this.currentTime = 0;
        };
    }
    activate(yesNo) {
        super.activate(yesNo); //this.action = yesNo; just as valid
        if(yesNo){this.sound.play();}
    }
}
The AnimAudio class inherits all of the goodies from the Anim class and adds an Audio object (with an automatic rewind) that gets played when the animation sequence is activated. Notice how the Anim activate method is called by the AnimAudio method of the same name. This has different syntax to the way a constructor manages the same thing.
Anim (and AnimAudio) classes are collected and used by an Actor class. Let’s start with an Actor constructor and a first method.
class Actor {
    constructor(x, y) {
        this.x = x;
        this.y = y;
        this.anims = [];
        this.current = -1;
        this.height = 0;
        this.width = 0;
        this.visible = true;
        this.solid = true;
    }
    resetCurrent(newc) {
        this.current = newc;
        this.anims[this.current].reset();
        let dim = this.anims[this.current].getDims();
        this.width = dim.width;
        this.height = dim.height;
    }
}
There is also an activate() method that basically calls the current animation activate method but has a constraint that stops an AnimAudio object activation while a prior one is still running. There is an assumption here that any associated audio is likely to be as long, or longer, than the related animation sequence.
    activate() {
        if (this.anims[this.current] instanceof AnimAudio) {
            if (this.anims[this.current].sound.currentTime) { return; }
        }
        this.anims[this.current].activate(true);
    }
Put this preparation work to good effect by adding weapons (or equivalent items of your choice) to the player object. That object has a weapons member currently set to null.
We can add a method that will give the player some guns (go on, admit it, that was what you wanted). Please ensure that the audio file names match the ones you have downloaded as they may not be the same as those shown.
createWeapons: function() {
    this.weapons = new Actor(0,0);
    let a = new AnimAudio("images/guna8x80x100.png", 8, 80, 100,
                                           false, 20, "audio/gun1.mp3");
    this.weapons.anims.push(a);
    a = new AnimAudio("images/gunb7x200x200.png", 8, 200, 200,
                                           false, 20, "audio/gun0.mp3");
    this.weapons.anims.push(a);
    this.weapons.display = function(ctx) {
        // inside function this => weapons object
        this.anims[this.current].animate(ctx, this.x, this.y);
    };
    this.weapons.change = function(to){
        this.resetCurrent(to);
        this.x = (Game.projectionWidth - this.width) / 2;
        this.y = Game.projectionHeight - this.height;
    };
         this.weapons.change(0);
}
The player.weapons variable points to an instance of the Actor class and that instance has two AnimAudio class instances added so there will be sound effects. Once again, sadly, you will have to download some suitable sounds yourself. Check chapter 7 for advice on some good Internet resources. The first sound should be an automatic hand gun with a duration of a second or less and the second, with a similar sound duration, more like a shotgun.
This Actor instance has two methods added to it. These are added in just the same way as we added methods to object instances. This should underline, that classes are just objects (hiding in plain sight).
The weapons.change() method switches between AnimAudio instances and updates the object’s x and y coordinates so that they can be used to draw the gun images onto the game view. The weapons.display() method does just what it says but notice it uses the camera canvas context.
To implement these weapons, we just have to add a call to createWeapons() to the initialise() function and then add a line to the renderScene() function.
function renderScene() {
    player.animate();
    camera.cast();
    player.weapons.display(camera.ctx);
}
The guns are just about ready to test although you will probably also want a way of switching between weapons. To do that we could add a method to the player object (not the weapons object) to cycle through the available options (you can add your own guns or whatever of course).
            changeWeapon: function(){
            let nextOne = this.weapons.current + 1;
            nextOne %= this.weapons.anims.length;
            this.weapons.change(nextOne);
            }
We can add a line to the keyDown() event listener in the main.js file to call the changeWeapon() method when (say) the <x> key is pressed and another to fire the current gun when the <space bar> is pressed.
function keyDown(e) {
    switch(e.keyCode){
        case 38: player.direction = 1; break; // up
        case 40: player.direction = -1; break; // down
        case 37: player.turn = -1; break; //left
        case 39: player.turn = 1; break; // right
        case 32: player.weapons.activate(true); break; // space bar
        case 88: player.changeWeapon(); break; // <x> key
    }
}
Once tested, and now suitably armed, we can turn our attention to a big new class of sprite, Non-Player Characters (NPCs). We can base them on the Actor class but they need quite a few more attributes and methods as these have the potential to get around just as much as the player. So, let’s start with a class and constructor.
class NPC extends Actor{
    constructor(x, y, rot, prog) {
        super(x, y);
        this.turn = 0;
        this.rotation = rot;
        this.speed = 0;
        this.mapRadius = 3;
        this.angle = 0;
        this.distance = 0;
        this.visible = true;
        this.canvas = document.createElement('canvas');
        this.ctx = null;
        this.manageActions = prog;
        this.state = NPC.states.idle;
        this.playerView = {};
        this.blocked = false;
        this.active = false;
        this.addAnims(); //
    }
}
An NPC object instance has an x/y position in the game and an initial rotation. It inherits all of the attributes of an Actor object and then adds things like a canvas instance to draw itself in the same way as the Sprite3D object did. The manageActions attribute harks back to the platform project Actor objects and can be used to attach a function to manage the behaviour of an NPC in the game.
The NPC constructor sets a state value to one of a list of states. The state list is stored in the NPC definition using the static keyword. This means that the list is only stored once and not replicated for each NPC instance. At the time of writing, the JSHint extension to VS Code did not like class members that were not methods although all of the current Web browsers were happy to support such. I therefore added the state list definition to the class between two comment lines that can be used to stop JSHint from marking the line as an error.
<Online Edition Note> The JSHint extension is now deprecated and no longer considered a suitable "linter" for your JavaScript code.
/* jshint ignore:start */
static states = {"idle": 1, "seen":2, "active": 4,"stand" : 8, "fight": 16,
                        "dead": 32};
/* jshint ignore:end */
The constructor finishes by making a call to an addAnims() method which is used to load the lengthy list of Anim classes. Using a separate method to achieve this would simplify the creation of NPCs with alternate looks or behaviours.
addAnims() {
    let a = new Anim("images/guard0x5x42.png", 5, 42, 64, true, 8);
    this.anims.push(a);
    a = new Anim("images/guard1x5x44.png", 5, 44, 64, true, 8);
    this.anims.push(a);
    a = new Anim("images/guard2x5x46.png", 5, 46, 64, true, 8);
    this.anims.push(a);
    a = new Anim("images/guard3x5x42.png", 5, 42, 64, true, 8);
    this.anims.push(a);
    a = new Anim("images/guard4x5x42.png", 5, 42, 64, true, 8);
    this.anims.push(a);
    a = new Anim("images/guard5x5x46.png", 5, 46, 64, true, 8);
    this.anims.push(a);
    a = new Anim("images/guard6x5x46.png", 5, 46, 64, true, 8);
    this.anims.push(a);
    a = new Anim("images/guard7x5x46.png", 5, 46, 64, true, 8);
    this.anims.push(a);
    a = new AnimAudio("images/guard8x8x33.png", 8, 33, 64, true,
                       8, "audio/guardgun.wav");
    this.anims.push(a);
    a = new Anim("images/guard9x8x62.png", 8, 62, 64, false, 8);
    this.anims.push(a);
}
Another sound file and AnimAudio class instance used there and I went for a sort or “rat-tat-tat” automatic rifle sound. The animation frame rates are also quite low (8) as there are not many frames in each sequence but feel free to tweak the value as you want.
Like other sprites, the NPC class needs a getDims() method and we might as well throw in an activate() while we are at it.
getDims() {
    return { width: this.width, height: this.height };
}
activate(yesNo) {
    this.active = yesNo;
    if (this.current > -1) {
        this.anims[this.current].activate(yesNo);
    }
}
As each of the NPCs we will be using will have Anim classes for each of eight viewing angles we are going to need a viewedFrom() method just like the Sprite3D object. We are also going to need an animate() method that can move the NPC sprite around the game. We can start with viewedFrom() which switches between Anim instances just as the Sprite3D switched between frames. In fact, the switching is confined to the first 8 animations associated with the NPC. The code also ensures that the object’s canvas is the correct size for the current Anim frame set by calling a further method called setCanvas().
    viewedFrom(x, y) {
        let dx = x - this.x;
        let dy = y - this.y;
        this.playerView.angle = only360(Math.atan2(dy, dx));
        this.playerView.index = getAngleIndex4(this.playerView.angle
                                                          / Math.PI);
        this.playerView.distance = Math.hypot(dx, dy);
        let angle = only360(this.rotation - this.playerView.angle);
        let ai = getAngleIndex(getNearestAngle(angle / Math.PI));
        if (ai != this.current && this.current <= 7) { // ***
            if (!this.anims[ai].loaded) { return; }
            this.resetCurrent(ai);
            if (this.active) {
                this.anims[this.current].activate(true);
            }
        }
    }
Then:
    setCanvas() {
        this.canvas.width = this.width;
        this.canvas.height = this.height;
        if (!this.ctx) { this.ctx = this.canvas.getContext("2d"); }
    }
The animate() method uses any turn attribute value to set the rotation and then any speed value to calculate a new x/y position that is then used to call detectCollisions3() or just detectCollision() at your choice. The method ends by drawing the current frame to the object’s canvas and then calling any function stored in manageActions.
animate() {
    if (this.turn) {
        this.rotation = only360(this.rotation + this.turn);
        this.turn = 0;
    }
    if (this.speed) {
        let newX = this.x + Math.cos(this.rotation) * this.speed;
        let newY = this.y + Math.sin(this.rotation) * this.speed;
        let pos = detectCollision3(this.x, this.y, newX, newY,
                                     this.width / 2, this.rotation, 1);
        if (pos.x === this.x && pos.y === this.y) {
            this.blocked = true; // if blocked stop activity
            if (this.current > -1) {
                this.anims[this.current].activate(false);
            }
            this.active = false;
        } else {
            this.x = pos.x;
            this.y = pos.y;
        }
        this.speed = 0;
    }
    if (this.current > -1) {
        this.ctx.clearRect(0, 0, this.width, this.height);
        this.anims[this.current].animate(this.ctx, 0, 0);
    }
    if (this.manageActions) { this.manageActions(this); }
}
That’s enough to try out the NPC object although further customisation is going to be needed. We could add an NPCs to our list of sprites in the Level object giving it a type of 3.
sprites: [
    {type: 1, image: "images/talllamp.png", x: 448, y:900},
    {type: 1, image: "images/talllamp.png", x: 448, y:1284},
    {type: 1, image: "images/talllamp.png", x: 448, y:1668},
    {type: 1, image: "images/pillar.png", x: 320, y:1216},
    {type: 1, image: "images/bollard.png", x: 306, y:2368},
    {type: 1, image: "images/sparehead.png", x: 150, y:2535},
    {type: 1, image: "images/pillar.png", x: 610, y:480},
    {type: 1, image: "images/talllamp.png", x: 704, y:1600},
    {type: 2, image: "images/table8x130x48.png", x: 960, y:704,
                                  fw: 130, rt: Math.PI, fc: 8},
    {type: 3, x: 180, y: 958, rt: 0, prog: null},
]
Then we can extend the setlevel() function in the main.js file to take the NPC spec and add an instance to the list of sprites.
for(let i = 0; i < Level.sprites.length; i++){
    let sp = Level.sprites[i];
    switch(sp.type){
        case 1:
            sprites.push(new Sprite(sp.image, sp.x, sp.y));
            break;
        case 2:
            sprites.push(new Sprite3D(sp.image, sp.x, sp.y, sp.fw,
                                                    sp.rt, sp.fc));
            break;
        case 3:
            sprites.push(new NPC(sp.x, sp.y, sp.rt, sp.prog));
            break;
    }
}
That should be all that is needed to position an NPC in the game so that you can move the player around to admire it. Of course, that was quite a lot of work to just create another pseudo 3D sprite. What we want is action.
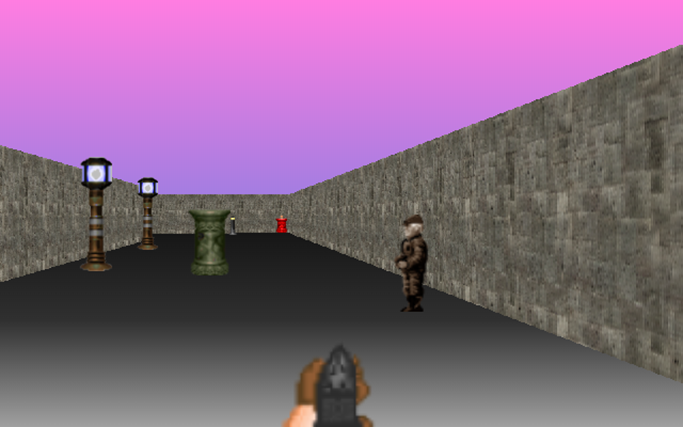
We could add a tweak to the camera.renderSprites() method to let an NPC sprite know that it has been “seen” just as we did for the Sprite3D class. We can go further and reset the NPC instance state as well. Find the relevant section in renderSprites() and edit as shown next.
// watch the brackets below (N.B. Sprite3D is also an instanceof Sprite)
if((sprites[i] instanceof Sprite3D) || (sprites[i] instanceof NPC)){
  this.ctx.drawImage(sprites[i].canvas, xStart.x, 0, width, dims.height,
                                  xPos, top, spriteWidth, spriteHeight);
  if(sprites[i] instanceof NPC){sprites[i].state |= NPC.states.seen;}
} else {
  this.ctx.drawImage(sprites[i].img, xStart.x, 0, width, dims.height, xPos,
                                        top, spriteWidth, spriteHeight);
}
The renderScene() function in the main.js file makes a call to the player.animate() method. We will need something similar for ant NPCs we have. That is best managed with a new function.
function animateNPCs(){
    for(let i = 0; i < sprites.length; i++){
        if(sprites[i] instanceof NPC){
            sprites[i].animate();
        }
    }
}
That function can be called from the renderScene() function.
function renderScene() {
    player.animate();
    animateNPCs();
    camera.cast();
    player.weapons.display(camera.ctx);
}
We can then write a simple behaviour for our test NPC. We are going to add the new method as a static method as it may only be needed by a limited number of our NPCs. Static methods (like static members) do not belong to an NPC instance so we will need to pass a reference to any given instance using doWalk() as an argument.
static doWalk(self){
    if(!(self.state & NPC.states.seen) &&
                         !(self.state & NPC.states.active)){return;}
    if(self.rotation === 0){
        self.turn = Math.PI / 2;
        self.activate(true);
    }
    if(self.blocked){
        self.turn = Math.PI;
        self.blocked = false;
        self.activate(true);
    } else {self.speed = 1.5;}
}
To implement this behaviour, we just have to tweak the line in the sprites array in the Level object to apply the new function to the sprite. Notice how it is referenced as belonging to the NPC class and not a specific instance.
{type: 3, x: 180, y: 958, rt: 0, prog: NPC.doWalkOrig},
You can now move the player around and admire the NPC as it passes by endlessly going backwards and forwards along one of the game passage ways.
You might want the game map display to include the location of any NPC sprites. If so, add the following new method to the map class.
markNPC(npc){
    this.tctx.beginPath();
    let x = npc.x * this.scale / Game.gameScale;
    let y = npc.y * this.scale / Game.gameScale;
    this.tctx.arc(x, y, npc.mapRadius, 0, Game.twoPi);
    this.tctx.fillStyle = "red";
    this.tctx.fill();
    this.tctx.closePath();
}
Then add a new function to the main.js file to call that method for any NPCs that should be mapped.
function mapNPCs() {
    for(let i = 0; i < sprites.length; i++){
        if(sprites[i] instanceof NPC){
            if(!(sprites[i].state & NPC.states.dead)){
                Game.map.markNPC(sprites[i]);
            }
        }
    }
}
A call to that new function can then be added to the renderScene() function after camera.cast().
One of the most interesting and certainly the most demanding areas in Artificial Intelligence (AI) research is that of “general intelligence”. Some researchers are working with Non Player Characters in games as suitable vehicles to explore general intelligence. I don’t think that we will be looking to rival that bleeding edge of research for this game but we can develop some functions to gift our NPCs with some autonomy and to make them much more interesting to encounter. This is an area where you can let your programming creativity rip (and enjoy some interesting debugging). Here are a range of short functions to get you started plus some changes to existing code to help the new behaviours along.
An NPC instance includes an object (called playerView) that can be used to hold some basic data on our player during any interaction. The viewedFrom() method added some values that we can use within our NPC behaviours. You can think of the playerView object as acting like a very primitive vision system for our NPCs. The NPC can "see" the player and record the relevant angle and distance.
To navigate around our game world, it would help if the NPC could see surrounding walls or at least to know how far they were away. We already have code that can calculate the distance to the game walls from a given position in the camera.trackRay() method. We could edit that slightly to allow the NPC's to make use of that block of code as well. Currently the trackRay() method makes direct use of the player x/y values so we will need to change that so it can use the NPC coordinates as well when needed.
Change the first line to add two new arguments.
trackRay: function(angle, strip, ex, ey){
Then look for every line in the method that makes use of player.x or player.y values and substitute the ex and ey values that are now passed as arguments. You should find the following changes need to be made:
let playerX = ex / Game.gameScale;
let playerY = ey / Game.gameScale;
......
  distance = Math.hypot(x * Game.gameScale - ex, y * Game.gameScale - ey);
.......
  let newDistance = Math.hypot(x * Game.gameScale - ex,
                               y * Game.gameScale - ey);
We also would not want the trackRay() method rendering a wall stripe when it gets called by an NPC so we could stop that by passing -1 as the value for the strip and adding a test for that before any strip gets drawn. We also need to add a final line to return the distance value to our NPC (this will be ignored by the camera.cast() method).
if(strip > -1){
  Game.map.drawRay(player, hit);
  // correct distance for fish eye distortion
  let noFish = distance * Math.cos(player.rotation - angle);
  this.renderStrip(strip, wallType, noFish, textureX);
}
return distance;
With that in hand we can make a slight change to the line in camera.cast() that calls trackRay() as that now needs to send the player coordinates.
for (let i = 0; i < this.sectionCount; i++) {
  this.dist[i] = this.trackRay(this.steps[i] + player.rotation, i,
                                                   player.x, player.y);
  this.dist[this.sectionCount] = Math.max(this.dist[i],
                                         this.dist[this.sectionCount]);
}
It would be a good idea at this point to test that our changes have had zero impact on the rendering of the walls and that the game runs unchanged (for the moment).
If, so far, all those code edits did not add up to anything it will prove time well spent as we can now put the changes into action. First is a new method for the NPC object that reads the distance to surrounding walls using the modified trackRay(). The method also demonstrates yet another way to add named members to a newly created empty object.
howFar() {
    // gets distances to wall in 90 degree steps
    let res = {};
    for (let i = 0; i < 4; i++) {
       res['d' + i] = camera.trackRay(i * Math.PI / 2, -1, this.x, this.y);
    }
    return res;
}
As you can see that method “looks” in the four directions from the NPC location to collect the distances to the nearest walls. We can capitalise on that new method with one that picks the direction with the longest distance to a wall but with a restriction on picking one of the directions – perhaps the direction the player is coming from or maybe just the one the NPC has just come from. This is created as an NPC static method as it makes no use of any instance values and so can be shared by all instances.
static getBest(ds, idx){
    let best = 0, newDir = 0;
    for(let i = 0; i < 4; i++){
        if(ds['d' + i] > best && i !== idx){
            best = ds['d' + i];
            newDir = i;
        }
    }
    return newDir;
}
Now a revised doWalk() function that can be triggered by being seen by the player or having a status setting that includes NPC.states.active.
static doWalk(self){
    if(!(self.state & NPC.states.seen) &&
                             !(self.state & NPC.states.active)){return;}
    if(self.state & NPC.states.idle){
        if(!(self.state & NPC.states.seen)){self.playerView.index = 99;}
        let newDir = NPC.getBest(self.howFar(), self.playerView.index);
        self.state ^= NPC.states.idle;
        self.state ^= NPC.states.seen;
        self.state |= NPC.states.active;
        self.rotation = newDir * Math.PI / 2;
        self.activate(true);
    }
    if((self.state & NPC.states.seen) &&
        self.playerView.distance <= 3 * Game.gameScale){
        self.manageActions = NPC.standReady;
    }
    if(self.blocked){
        self.turn = Math.PI;
        self.blocked = false;
        self.activate(true);
    } else {self.speed = 1.5;}
}
That version should have an NPC strolling backwards and forwards until the player gets too close when a new method (standReady()) is substituted for doWalk(). Just to be clear, you can change the function associated with NPC.manageActions from within a function called from NPC.manageActions. This is because the manageActions value only points to the function and it does not become the function in any way. Changing what manageActions points to also has no impact upon the currently running function.
We could set up one or more NPC sprites ready to start moving around by creating them with a manageActions value pointing at a simple function like:
static readyToWalk(self){
    self.manageActions = NPC.doWalk;
    self.state |= NPC.states.active;
}
Another obvious behaviour for an NPC might be to run away. How about:
static runAway(self) {
    if(!(self.state & NPC.states.seen) &&
                            !(self.state & NPC.states.active)){return;}
    if(self.state & NPC.states.idle){
        let newDir = NPC.getBest(self.howFar(), self.playerView.index);
        self.state ^= NPC.states.idle;
        self.state |= NPC.states.active;
        self.rotation = newDir * Math.PI / 2;
        self.activate(true);
    }
    //alternative is to check for new direction every grid square
    if(self.blocked){
        let dir = getAngleIndex4(self.rotation/Math.PI);
        let halfRad = self.width/4; // to back off a bit
        switch(dir) {
            case 0:
            case 2:
                self.x += (dir === 0) ? -halfRad : halfRad;
                break;
            default:
                self.y += (dir === 1) ? -halfRad : halfRad;
                break;
        }
        dir = (dir + 2) % 4; // 0=>2,1=>3,2=>0,3=>1
        let ds = self.howFar();
        let newDir = NPC.getBest(ds, dir); // but is best good enough?
        if(ds['d'+newDir] >= 3 * Game.gameScale){
            self.rotation = newDir * Math.PI / 2;
            self.blocked = false;
            self.activate(true);
        } else {
            self.activate(false);
            self.state ^= NPC.states.seen;
            self.rotation = dir * Math.PI / 2;
            self.manageActions = NPC.standReady;
        }
    } else {
        self.speed = 1.5;
    }
}
Both of the behaviours shown so far include mention of a function standReady().
static standReady(self){
    if(!(self.state & NPC.states.seen)){return;}
    self.blocked = false;
    self.rotation = self.playerView.angle;
    if(self.playerView.distance < Game.gameScale * 3){
        self.manageActions = NPC.attack;
    }
}
Standing ready can lead to an attack on the player.
static attack(self) {
    if(!(self.state & NPC.states.fight)){
        self.resetCurrent(8);
        self.activate(true);
        self.state |= NPC.states.fight;
    }
    self.rotation = self.playerView.angle;
    if(self.playerView.distance > Game.gameScale * 3){
        self.activate(false);
        self.state ^= NPC.states.fight;
        self.manageActions = NPC.standReady;
    } else if(self.anims[8] instanceof AnimAudio){
        if(self.anims[8].sound.currentTime === 0){
            self.anims[8].sound.play();
            self.anims[8].action = true;
        }
    }
}
With an NPC firing an automatic weapon towards the player, perhaps we had better allow for some player defence. Why not try an addition to the player’s weapon object. Try adding the following to the createWeapons() function.
this.weapons.deploy = function() {
    this.activate(true);
    for(let i = 0; i < sprites.length; i++){
        if(sprites[i] instanceof NPC){
            if(sprites[i].state & NPC.states.seen){
                if(sprites[i].playerView.distance <= Game.gameScale * 2.5){
                    let angle = only360(sprites[i].playerView.angle +
                                                                  Math.PI);
                    let hit = Math.abs(angle - player.rotation) <= 6 *
                                                             Math.PI / 180;
                    if(hit) {
                        sprites[i].manageActions = NPC.passOn;
                            }
                }
             }
        }
    }
};
The intention for that new method is that it replaces the simple activate() call when the space bar is pressed. It loops through the list of sprites looking for nearby NPC objects. When one is found, then the angle from the player to the sprite is calculated by adding 180 degrees (Math.PI in radians) to the angle from the sprite to the player that will already be stored. If the resulting angle is within (generously) 5 degrees of the player’s current rotation then the method assumes that the player has hit the NPC. A hit triggers a change to the NPC object’s manageActions value. So we had better look at the static NPC passOn() method.
static passOn(self){
    // sadly we have a death scene
    if(!(self.state & NPC.states.dead)){
        self.resetCurrent(9);
        self.activate(true);
        self.solid = false;
        self.state |= NPC.states.dead;
        self.manageActions = null;
    }
}
That sequence of events needs a change to the keyDown() event handler in the main.js file to get them started.
function keyDown(e) {
    switch(e.keyCode){
        case 38: player.direction = 1; break; // up
        case 40: player.direction = -1; break; // down
        case 37: player.turn = -1; break; //left
        case 39: player.turn = 1; break; // right
        //case 32: player.weapons.activate(true); break; // space bar
        case 32: player.weapons.deploy(); break; // space bar
        case 88: player.changeWeapon(); break; //  key
    }
}
Now would be a good moment to add to our population of NPCs and to then send the player off to hunt them down. For testing, try adding these to the Level object.
{type: 3, x: 180, y: 958, rt: 0, prog: NPC.runAway},
{type: 3, x: 3008, y: 186, rt: 0, prog: NPC.readyToWalk},
{type: 3, x: 2880, y: 186, rt: 0, prog: NPC.readyToWalk},
{type: 3, x: 180, y: 3008, rt: 0, prog: NPC.standReady},
{type: 3, x: 2368, y: 3008, rt: 0, prog: NPC.doWalk}
All of the NPC behaviour functions are just crying out for tweaks to improve the responses and to deal with edge cases. This is definitely somewhere for you to further develop your JavaScript skills and game play creativity. It might also be nice to add at least one function that could review the position and state of all of the active NPC sprites with a view to coordinating them in a way to enhance their opposition to the player.
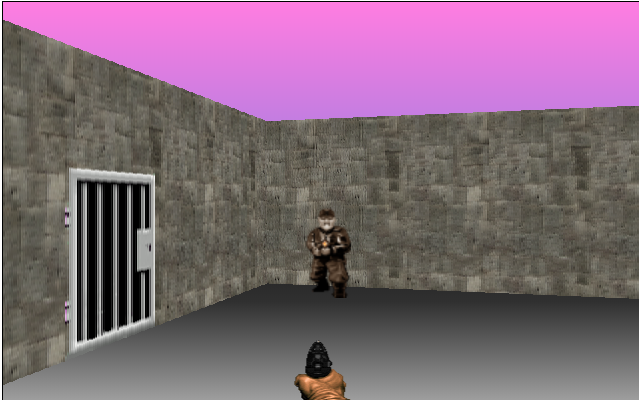
Building on a low power PC
This project applies a reasonably heavy JavaScript load that sees a long sequence of functions running many times a second. While most desktop PCs will shrug off that workload (remember we added some code to slow down sprite animations) some devices with low power CPUs designed to optimise battery life on the go may be struggling. With a little tuning though, this game will run at satisfactory speeds on even a very basic Chromebook. The following steps optimized the game to run nicely on a 1.7ghz Dual Core ARM CPU from Samsung running an eight year old (2012) entry level Chromebook and on a 2021 raspberry Pi 4 (which has limited RAM).
First thing, comment out the line in trackRay() that calls the drawRay() method. That visualisation was only intended to help you, the developer, keep a clear view on what should be shown in the player’s view.
//map.drawRay(player, hit);
The NPC sprites need to be switched to using something like the original detectCollision() function rather than the more process intensive detectCollision3() function. Trouble is, there is a bug in the original version which only comes into play when it is used by the NPC sprites. The problem is that, as it was first written, a sprite can detect a collision with itself.
We need a simple way of detecting that a sprite being checked is the same sprite as the one that is using the detectCollision() function. The simplest way to adjust the function would be to pass the current x/y coordinates of the sprite making the call. My revised detectCollision2() function is shown below with a slightly different name and set of arguments. This is to make it a simpler “drop in” replacement to make it easier to experiment.
function detectCollision2(curX, curY, newX, newY, radius){
    let angle = 0, pos;
    let retPos = {x: curX, y: curY};
    while (angle < Game.twoPi){
      pos = findPointOnCircle(newX, newY, radius, angle);
      if(Game.map.isWall(pos.x, pos.y)) {return retPos;}
      angle += Math.PI / 4;
    }
    for(let i = 0; i < sprites.length; i++){
      if(!sprites[i].solid){continue;}
      if(sprites[i].x === curX && sprites[i].y === curY){
          continue;
      }
      let dim = sprites[i].getDims();
      if(circIntersect(newX, newY, radius, sprites[i].x,
                            sprites[i].y, dim.width/2)){
        return retPos;
      }
    }
    return {x: newX, y: newY};
}
The NPC.animate() method then needs to be changed to use the revised function.
//let pos = detectCollision3(this.x, this.y, newX, newY, this.width / 2, this.rotation, 1);
let pos = detectCollision2(this.x, this.y, newX, newY, this.width / 2);
After that, performance gains are down to your game design. Keep the number of sprites down to those that are important to the atmosphere or game play. In particular, make minimal use of the Sprite3D type. The NPC sprites are “expensive” when they are moving about so set most of them up so they wait for the approach of the player before becoming active. That way you can have a good mix of challenges without slowing the game enough for the person playing to notice.
Code downloads for this chapter are available here.