Chapter 10: A touch Of This
When we tackled the flappy bird project, we included provision for very basic touch input to the game. Otherwise, we have concentrated on keyboard input but that might seem a bit limited in a world where touch sensitive screens and pen input are often available alongside the traditional mouse or trackpad. This project is also a good excuse to introduce different ways of encapsulating JavaScript code in modules while also exploring some of the vagaries of the “this” keyword. Don’t worry if you do not have a touch sensitive screen available, all but the final test can be managed just as well with a mouse.
That final point takes us straight to the first decision point. When tablets and smart-phones became popular platforms Web browsers were quick to implement touch control. The Touch web API (Applications Programming Interface) has advanced and is fully accessible from JavaScript. If your future programming came to focus on mobile platforms then you will probably feel best served by the Touch API. Meanwhile, PC device design continued to advance and now it is not uncommon for even a budget PC to support a touch screen, maybe a pen interface, certainly a trackpad and a mouse (via a USB port) all at the same time. Such developments brought the Pointer API into existence to provide a common solution for all such input types. This chapter is going to explore the Pointer API along with some advanced JavaScript.
The chapter needs a project; so, how about a simple paint program that could become a platform for further JavaScript exploration. Not strictly a game, but the techniques could be applied in a range of game designs.
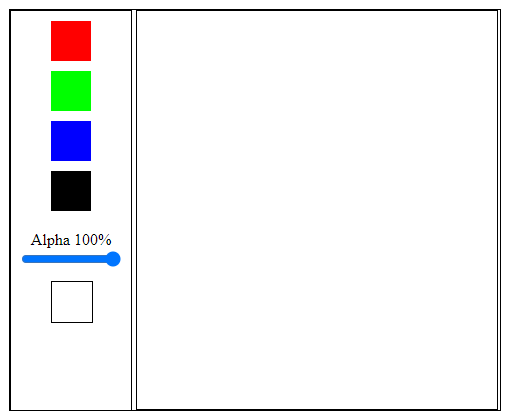
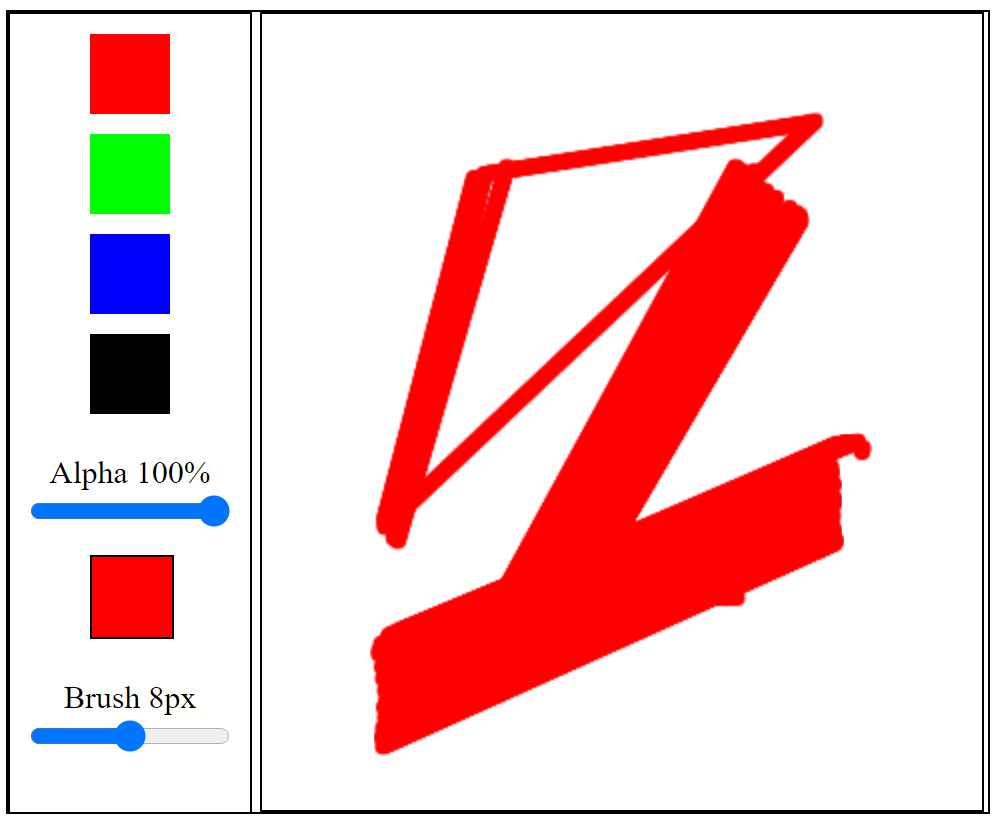
We start with the HTML and CSS to lay out a simple four colour pallet, a slider to set opacity and a <div> below that to show the selected colour. The large area to the right will be the painting surface.
From time to time, when working with HTML, one might wonder if there was any way of adding “custom” data to an HTML tag and retrieve (or set) that data from JavaScript. There were a number of “ad-hoc” workarounds tolerated, rather than supported, by browsers over the years but now we have a standard. We can add custom data to an HTML tag by preceding the attribute name with “data-“, as you will see.
Starting then, with an HTML file (index.html, in a new game folder) with the following content.
<!DOCTYPE html>
<html>
<head>
    <meta charset="utf-8" />
    <meta http-equiv="X-UA-Compatible">
    <title>Touch Support</title>
    <meta name="viewport" content="width=device-width, initial-scale=1">
    <link rel="stylesheet" type="text/css" media="screen"
                                           href="main.css" />
    <script src="paint.js"></script>
</head>
<body>
    <div id="dvMain">
        <div id="dvPall">
            <div id="dvRed" class="pCol" data-colour="ff0000"></div>
            <div id="dvGreen" class="pCol" data-colour="00ff00"></div>
            <div id="dvBlue" class="pCol" data-colour="0000ff"></div>
            <div id="dvBlack" class="pCol" data-colour="000000"></div>
            <label for="inpAlpha" id="lblA">Alpha 100%</label>
            <input type="range" min="0" max="100" value="100"
                                         name="inpAlpha" id="inpAlpha">
            <div id="dvSwatch" class="pCol">
                <canvas ID="cvSwatch"></canvas>
            </div>
        </div>
        <div id="dvCanv">
            <canvas id="cvMain"></canvas>
        </div>
    </div>
    <script src="main.js"></script>
</body>
</html>
The <div>s representing the colour pallet have a data-colour attribute that is set to a hexadecimal colour code. The <head> section references a CSS file and a JavaScript file (paint.js) with another (main.js) included at the bottom of the <body> section.
The only line in the main.css file (which is the next one to create) with anything really new is the first. The overall CSS for the HTML sets touch-action to “none”. This stops the browser window from attempting to scroll our page content when selected touch actions occur – everything is left to our JavaScript to interpret and action.
html {padding: 10px; margin: 5px; touch-action: none;}
div {border: black solid 1px;}
#dvMain {
    width: 490px;
    height: 400px;
    overflow: hidden;
    position: fixed;
}
#dvPall {
    width: 120px;
    height: 100%;
    text-align: center;
}
#dvCanv {
    width: 360px;
    height: 398px;
    position: fixed;
    top: 24px;
    left: 150px
}
.pCol {
    width: 40px;
    height: 40px;
    margin-top: 10px;
    margin-left: 40px;
    border: none;
}
#dvSwatch {border: black solid 1px;}
input {width: 100px;}
#dvRed {background-color: #ff0000;}
#dvGreen {background-color: #00ff00;}
#dvBlue {background-color: #0000ff;}
#dvBlack {background-color: black; margin-bottom: 20px;}
#cvMain {
    width: 100%;
    height: 100%;
    background-color: white;
}
#cvSwatch {width: 40px; height: 40px;}
You might wonder why touch-action is a CSS attribute when it feels like something to do with an “event”. I suppose the explanation is that it influences how interactive HTML elements are displayed and someone (probably a committee) had to make a choice. If you think back to the ”Minesweeper” game, we used the “hover” CSS attribute to change the image used for the menu icon but then again, in that same game, we suppressed the browser context menus with an HTML attribute for the <body>.
If you create empty JavaScript files called paint.js and main.js in the project folder then you should be able to use the VS Code Run Menu to check that the HTML is correctly rendered.
Starting at the top of the new paint.js file we next create an object to hold and manipulate colours. As we are going to create colour objects from a string containing a six-character hex code we can get the object constructor to do all the conversion work for us.
var Colour = function(val){
    this.red = parseInt(val.substring(0,2), 16);
    this.green = parseInt(val.substring(2,4), 16);
    this.blue = parseInt(val.substring(4), 16);
    this.alpha = 1;
};
The Colour object constructor takes each pair of hex codes in turn and uses the inbuilt parseInt() function to convert the string to an integer. As the colour is encoded in hexadecimal the function is passed the number base (16) as an argument. This would convert (say) “ff” to 255. The constructor also sets a default alpha (or opacity) value.
As the Colour object is created with a constructor, we use the prototype chain to add some methods. Staring with one to adjust the alpha value and then a toString() method to return a string representing the colour (and alpha value) stored in the object.
Colour.prototype.setAlpha = function(alpha){
    this.alpha = alpha;
};
Colour.prototype.toString = function() {
    let opacity = Math.round(this.alpha * 255);
    return this.red.toString(16).padStart(2, "0") +
            this.green.toString(16).padStart(2, "0") +
            this.blue.toString(16).padStart(2, "0") +
            opacity.toString(16).padStart(2, "0");
};
The Colour.toString() method uses the built in toString() function belonging to numbers together with an argument (16) to set the number base. The result is the opposite of the parseInt() we used in the constructor. As an integer value of (say) 14 would just result in a single character (“e”) we use the padStart() function to pad the string to 2 characters (if required) with a leading “0”. We came across the opacity value in the flappy bird project where we found it varied from 1 (opaque) to 0 (transparent). When opacity is added to a colour hex code string, the value is set in the range 0 to 255 just like the colour components.
The next object to add to the paint.js file is one that will make use of the Colour objects. The new Paint object contains three variables and four methods.
The setCallback() method allows us to set a function that will be called when the stored colour changes. The setAplha() method resets the alpha value for the current colour and the getColour() method does what it says and returns the current colour as a hex colour string. Those last two methods making use of methods previously created for the Colour object.
The addColour method is where the action is. It is passed the “id” of one of our HTML colour pallet <div>s. The line:
let data = dvPal.dataset.colour;
gets the data-colour value from the HTML <div> tag data attribute. Then the code has a choice. If the method is called twice (or more) times within a second then an attempt is made to blend the new colour with the current colour. We will need to add a Colour.blend() method shortly.
Note that when the colour or alpha setting changes then any pre-set call-back function is called and passed the current colour string.
var Paint = {
    lastSet: Date.now(),
    current: new Colour("ffffff"),
    callBack: null,
    addColour: function(pBoxId){
        let dvPal = document.getElementById(pBoxId);
        let data = dvPal.dataset.colour;
        if(Date.now() - this.lastSet > 1000){
            this.current = new Colour(data);
        } else {
            this.current.blend(data);
        }
        this.lastSet = Date.now();
        if(this.callBack){
            this.callBack(Paint.getColour());
        }
    },
    setAlpha: function(alpha){
        this.current.setAlpha(alpha);
        if(this.callBack){
            this.callBack(this.getColour());
        }
    },
    getColour: function() {
        return this.current.toString();
    },
    setCallback: function(func){
        this.callBack = func;
    }
};
Now add a Colour.blend() method to the file along with the other Colour methods and before the Paint object definition. The order is important as the code within the Paint object is analysed as the JavaScript file is loaded and the process needs to already know all about the Colour object.
Colour.prototype.blend = function(tint){
    let t = new Colour(tint);
    this.red = Math.min(this.red + t.red, 255);
    this.green = Math.min(this.green + t.green, 255);
    this.blue = Math.min(this.blue + t.blue, 255);
};
This blend() method is very simple (perhaps too simple) but works OK with the primary colour pallet we are currently experimenting with. There are some more options you might like to try out after we have got the first part of this project running.
We now turn our attention to that empty main.js file. The aim is to interact with the Paint object using the Pointer API. Start with setting up references to the <canvas> object in the swatch <div>.
var swatch = document.getElementById("cvSwatch");
var sCtx = swatch.getContext("2d");
swatch.width = swatch.height = 40;
Then we can follow that with a short function to draw a rectangle on that Canvas with a colour specified as a hex colour string. This is going to be the function that the Paint call-back passes any colour changes to, ready to be displayed.
function testColour(tint){
    sCtx.clearRect(0, 0, swatch.width, swatch.height);
    sCtx.beginPath();
    sCtx.rect(0,0, 40, 40);
    sCtx.fillStyle = "#" + tint;
    sCtx.fill();
    sCtx.closePath();
}
We can set the call-back to testColour() with the next line and then follow that with an event handler to pass changes to the Alpha value slider to the Paint object.
Paint.setCallback(testColour);
document.getElementById("inpAlpha").addEventListener("input", function(){
    Paint.setAlpha(this.value / 100);
    document.getElementById("lblA").innerHTML = "Alpha " +
                                                this.value + "%";
});
Now comes the first use of the Pointer API where we respond to a click or touch on the first three of our colour pallet <div>s by passing the <div> id to the Paint.addColour() method. Please remind yourself, in passing, that the keyword “this” inside these anonymous functions, acting as event handlers, points to the HTML element.
document.getElementById("dvRed").addEventListener("pointerdown",
                           function(e){Paint.addColour(this.id);});
document.getElementById("dvGreen").addEventListener("pointerdown",
                            function(e){Paint.addColour(this.id);});
document.getElementById("dvBlue").addEventListener("pointerdown",
                            function(e){Paint.addColour(this.id);});
Now for the first code test. If all is well, you should find you can mix red and green to get yellow or green and blue to get cyan. If you are quick, you can click (or touch) all three to get white. Have a play with the Alpha slider. There is a bug. Can you spot it?
The bug is that when the “current” colour is reset then the alpha setting is lost until the slider gets jiggled. The most elegant solution would be to add a setColour() method to the Colour object.
Colour.prototype.setColour = function(val){
    this.red = parseInt(val.substring(0,2), 16);
    this.green = parseInt(val.substring(2,4), 16);
    this.blue = parseInt(val.substring(4), 16);
};
You can copy and paste the code for that new method from the first three lines in the Colour constructor. If that feels a bit repetitive then why not go back and change the constructor to use this new setColour() method?
var Colour = function(val){
    this.setColour(val);
    this.alpha = 1;
};
Now we can make the small change to the Paint.addColour() method to also use the new method to re-set the current colour. Just the changed section shown next.
        if(Date.now() - this.lastSet > 1000){
            //this.current = new Colour(data);
            this.current.setColour(data);
        } else {
            this.current.blend(data);
Time to test the bug fix. Has that eliminated the problem?
As this is just about the end of the first stage of this project it is time to revisit or experiment with alternatives to the Colour.blend() method. The problem with the existing method is that if you (say) blend two colours that include a small red component then the blend will add them together and you will end up with a lot of red. Turns out “mixing” RGB colours is a bit of a “rabbit hole” as a trial Internet search will probably reveal.
Mixing coloured inks is better understood as that is just what colour printers do all the time. They use cyan, yellow and magenta inks to effect a full colour range although printers also include a black ink as, while the combination of the three primary colours should result in black, the final mix tends to be rather muddy looking.
Time for some “homework” if you are up for it. Try out some alternate ideas for RGB colour mixing. To get you started, I have two suggestions.
The first (blend2) takes the larger of each colour component from each of the colours to be blended. That, at least, stops a single colour over dominating the result but colours will tend to get “lighter” in shade. Can you work out how that function works?
My second offering (blend3) suggests taking a halfway point between each colour component.
You can test these and other ideas you develop by switching the .blend() method called by the Paint object.
Colour.prototype.blend2 = function(tint){
    let t = new Colour(tint);
    this.red = this.red | t.red;
    this.green = this.green | t.green;
    this.blue = this.blue | t.blue;
};
Colour.prototype.blend3 = function(tint) {
    let t = new Colour(tint);
    this.red = this.diff(this.red, t.red);
    this.green = this.diff(this.green, t.green);
    this.blue = this.diff(this.blue, t.blue);
};
Colour.prototype.diff = function(v1, v2) {
    return Math.min(v1, v2) + Math.round(Math.abs(v1 - v2) / 2);
};
The alternatives will be best demonstrated when offered some alternate colours to our “pure” red, green and blue. Why not create a new subfolder, copy the current HTML, CSS and two JavaScript files from this project into that folder and then start experimenting? In my trials I added another colour <div> to the pallet and reassigned the black <div> to some alternatives. [Don’t forget to set the data-colour values in the HTML and adjust the CSS.]
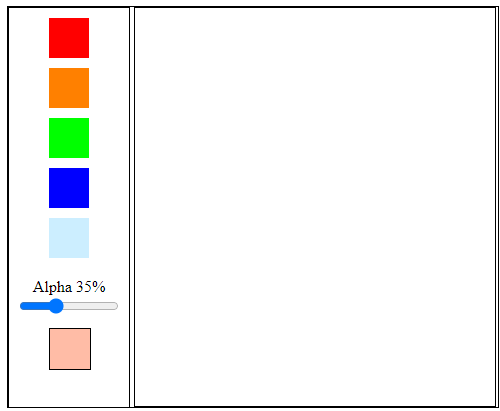
Colour mixing might be a side issue for our project but a little experimentation along the way builds on and re-enforces your programming skills.
Stage 2
Programmers will often look for opportunities to write re-usable code. We have an opportunity to add a JavaScript code module (object) to handle the Pointer API in a way that we might well be able to re-use in other projects.
Start this stage by creating a new JavaScript file called touch.js in the project folder. We will need to add a reference to that script file in the <head> section of the HTML file.
<head>
   <meta charset="utf-8" />
   <meta http-equiv="X-UA-Compatible">
   <title>Touch Support</title>
   <meta name="viewport" content="width=device-width, initial-scale=1">
   <link rel="stylesheet" type="text/css" media="screen" href="main.css" />
   <script src="touch.js"></script>
   <script src="paint.js"></script>
</head>
We can now start adding code to the touch.js file that will define an object called Touch with one public method and some private methods that are intended only to be used by the Touch object itself. The “private” methods have names that starts with an underscore as a signal that they should not be called by external code. This is a JavaScript convention.
The Touch object code starts as follows, but note there is no closing brace as yet and the partial code ends with a comma. There is more to come to complete the object definition.
var Touch = {
    elems: [],
    addTouch: function(elemId, options){
        let opts = this._setOptions(options);
        opts.elemId = elemId;
        let elem = document.getElementById(elemId);
        let me = this;
        // in the next lines "this" would refer to the HTML element and not
        // the Touch code module so use the variable "me"
        elem.addEventListener("pointerdown", function(e) {
                                                  me._start(e);}, true);
        elem.addEventListener("pointermove", function(e) {
                                                  me._move(e);}, true);
        elem.addEventListener("pointerup", function(e) {
                                                  me._end(e);}, false);
        this.elems.push(opts);
    },
The main part of that code section is a method called addTouch() which uses similar code to that used in the first stage to set event listeners for an HTML element referred by its HTML id. The key thing to note is that the Touch object wants to set its own private methods as the handlers for each event but the code can’t use “this” to identify them as “this” would refer to the HTML object and not the Touch object. The solution is to define a variable (in this case called me) that points to the Touch object version of “this”.
That sounds reasonable but you might wonder about the variable named me. That was created using the “let” keyword, so it should only have local scope. How is it usable within another method? The answer is that JavaScript creates what is known as a “closure” and traps (or wraps) the Touch method identity ready to be used by the anonymous functions when triggered.
The use of a variable to store an object’s “this” (read context) is a useful technique that is well worth mentally storing against those infrequent occasions when there is any sort of conflict.
The addTouch() method calls a private method, _setOptions(), so that one should be added next.
    _setOptions: function(options){
        let opts = {
            onDown: null,
            onMove: null,
            onUp: null,
            preventDefault: true
        };
        for (const opt in options){
            for(const def in opts) {
                if(opt === def){
                    opts[opt] = options[opt];
                    break;
                }
            }
        }
        return opts;
    },
The code expects to be passed an object that may or may not define call-back functions for the pointerdown, pointermove or pointerup events (but named onDown. onMove and onUp). The method starts by creating a new object with default values and then loops through any values passed in the options object to overwrite the defaults (which start as null for the call-back functions). The method returns the object containing the defaults modified by any values passed in the options object.
As our project currently makes use of pointerdown events to select and mix colours the next method will handle those. We can leave the _move() and _end() methods empty for the moment.
    _start: function(e){
        for(let s=0; s < this.elems.length; s++){
            if(this.elems[s].elemId === e.currentTarget.id) {
                let el = this.elems[s];
                if(el.preventDefault){
                    e.preventDefault();
                }
                if(el.onDown){
                    el.onDown(el.elemId);
                }
                break;
            }
        }
    },
    _move: function(e) {
    },
    _end: function(e) {
    }
};
The _start() method uses the currentTarget.id value in the event object to identify the object storing the options for any matching HTML element stored in the elems[] array. If a match is found and there is a defined onDown call-back function then that function is called. Just in case the function is “shared” between HTML elements then the relevant id is passed as an argument.
Note that last code block included the completing brace for the Touch object.
Touch.addTouch("dvRed", {onDown: Paint.addColour});
Touch.addTouch("dvGreen", {onDown: Paint.addColour});
Touch.addTouch("dvBlue", {onDown: Paint.addColour});
Touch.addTouch("dvBlack", {onDown: Paint.addColour});
With those replacements made in main.js we are ready to test again. Give it a go. Click on the colours and what do you see?
Well, probably not a lot. Even if your Touch object code is working there will still be an execution error. If you look back at VS Code you will see the following error message at the bottom on the window.

Going back to the Chrome window and hitting the
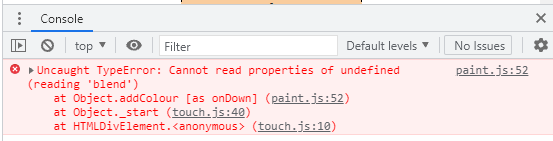
Looks like the Touch object worked fine but there is an issue in the previously tested and working code in the Paint object.
A check on the sources tab and the paint.js code in developer tools will see one line highlighting the error. How can the blend() method of Colour be undefined?
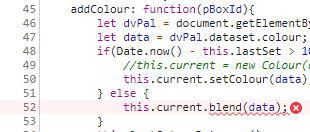
Setting a breakpoint in addColour(), refreshing Chrome and clicking on a colour <div> allows us to inspect the value of “this” back in VS Code.
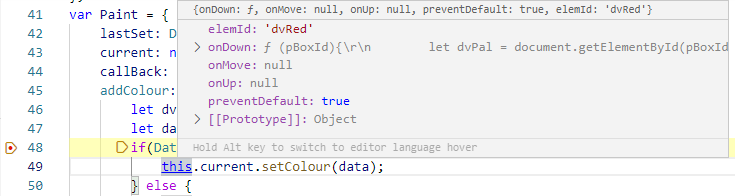
It looks like “this” refers back to one of the entries in the Touch object elems[] array.
I am prepared to state that there is not a programmer on earth working with a programming language that includes the “this” keyword who has not eventually run into an issue such as this. Fortunately, we are working in JavaScript and with Chrome and VS Code so we can identify the issue pretty quickly.
The solution is to change the references to “this” in Paint.addColour() to the object name. So, the code needs to be edited as shown next.
    addColour: function(pBoxId){
        // Note use of Paint and not "this" as
        // "this" has the context of the Touch.elems[] item
            let dvPal = document.getElementById(pBoxId);
            let data = dvPal.dataset.colour;
            if(Date.now() - Paint.lastSet > 1000){
                Paint.current.setColour(data);
            } else {
                Paint.current.blend2(data);
            }
        Paint.lastSet = Date.now();
        if(Paint.callBack){
            Paint.callBack(Paint.getColour());
        }
    },
Time to re-run that test and, hopefully, all will now be well. The colour options now include black although, in RGB colour terms, black is an absence of colour.
Now we have Touch at least partly implemented it is time to move on to the next stage and start making use of the colours to actually paint.
Stage 3
Even a minimalist painting program should probably have a tool to set the brush size.

The HTML will need three additions, the CSS a tweak and then some more JavaScript.
To get all of the HTML additions finished in one go, please create a new, empty JavaScript file called picture.js in the project folder and then add a reference to it in the HTML <head> section.
<script src="picture.js"></script>
Then add new label and slider controls below the existing <dvSwatch> but still within <dvPall>
 <label for="inpBrush" id="lblB">Brush 8px</label>
 <input type="range" min="1" max="15" value="8" name="inpBrush"
        id="inpBrush">
The #dvSwatch CSS needs a small addition in main.css to help lay things out neatly.
#dvSwatch {
    border: black solid 1px;
    margin-bottom: 20px;
}
To support the actual painting process on the cvMain <canvas> we can create a new (and slightly different) object in the new picture.js file. We only need a single instance of this new object but we will want it to run some code after the HTML has been rendered and before it is used. We can give it an init() method that we can call from the main.js code.
That init() method will link to the <canvas> where the painting will be done but will need to know just where a mouse or touch event occurs on that painting surface. The pointer API event object provides a wealth of data (see appendix 6) including several ways of defining the event position. You might like to experiment with the alternatives but I have found using event.clientX and event.clientY (taking into account the position of the <canvas>) to be bomb proof. This is very similar to how we positioned the “paddle” using a mouse in the Breakout game project.
The Picture object therefore start like:
var Picture = {
    canvas: null,
    ctx: null,
    xPos: 0,
    yPos: 0,
    brush: 8,
    init: function() {
        this.canvas = document.getElementById("cvMain");
        this.ctx = this.canvas.getContext("2d");
        let dv = document.getElementById("dvCanv");
        let rect = dv.getBoundingClientRect(); // where the div is
        this.xPos = rect.left;
        this.yPos = rect.top;
        this.canvas.width = dv.clientWidth;
        this.canvas.height = dv.clientHeight;
    },
We can then add a handler for the start of a touch:
touchStart: function(id, data){
    let col = Paint.getColour();
    Picture.ctx.beginPath();
    Picture.ctx.arc(data.x - Picture.xPos, data.y - Picture.yPos,
                    Picture.brush / 2, 0, Math.PI * 2, false);
    Picture.ctx.fillStyle = "#" + col;
    Picture.ctx.fill();
    Picture.ctx.closePath();
},
Note that we have learned from our experience with the Paint object methods called by our Touch object and used the Picture object name in place of “this”.
That is then followed by a method to handle the movement of a touch and a final method to set the notional brush size:
touchMove: function(id, data){
    let col = Paint.getColour();
    Picture.ctx.beginPath();
    Picture.ctx.arc(data.x - Picture.xPos, data.y - Picture.yPos,
                    Picture.brush, 0, Math.PI * 2, false);
    Picture.ctx.fillStyle = "#" + col;
    Picture.ctx.fill();
    Picture.ctx.closePath();
},
setBrush: function(val) {
    this.brush = val;
}
};
That final closing brace completes the Picture object.
The Touch object now needs a little code added to the empty (private) _move() method to activate the Picture.touchMove() method for pointer events on the Picture <canvas>.
_move: function(e) {
    for(let s=0; s < this.elems.length; s++){
        if(this.elems[s].elemId === e.currentTarget.id) {
            let el = this.elems[s];
            if(el.preventDefault){
                e.preventDefault();
            }
            if(el.onMove){
                let dta = {
                    x: e.clientX,
                    y: e.clientY,
                };
                el.onMove(el.elemId, dta);
            }
            break;
        }
    }
},
To give this a first run, all we now need to do is add some lines to main.js. we need to provide support for the new brush size slider, make a call to Picture.init() and add the painting <canvas> to the Touch object with suitable call-backs (again) to Picture. The new lines can go more or less anywhere in that file.
Picture.init();
document.getElementById("inpBrush").addEventListener("input",
    function(){
        Picture.setBrush(this.value);
        document.getElementById("lblB").innerHTML =
                                "Brush " + this.value + "px";
});
Touch.addTouch("cvMain", {onDown: Picture.touchStart,
                                  onMove: Picture.touchMove});
A quick test run will probably reveal two snags. The first is that the brush appears to skip when in movement and (if you test with a mouse) painting occurs when a mouse cursor travels over the <canvas> surface even without a preceding “pointerdown” event. In a true touch situation, you can’t get a touch move event without a touch down. However, the Pointer API supports general mouse movements over a given surface which, in another context, might be just what you need but represents a bug for us here.

We are going to have to add some code to ensure that our Picture object only gets movement events that follow a “pointerdown” and precede a “pointerup”. We also need to paint the intermediate steps tracking a pointer over our painting surface. One thing though, we know we are getting close to a working program.
The Touch object can be extended to store some additional data in response to a touch or subsequent touch movement. Please edit the start of Touch.addTouch() method to add three more values to the opts object.
    addTouch: function(elemId, options){
        let opts = this._setOptions(options);
        opts.elemId = elemId;
        opts.touchDown = false; // add some more non-optional values
        opts.lastX = 0;
        opts.lastY = 0;
We can then edit the Touch._start() method to make use of those additional values.
    _start: function(e){
        for(let s=0; s < this.elems.length; s++){
            if(this.elems[s].elemId === e.currentTarget.id) {
                let el = this.elems[s];
                if(el.preventDefault){
                    e.preventDefault();
                }
                let dta = {
                    x: e.clientX,
                    y: e.clientY
                };
                el.touchDown = true;
                el.lastX = e.clientX;
                el.lastY = e.clientY;
                if(el.onDown){
                    el.onDown(el.elemId, dta);
                }
                break;
            }
        }
    },
If _start() is setting .touchDown to true then we need some code in _end() to reset to false.
    _end: function(e) {
        for(let s=0; s < this.elems.length; s++){
            if(this.elems[s].elemId === e.currentTarget.id) {
                this.elems[s].touchDown = false;
            }
        }
    }
Then _move() needs to test for .touchDown and then send the last event position along with the new one – plus store the changes.
                if(el.onMove && el.touchDown){
                    let dta = {
                        x: e.clientX,
                        y: e.clientY,
                        lastX: el.lastX,
                        lastY: el.lastY
                    };
                    el.lastX = dta.x;
                    el.lastY = dta.y;
                    el.onMove(el.elemId, dta);
Now additional data is being passed to Picture.touchMove we can edit that function to draw a sequence of circles from the last drawn x/y location to the new one; which should give a reasonably smooth painted line.
touchMove: function(id, data){
    let col = Paint.getColour();
    let dx = data.x - data.lastX;
    let dy = data.y - data.lastY;
    let steps = Math.max(Math.abs(dy), Math.abs(dx));
    for(let p = 0; p < steps; p++){
        Picture.ctx.beginPath();
        data.lastX += dx / steps;
        data.lastY += dy /steps;
        Picture.ctx.arc(data.lastX - Picture.xPos, data.lastY -
                 Picture.yPos, Picture.brush / 2, 0, Math.PI * 2, false);
        Picture.ctx.fillStyle = "#" + col;
        Picture.ctx.fill();
        Picture.ctx.closePath();
        }
    }
The code calculates the maximum number of steps (x or y) between the last position and the new one and then draws a circle at each step.
A new test with a mouse should now show that our project will only paint when a mouse button is “down” and that our painted lines are much improved.
Readers with a touch sensitive screen however will notice some issues when they use more than one finger to paint on the <canvas> surface. It looks like we will need to differentiate between individual touches when sending data to the Picture object.
Don’t worry if you do not have a touch sensitive screen, the changes are short and the chapter ends with a JavaScript class – so worth continuing for everyone, I trust.
Stage 4
All the changes that need to be made are in the Touch object and are based upon the fact that the Pointer event object contains a value for a pointerId and this will be unique for all of the pointers in play. We can use that id to store location data and pointer state (touchDown) for any pointers that Touch gets to know about.
Once again, we change the start of the Touch.addTouch() method – but this time we replace the individual values for pointer state and last position with an array to hold that same data for each pointer. The start is now shorter:
    addTouch: function(elemId, options){
        let opts = this._setOptions(options);
        opts.elemId = elemId;
        opts.touches = [];
        let elem = document.getElementById(elemId);
The Touch._start() method needs to create an object with the same data we recorder before and then store that in the new touches[] array. So, edit the core of that method as shown.
    if(el.onDown){
        let dta = {
            x: e.clientX,
            y: e.clientY
        };
        let touch = {
            touchDown: true,
            lastX: e.clientX,
            lastY: e.clientY
        };
        el.touches[e.pointerId] = touch;
        el.onDown(el.elemId, dta);
    }
The Touch._move() method now needs to check for an entry in the touches[] array before checking the value of touchdown and then send the same data as before to the Picture method that does the painting.
    if(el.onMove && el.touches[e.pointerId] &&
            el.touches[e.pointerId].touchDown){
        let dta = {
            x: e.clientX,
            y: e.clientY,
            lastX: el.touches[e.pointerId].lastX,
            lastY: el.touches[e.pointerId].lastY,
        };
        el.touches[e.pointerId].lastX = dta.x;
        el.touches[e.pointerId].lastY = dta.y;
        el.onMove(el.elemId, dta);
    }
That “if” statement is longer than you might at first expect because it has to allow for the possibility that there is not an entry in the touches[] array for the current pointer id. Can’t check what is not defined.
Finally, the Touch._end() method needs to reset the touchdown value for each individual pointer as that event occurs.
_end: function(e) {
    for(let s=0; s < this.elems.length; s++){
        if(this.elems[s].elemId === e.currentTarget.id) {
            this.elems[s].touches[e.pointerId].touchDown = false;
        }
    }
}
Time for a re-test. Readers with touch sensitive screens should now see individual painted tracks for each touch in contact with the painting surface. Everyone else should see that the mouse or trackpad still works as it did before.
Finally
This project has included a number of code objects with some distinct differences. Each designed for a specific purpose and (to be honest) to highlight some potential but relatively uncommon issues with “this”.
Finally, I thought it might be nice to take a first look at just one more object type – the JavaScript “class”. Don’t worry, this just takes a few clicks as VS Code is going to do all of the work. I was a bit dismissive of the JavaScript class when it was previously mentioned, describing it as syntactic sugar covering the normal JavaScript object. While that is true, everyone likes a little sugar now and again.
Switch to the paint.js code tab and scroll to the top where the Colour object is defined and extended. Notice the three dots under the C of Colour where the constructor is defined? If you hover your mouse cursor over those three dots then VS Code will display an information pop-up.
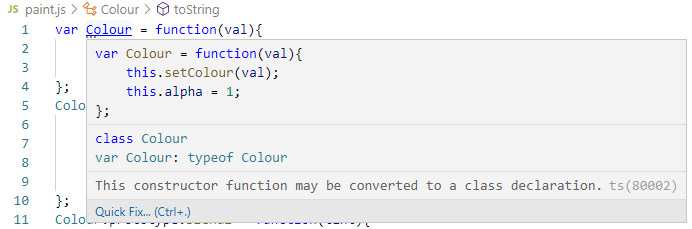
That pop-up information box suggests that the colour constructor could be converted to a class declaration. Click on the words “Quick Fix” at the bottom left and a very small dialogue will flash up.

Click on that, and VS Code will convert the Colour object constructor to a class that also incorporates all of the methods attached via the prototype chain. It is worth doing, as the class entity combines all of the Colour object code in a nice neat object and it is all automatic.
A test run will reassure you that no changes are required to your code anywhere else as a result of switching the Colour object to a Class type. The Colour class is just another way of constructing the same code.
The event object
You should find a list of the key data exposed by the Pointer API event object in appendix 6. Some of the event attributes we have not explored here might allow you to extend the capability of the Touch object, from this project, into new areas.
Online Extra: Colour Mixing
A clever team have tackled the thorny issue of managing colour mixing and produced a multi-platform solution called Mixbox. This excellent software is free for non-commercial use so, if you are inclined, you can try it out with our rather basic touch painting project.
Code downloads for this chapter are available here.