Chapter 13: Voxel Terrain Rendering
There is a great software technique for generating a three-dimensional landscape which shares many similarities to the Ray Casting approach to a three-dimensional game, we have already explored. I was pleased to come across a very nice web page with a demonstration program simulating helicopter flight over a realistic terrain written by Sebastian Macke. The following project was influenced by his code and borrowed many of the numeric values he used which was a great start point. I hope this is seen as encouragement to look at what others have published online as reading different programmer’s code is a great way to extend the scope of your knowledge. Keep asking why. Why use that specific expression or why use that language feature?
Getting you flying requires surprisingly little code. This project though, extends the basics to include some interesting flight instruments. Behind all of that, this chapter deals with some new JavaScript array types and demonstrates a varied range of graphical techniques for those flight instruments. Above all, it is a fun project.
The fundamental idea is that you start with a coloured terrain map such as this:
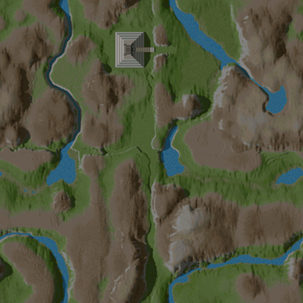
This is matched by a file that holds a height for each pixel in the terrain map. The demonstration map we will be using is 1024 pixels square which means that we would need 1,048,576 height values. That is not a list that anyone would contemplate typing in so someone had the cunning idea of encoding the heights (they range from 0 to 255) as a monochrome bitmap that could then be compressed using the .png format. This was a great idea because web browsers are very happy to load image files and we can easily write code to store and access the height values once the image file has been loaded.
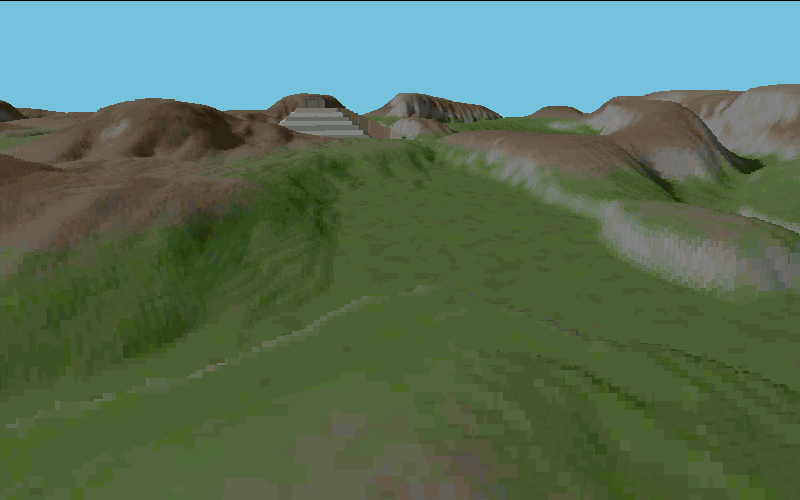
The Voxel technique is applied by drawing a vertical line with the colour taken from each pixel “in view” from the terrain map and with a height taken from the height data (scaled to fit the projection view).
The process starts by determining the notional triangular section of the terrain map selected based upon the viewers angle and the Field Of View (FOV) in a very similar way to that used in deciding upon wall sections for our first person shooter style project. Taking each row of pixels in the FOV from back to front, in turn, the colour can be selected from the terrain map and a vertical line drawn to represent the scaled height. That’s the concept.
This, of course, is a lot of JavaScript drawing each time the view needs refreshing. We can counter that workload by working some integer magic and by turning the algorithm on its head and working front to back. We can do that, if we hold a value for the highest line drawn at each pixel column across our view and then only draw subsequent lines working backwards if they are taller and, even then, only drawing the section that is taller. The result should be the same visually but we do less drawing and drawing is a bit slow.
To help with timing the image changes in the game viewer we will in fact be “drawing” the selected coloured vertical lines into a buffer with the visible <canvas> object being updated from the buffer.
To start the project, create a new game folder with an images subfolder and download the image files from the book website. Then start the project proper with a short HTML file – definitely call it index.html. Running this project requires the use of a web server to avoid security issues thrown up by browsers as they do not take kindly to our taking liberties with image files.
<!DOCTYPE html>
<html>
<head>
   <meta charset="utf-8" />
   <meta http-equiv="X-UA-Compatible">
   <title>Voxel Adventure</title>
   <meta name="viewport" content="width=device-width, initial-scale=1">
   <link rel="stylesheet" type="text/css" media="screen" href="main.css" />
   <script src="viewer.js"></script>
</head>
<body>
    <div id="dvViewer">
        <canvas id="cvView"></canvas>
    </div>
    <div id="dvControls">
    </div>
    <script src="main.js"></script>
</body>
</html>
This can be matched with a CSS file named main.css.
html { padding: 0; margin: 0; border: 0;}
#dvViewer {
    width: 800px;
    height: 500px;
    top: 20px;
    left: 0;
    border : 1px solid black;
}
#dvControls {
    position: relative;
    width: 100%;
}
canvas {
    position: absolute;
}
Probably a good idea to create an empty main.js JavaScript file and then a viewer.js file into which we can start adding some objects.
There are three main components. One looks after rendering the view on the <canvas> element, another looks after the game viewpoint and the third contains the images used to render the game view.
The first (called Viewer) starts:
var Viewer = {
    projectionWidth: 800,
    projectionHeight: 500,
    fov: 90 * Math.PI / 180,
    canvas: null,
    ctx: null,
    imageData: [],
    buffArray: [],
    buff8: [],
    buff32: [],
    cameraDistance: 0,
    mapWidth: 0,
    mapHeight: 0,
    hidden: null
 };
We will dig into the nature of those arrays when we come to feed them some data. Next up, is an object supporting the map images with another couple of interesting arrays.
var ImgMap = {
    width: 1024,
    height: 1024,
    colour: new Uint32Array(1024*1024), // array of 32 bit colour values
    altitude: new Uint8Array(1024*1024) // array of height values 0 to 255
};
A Uint32Array type is a special JavaScript array type that holds unsigned 32 bit numbers which is handy for storing pixel colour values as they are constructed (if you recall from the Flappy Bird project) from four 8 bit byte values. The Uint8Array type holds unsigned 8 bit integers which can range from 0 to 255 which is handy for our terrain height data.
We next have a camera object to hold values that identify the position and view angle from which the visual projection is calculated.
var Camera = {
    x:        512, // x position on the map
    y:        800, // y position on the map
    height:    78, // height of the camera
    angle:      0, // direction of the camera
    horizon:  100 // horizon position (look up and down)
};
We can then turn to the main.js file and start with an initialise() function and a call to that function at the end of the JavaScript file.
function initialise() {
    window.addEventListener("keydown", function(e){keyDown(e);});
    window.addEventListener("keyup", function(e){keyUp(e);});
    Viewer.init("cvView");
    ImgMap.load(["images/C1W.png", "images/D1.png"]);
}
initialise();
The initialise() function calls two object methods and sets up some familiar keyboard event handlers. We can explore all four functions in turn. First up, we have the Viewer.init() method which sets up those arrays in the viewer object. We can add that to the viewer.js file to keep things tidy.
The first four lines should need no introduction as they simply set up and size the viewer canvas object along with its context variable.
Viewer.init = function(canvId){
    this.canvas = document.getElementById(canvId);
    this.ctx = this.canvas.getContext("2d");
    this.canvas.width = this.projectionWidth;
    this.canvas.height = this.projectionHeight;
    this.imageData = this.ctx.createImageData(this.projectionWidth,
                                              this.projectionHeight);
    this.buffArray = new ArrayBuffer(this.projectionWidth *
                                     this.projectionHeight * 4);
    this.buff8 = new Uint8Array(this.buffArray);
    this.buff32 = new Uint32Array(this.buffArray);
    this.cameraDistance = Math.floor((this.projectionWidth / 2) /
                                      Math.tan(this.fov / 2)) * 2;
    this.mapWidth = ImgMap.width - 1;
    this.mapHeight = ImgMap.height - 1;
    this.hidden = new Int16Array(this.projectionWidth);
 };
The fifth line of that function uses a new (for us) canvas drawing method to create an image data object sized to fit the viewer canvas. We met image data objects in the Flappy Bird project. For the moment, that object is empty of data. We then define something that is very new, an ArrayBuffer initialised to hold four times the number of bytes as there are pixels on the viewer canvas.
An ArrayBuffer object is used to represent raw binary data. It is initialised to a number of bytes. We cannot access the data in this array directly but we can connect it to one or more array of types that can be used to access the data. Linking the ArrayBuffer to multiple arrays of different types allows us to access the same raw data with each linked array being able to treat the underlying data as a different data type.
Treating a common block of data bytes as multiple data types is something that is reasonably straightforward when programming using a language such as C. The specialist array types we are using for this project allow us to do something similar using JavaScript.
The ArrayBuffer is then used to initialise two typed arrays. The buff8 array will see the buffArray data as unsigned 8 bit integers while buff32 array will see the same data as unsigned 32 bit integers. These two array objects are linked to the ArrayBuffer data and hold no values of their own.
The method then sets a cameraDistance value based upon the projection width and field of view (just like the First Person Shooter project). That is followed by a couple of variables that are used later and then the creation of an array to hold the “highest” drawn pixel for every column in the projection so we can skip drawing pixels that are hidden behind previously drawn ones.
Next the keydown() handler which uses keyboard keys to set flight control data that is stored in an object called flight which acts as a buffer between the keyboard events and the view rendering process that in turn responds to those flight control adjustments. Better start with that flight object. This could go in either JavaScript file but I plumped for main.js where the keyboard event handlers will be placed.
var flight = {
    rotate: 0,
    climb: 0,
    forward: 0,
    pitch: 0
};
Now that keyDown() function. Please note that the values stored in the flight object are arbitrary and it is quite likely that you will want to change them after testing.
function keyDown(e) {
    switch(e.keyCode){
        case 37: // left arrow
            flight.rotate = 1;
            break;
        case 39: // right arrow
            flight.rotate = -1;
            break;
        case 38: // up
            flight.forward = 3;
            break;
        case 40: //down
            flight.forward = -3;
            break;
        case 82: // (r)ise
            flight.climb = 2;
            break;
        case 70: // (f)all
            flight.climb = -2;
            break;
        case 69: // e pitch up
            flight.pitch = 1;
            break;
        case 81: // q pitch down
            flight.pitch = -1;
            break;
    }
}
As you will expect by now, there is a matching (but shorter) keyup handler.
function keyUp(e) {
    switch(e.keyCode){
        case 37:
        case 39:
            flight.rotate = 0;
            break;
        case 38:
        case 40:
            flight.forward = 0;
            break;
        case 70:
        case 82:
            flight.climb = 0;
            break;
        case 69:
        case 81:
            flight.pitch = 0;
            break;
    }
}
The second object method called by the initialise() function is called ImgMap.load(). This function is going to manage the loading of the two map image files and convert the data so that it can be stored in the unsigned integer arrays that form part of the map object we have already created. There is a challenging problem here that we have (partly) met before. We can connect an image object to an image file but it is not instantly loaded. We have dealt with this in previous projects where having an image loaded before trying to use it was critical by creating a handler for the “onload” event. Here though, we want to run some code after both images have loaded and that makes that processing tricky to time.
Some languages and runtime environments are able to take advantage of multiple “threads”. In such an environment we could push each task onto its own thread and expect to receive a signal of some sort when those tasks were completed. JavaScript runs in a single thread. We will therefore have to use a reasonably recent addition to JavaScript that allows us to define a function that runs asynchronously and which can pause and wait for another function to complete.
To explain the whole process, we need to start with the function that gets called by ImgMap.load().
ImgMap.loadImages = function(imgList){
    return new Promise(function(resolve, reject){
        let ret = [];
        let count = imgList.length;
        for(let i = 0; i < imgList.length; i++){
            let img = new Image();
            img.onload = function() {
                let canvas = document.createElement("canvas");
                let ctx = canvas.getContext("2d");
                canvas.width = this.width;
                canvas.height = this.height;
                ctx.drawImage(img, 0, 0, this.width, this.height);
                ret[i] = ctx.getImageData(0, 0, this.width,
                                          this.height).data;
                count--;
                if(count === 0){resolve(ret);}
            };
            img.src = imgList[i];
        }
    });
};
The first line in that method returns a newly created Promise object. A Promise object represents the completion or failure of an asynchronous process passing a successful result (resolve) or an error message (reject). The full range of asynchronous processing is outside the scope of this book so we will concentrate on just the basics here and the content of this particular Promise object’s function.
The function creates an image object for each of the images files named in the imgList array passed as an argument to loadImages(). The function adds an onload event handler to each image before setting the .src value. The anonymous onload function creates a new canvas object, connects a context object to that and then sizes it using the ImgMap object dimensions. The loaded image is then drawn on the canvas and then the image data object is extracted and added to the ret[] array. A count value is decremented and when that reaches zero (after both images have been loaded and their image data extracted) then the function returns the ret[] array.
Now the function that called that process wrapped up in a Promise object.
ImgMap.load = async function(imgList){
    let result = await this.loadImages(imgList);
    let colourData = result[0], heightData = result[1];
    let sqr = this.width * this.height;
    for(let i = 0; i < sqr; i++){
        // we want all 4 components in the colour array RGBA
        this.colour[i] = 0xff000000 | (colourData[(i<<2) + 2] << 16) |
                    (colourData[(i<<2) + 1] << 8) | colourData[(i<<2)];
        this.altitude[i] = heightData[i<<2];
    }
    reDraw(); // start things running
};
The load() method is marked with the “async” keyword. The first line calls the loadImages() function passing the two element string array containing the map image file names. That function call uses the “await” keyword and that is just what happens. The function waits until the Promise returns the two element array of image data objects. Once the objects are available, they are processed.
What are those << chevron operators?
The << operator is a left shift operator and it is one of the JavaScript bitwise operators. We have already met the bitwise and (&), or (|) and xor (^). When bitwise operators are applied to a number then JavaScript converts the number to a 32 bit integer (discarding any fractional part) before applying the operator.
The expression “x << y” would shift the binary bits in the value x left y places filling in the empty slots on the right with zeros. The expression “x << 1” would effectively multiply the integer part of a number stored in x by 2.
There is also a sign retaining right shift >> operator and a zero fill right shift >>>.
| Operator | |
| x >> y | Shifts the bits in the 32 bit integer y bits right discarding those shifted off but retaining the sign bit (which is the leftmost and most significant bit) |
| x >>> y | Shifts the bits in the 32 bit integer y bits right (including the sign bit) discarding those shifted and adding zero bits onto the left hand end. |
| ~ x | To complete the set, there is also a bitwise NOT operator which inverts all of the bits in the 32 bit integer x. 1 becomes 0 and 0 becomes 1. |
The ImgMap.colour array is an array of unsigned 32 bit integers. We need to convert the individual values in the four element image data array representing each image pixel into just such an integer. We start by defining a 32 bit integer using a hexadecimal numeric literal. That sets the highest 8 bits in the integer which represents the Alpha (or opacity) value to 255. That might seem strange as we know that the Alpha value would be the fourth element in the image data array for any given pixel but integers are laid out in memory starting with the lowest value bit at the lowest memory address. This is the reverse of the way we humans naturally write numbers down where we start with the most significant figure and end with the least.
We next use the bitwise OR operator to add the Blue, Green and Red 8 bit values to the integer after shifting them left the appropriate number of places to get them into the correct slots in the integer bit sequence.
The ImgMap.altitude data is much easier to manage as it is coming from an 8 bit source.
The final line of the asynchronous function calls a reDraw() function to start the rendering process. We had better add that in main.js and ten run through that process.
function reDraw(){
    Camera.setAngle();
    Viewer.renderView();
    window.requestAnimationFrame(reDraw);
}
Starting with the last line. The window.requestAnimationFrame() method tells the browser that we want to perform an animation and we would like to do that before the browser next repaints the browser window. In our case, we will be building a revised view in a buffer and then resetting all of the pixels on our view canvas in one go. We certainly don’t want to have the normal window screen refresh occur when we are part way through that. We can also use the method as an effective timer as it will continually call the reDraw() method as soon as the browser is ready for an update.
Now the two methods called by the reDraw() function. That starts with Camera.setAngle() which updates the camera object values based upon any values stored in the flight object in response to user keystrokes.
Camera.setAngle = function() {
    this.angle += flight.rotate * 0.1;
    this.x -= flight.forward * Math.sin(this.angle);
    this.y -= flight.forward * Math.cos(this.angle);
    this.height += flight.climb;
    this.horizon += flight.pitch;
    let offset = ((Math.floor(this.y) & (ImgMap.width-1)) << 10) +
                         (Math.floor(this.x) & (ImgMap.height-1))|0;
    if ((ImgMap.altitude[offset]+10) > this.height) {
        this.height = ImgMap.altitude[offset] + 10; // dont crash
    }
};
The camera angle, height and horizon values are set more or less directly from any values currently stored in the flight object. The camera x and y coordinates are adjusted using the same basic trigonometry as we used extensively in the Ray casting project. The function concludes by calculating the position in the ImgMap.altitude array that represents the current camera x/y coordinates. The height is then checked and if the camera height is not greater than the terrain height then the camera height is adjusted upwards, plus a bit. This avoids crashing into the terrain and would be a great help to all student pilots. [Bit shifting left << 10 effectively multiplies an integer value by 1024 (2 to the power of 10).]
All of the “magic” is to be found in the Viewer.renderView() method and that is going to take a bit of explanation. It would probably help if we can add a few helper methods first as then we can work through the meat of the thing without being diverted.
Start by adding a Viewer.drawBackgroung() method
 Viewer.drawBackground = function(){
    let c = 0xffddc275; //ABGR as byte order reverse of RGBA colour order
    for(let i = 0; i < this.buff32.length; i++){
        this.buff32[i] = c;
    }
 };
This is a good start point as it underlines that all of our “drawing” is managed by setting the bytes in the buff32[] array. For a background we are just using a nice blue colour but with the bytes reversed to match the way they are stored in a 32 bit integer.
Most of our drawing will involve setting the bytes representing a vertical column of pixels to a colour drawn from the ImgMap.colour array. So next is drawVerticalStrip().
Viewer.drawVerticalStrip = function(x, yTop, yBottom, colour){
  let offset = ((yTop * Viewer.projectionWidth) + x); //first pixel to draw
  for (let i = yTop; i < yBottom; i++){
       Viewer.buff32[offset] = colour;
       offset += Viewer.projectionWidth; // position of next vertical pixel
  }
};
That method calculates the position of the first pixel to be set in the buff32 array, sets the value to the colour argument and then jumps forward through the array to the next vertical pixel position. For performance reasons, only those pixels that will be visible get set to the relevant colour.
When all of the vertical strips representing the view projection have been drawn the <canvas> element has all of its pixels set from the prepared imageData object.
Viewer.updateView = function(){
    this.imageData.data.set(this.buff8);
    this.ctx.putImageData(this.imageData, 0, 0);
};
The big one is next but first we should probably work out just what it should be doing. We only have a “map” that is 1024 pixels square but we don’t want our flying experience to be constrained to that. If you look carefully at the coloured image then you will see that, just like the wall images we used in the First Person Shooter game project, it can be “joined” to itself seamlessly. This means that if our forward view is running out of map pixels it can start using those from the opposite edge.

The view that we want to project, is a triangle of pixels from the camera position (also the notional pilot’s eye position) forward to the horizon. The hight that we will draw any coloured column to represent a pixel on the map will be influenced by the notional camera height. So, once again, we are off into a world of trigonometry to help us calculate which pixels we can see for each horizontal “scan” of the triangular view in front of the camera position.
Viewer.renderView = function(){
    this.drawBackground();
    let sina = Math.sin(Camera.angle);
    let cosa = Math.cos(Camera.angle);
    for (let i = 0; i < this.hidden.length; i++){
        this.hidden[i] = this.projectionHeight;
    }
    let deltaZ = 1;
    for(let z = 1; z < this.cameraDistance; z += deltaZ){
        let leftX = -cosa * z - sina * z;
        let rightX = cosa * z - sina * z;
        let leftY = sina * z - cosa * z;
        let rightY = -sina * z - cosa * z;
        let dx = (rightX - leftX) / this.projectionWidth;
        let dy = (rightY - leftY) / this.projectionWidth;
        leftX += Camera.x;
        leftY += Camera.y;
        let invZ = 1 / z * 240; // decreases as z increases
        for(let i = 0; i < this.projectionWidth; i++){
            let offset = Math.floor((Math.floor(leftY) & this.mapWidth) <<
                                10) + (Math.floor(leftX) & this.mapHeight);
            let drawHeight = Math.floor((Camera.height -
                         ImgMap.altitude[offset]) * invZ + Camera.horizon);
            if(drawHeight < 0){drawHeight = 0;}// terrain above viewer top
            if(drawHeight <= this.hidden[i]){
                this.drawVerticalStrip(i, drawHeight, this.hidden[i],
                                                    ImgMap.colour[offset]);
                this.hidden[i] = drawHeight;
            } // else hidden so not drawn
            leftX += dx;
            leftY += dy;
        }
        deltaZ += 0.005;
    }
    this.updateView();
};
That’s the code finished. Time to get flying, but to do that (and debug any typos) we are going to have to run this code from a web server. To find out why, you could use our regular approach which is to use the Run menu and select to run the index.html file in the Chrome browser. If you do that then very little will show up on the browser window.
VS Code will report “Uncaught DOM Exception: Failed to execute 'getImageData' on 'CanvasRenderingContext2D': The canvas has been tainted by cross-origin data.” And you see the same message if you use the Chrome Developer tools and check the Console tab.
The browser is protecting you from a potential security risk so we need to reassure the browser that the images in question have suitable “bona fides”.
The following assumes that you have node.js installed. If not then you might like to try looking around for a simple server – one that was available at the time of writing was “200 OK Chrome Web Server” and you will find instructions on using that Chrome app available on the book website.
For the node enabled. First create a new file in the project folder named package.json with the following content:
{
    "name": "voxel",
    "version": "1.0.0",
    "description": "demo project.",
    "scripts": {
      "lite": "lite-server --port 10001",
      "start": "npm run lite"
    },
    "author": "",
    "license": "ISC",
    "devDependencies": {
      "lite-server": "^1.3.1"
    }
 }
That json file says that we will be using the “lite” server and that a “start” command will run the program. We now need to install the server. Click the Terminal tab at the bottom of the VS Code window and then enter the following command:
npm install
Once the installation is complete you can start the server which will automatically load Chrome with the index.html page. The command is:
npm start
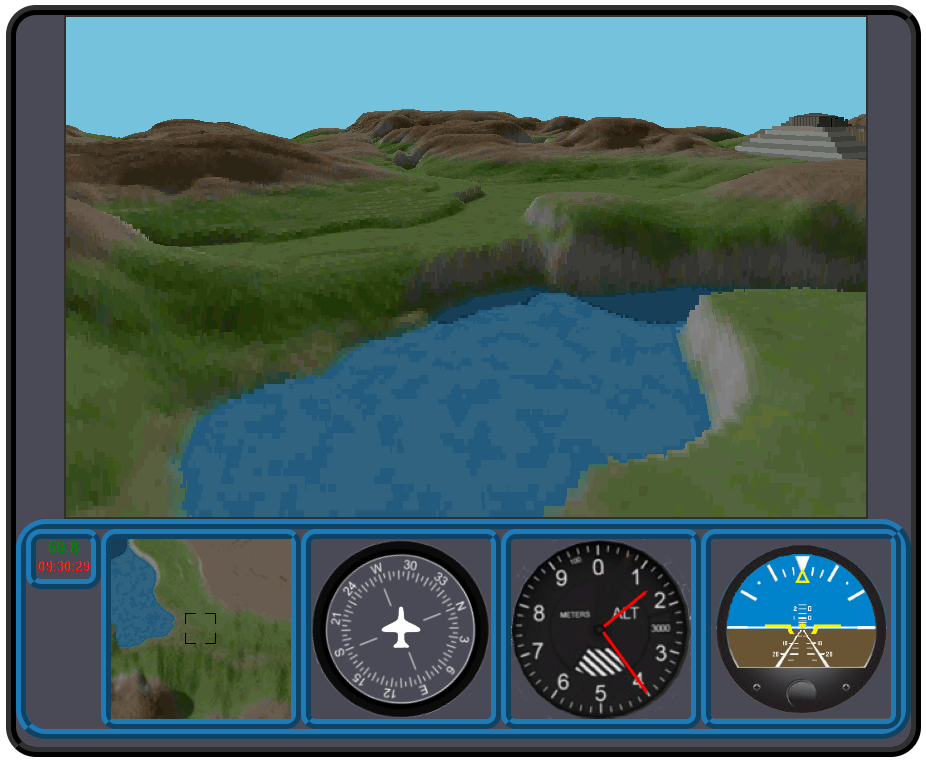
What you should see is something like:
Try out the flight controls and have a blast. You might get the impression that you are flying an alien space ship as it seems to be able to alternate between supersonic flight and a dead stop although the rendering speed will relate to the available processing power. Even on a very slow PC the effect should still be very pleasing if overall just a bit pixilated.
If you need to do some debugging then every time you save an edited project file the server will reload the page. We don’t have the VS Code “Run” control but it is still straightforward to debug the project with the help of the Chrome Developer Tools if necessary. The server process will keep running while the Terminal tab remains open. If you close your VS Code project then you can restart it again later by issuing the “npm start” command in the terminal window with the project folder open.
That is the voxel terrain rendering technique done and finished along with (just about) the last of the JavaScript language components featured in this book. But this is a book that is also about games and I wanted to add to the project by including some flight instruments. Each instrument featured uses a different technique to display its values. Each is encapsulated in an object with a handful of short methods.
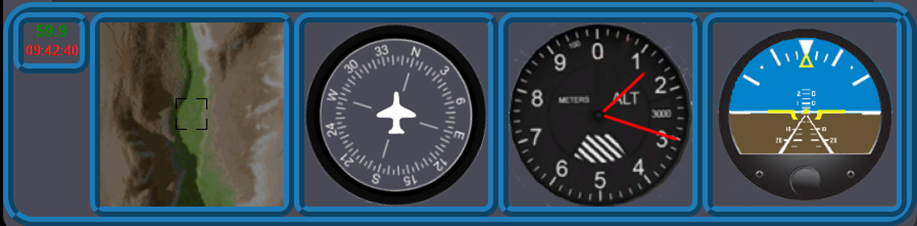
All of the instrument graphics in the downloadable project set were prepared using Paint.NET to edit images grabbed from multiple Internet locations.
The instrument panel is going to need some supporting HTML and CSS and we can place almost all of the new code in a new JavaScript file called dials.js.
First update the <head> section of the HTML to include the new dials.js file and then the <body> as follows:
<body>
  <div id="dvGame">
    <div id="dvViewer">
        <canvas id="cvView"></canvas>
    </div>
    <div id="dvControls">
      <div id="dvFps">
          <label id="lblFps">000</label>
          <label id="lblTime">0000</label>
      </div>
      <div id="dvMap">
          <canvas id="cvMap"></canvas>
      </div>
      <div id="dvHead">
          <canvas id="cvHeadA"></canvas>
          <canvas id="cvHeadB"></canvas>
      </div>
      <div id="dvAlt">
          <canvas id="cvAlt"></canvas>
      </div>
      <div id="dvPitch">
          <img src="images/pitchB.png" id="imgPitchB">
          <img src="images/pitchA.png">
      </div>
    </div>
  </div>
  <script src="main.js"></script>
</body>
Those new HTML elements are going to need some CSS – in fact the changes and additions in that file are quite extensive.
html { padding: 0; margin: 0; border: 0;}
div {
    background-color: #4a4a56;
    position: relative;
}
canvas, img { position: absolute;}
#dvGame {
    width: 895px; height: 732px;
    border: 10px ridge #303030;
    border-radius: 30px;
}
#dvViewer {
    width: 800px; height: 500px;
    top: 0px; left: 48px;
    border : 2px solid #303030;
}
#dvControls {
    width: 875px; height: 200px;
    border: 10px ridge #1F7BB7;
    border-radius: 30px;
}
#dvMap, #dvHead, #dvAlt, #dvPitch {
    float: left;
    height: 180px; width: 180px;
    border: 10px ridge #1F7BB7;
    border-radius: 15px;
}
#dvAlt {background-image: url("images/alt.png");}
#dvPitch {overflow: hidden; }
#dvFps {
    float: left;
    height: 40px; width: 55px;
    border: 10px ridge #1F7BB7;
    border-radius: 15px;
    text-align: center;
}
#lblFps, #lblTime {
    position: relative;
    padding-top: 5px;
    color: green;
    font-family: Arial, sans-serif;
    font-weight: bold;
}
#cvHeadA { z-index: 100;}
#cvHeadB { z-index: 200;}
#lblTime {
    color: red;
    font-size: smaller; font-weight: normal;
}
#imgPitchB { top: -90px;}
Well that nicely takes care of the layout but you might like to check that all is broadly in the right place with a quick test. Following that, we can get on with the code additions to get those flight instruments responding.
We can start with the instrument that shows the aircraft heading. It takes the form of a central image of an aeroplane and a compass rose that can be rotated to show the current heading. First the Heading object to be added to the dials.js file.
var Heading = {
    canvas: [], // array to hold both
    ctx: [],
    image: new Image(),
    width: 180,
    height: 180
};
The new object has an init() method to load both related images and to draw the small white aircraft onto the <canvas> with the id of “cvHeadB”. We are going to view the compass rose (when it is drawn) through the transparent pixels of this image.
Heading.init = function(){
    this.canvas.push(document.getElementById("cvHeadA"));
    this.canvas.push(document.getElementById("cvHeadB"));
    for(let h = 0; h < 2; h++){
        this.ctx[h] = this.canvas[h].getContext("2d");
        this.canvas[h].width = this.width;
        this.canvas[h].height = this.height;
    }
    let img = new Image();
    img.onload = function() {
        Heading.ctx[1].drawImage(this, 0, 0);
    };
    img.src = "images/headingB.png";
    this.image.src = "images/headingA.png";
};
The Heading object also has a draw() method that draws the compass rose at the correct rotation taking into account the Camera.angle value.
Heading.draw = function(){
    let angle = (Camera.angle + Math.PI * 0.5) % (Math.PI * 2);
    this.ctx[0].clearRect(0,0,this.width, this.height);
    this.ctx[0].save();
    let mid = this.width / 2;
    this.ctx[0].translate(mid, mid);
    this.ctx[0].rotate(angle);
    this.ctx[0].drawImage(this.image, -mid, -mid);
    this.ctx[0].restore();
};
Next up is the instrument to show the aircraft pitch (well only the nose up and down pitch but feel free to extend it later). This is managed by moving a background image representing the horizon behind the transparent pixels of the pitch instrument image. The object and its methods are very straightforward (note that the dial images are referenced in the HTML). The draw() method simply adjusts the position of the background image.
var Pitch = {
    image: null,
    value: -90
};
Pitch.init = function(){
    this.image = document.getElementById("imgPitchB");
};
Pitch.draw = function(){
    // move the sky/earth image up and down
    let set = (Camera.horizon - 100)/5; // arbitrary
    this.image.style.top = "" + (this.value + set) + "px";
};
Now an altimeter, where we can draw hands indicating altitude over the image of a dial.
var Altitude = {
    canvas: null,
    ctx: null,
    width: 180,
    height: 180
};
Altitude.init = function(){
    this.canvas = document.getElementById("cvAlt");
    this.ctx = this.canvas.getContext("2d");
    this.canvas.width = this.width;
    this.canvas.height = this.height;
};
The draw() method calculates the angles for the two hands and then calls another method to do the actual drawing. The drawHand() method calls an old friend, the function findPointOnCircle() which you could copy and paste from one of the earlier projects.
Altitude.draw = function(){
    let hasl = Math.round(Camera.height * 50 / 3);
    if(hasl > 9999){hasl = 9999;}
    let ts = hasl/1000; // number of thousands
    let tsa = Math.PI * 2 * (ts / 10) - Math.PI * 0.5;
    let us = hasl % 1000; // remaining units
    let usa = Math.PI * 2 * (us / 1000) - Math.PI * 0.5;
    this.ctx.clearRect(0,0,this.width,this.height);
    this.drawHand(tsa, 58, 3);
    this.drawHand(tsa, 60, 1);
    this.drawHand(usa, 78, 3);
    this.drawHand(usa, 80, 1);
};
Then:
Altitude.drawHand = function(angle, length, width){
    const midPt = 90;
    let ls = findPointOnCircle(midPt, midPt, 4, angle);
    let lf = findPointOnCircle(midPt,midPt,length,angle);
    this.ctx.beginPath();
    this.ctx.moveTo(ls.x, ls.y);
    this.ctx.lineTo(lf.x, lf.y);
    this.ctx.strokeStyle = "red";
    this.ctx.lineWidth = width;
    this.ctx.stroke();
    this.ctx.closePath();
};
And that old friend:
function findPointOnCircle(originX, originY, radius, angleRadians) {
    let circX = radius * Math.cos(angleRadians) + originX;
    let circY = radius * Math.sin(angleRadians) + originY;
    return {x: circX, y: circY};
}
The next instrument is a GPS style map showing the area under the helicopter (flying saucer or what have you). This map is drawn using some of the techniques used to draw the terrain projection although this only needs to be a direct copy of selected pixels from the map image. Starting with the GpsMap object.
var GpsMap = {
    height: 180,
    width: 180,
    canvas: null,
    ctx: null,
    imageData: [],
    buffArray: [],
    buff8: [],
    buff32: []
};
Those arrays need initialising in a similar way to those of the Viewer object.
GpsMap.init = function(){
    this.canvas = document.getElementById("cvMap");
    this.ctx = this.canvas.getContext("2d");
    this.canvas.width = this.width;
    this.canvas.height = this.height;
    this.imageData = this.ctx.createImageData(this.width, this.height);
    this.buffArray = new ArrayBuffer(this.width * this.height * 4);
    this.buff8 = new Uint8Array(this.buffArray);
    this.buff32 = new Uint32Array(this.buffArray);
};
The draw() method in part shadows the Viewer.renderView() method although the resulting image is flat and is just the section below the notional camera position. The method calls drawGraticule() to draw that position over the coloured terrain map.
GpsMap.draw = function(){
    for(let row = 0; row < this.height; row++){
       let y = ((Camera.y - this.height / 2)  + row) & (ImgMap.height - 1);
       for(let col = 0; col < this.width; col++){
          let x = ((Camera.x - this.width / 2) + col) & (ImgMap.width - 1);
          let offset = (y << 10) + x;
          this.buff32[row * this.width + col] = ImgMap.colour[offset];
      }
   }
   this.drawGraticule();
   this.imageData.data.set(this.buff8);
   this.ctx.putImageData(this.imageData, 0, 0);
};
The drawGraticule() method sets the relevant buffer pixels to solid black colour.
GpsMap.drawGraticule = function(){
    const strt = Math.floor(this.width / 2) - 16;
    const end = strt + 30;
    const black = 0xff000000 | 0;
    for(let row = strt; row <= end; row++){
        if(row > strt + 10 && row < strt + 20){continue;}
        if(row === strt || row === end){
            for(let col = strt; col <= end; col++){
                if(col > strt + 10 && col < strt + 20){continue;}
                this.buff32[row * this.width + col] = black; //0xff000000
            }
        } else {
            let x = strt;
            this.buff32[row * this.width + x] = black; //0xff000000;
            x = end;
            this.buff32[row * this.width + x] = black; //0xff000000;
        }
    }
};
The final instrument is just there to give you, the developer, some feedback on the overall performance of the project – namely rendered frames per second.
var FlightData = {
    lblTime: null,
    time: Date.now(),
    frames: 0,
    lblFps: null
};
FlightData.init = function(){
    this.lblTime = document.getElementById("lblTime");
    this.lblFps = document.getElementById("lblFps");
};
FlightData.draw = function(){
    this.frames++;
    let time = Date.now();
    if(time - this.time > 1000){
        let fps = this.frames / ((time - this.time) / 1000);
        this.lblFps.textContent = fps.toFixed(1);
        this.frames = 0;
        this.time = time;
        let clock = new Date();
        this.lblTime.textContent = clock.toTimeString().substr(0, 8);
    }
};
All we need to do now is include the instrument init() and draw() methods into the process.
function initDials(){ GpsMap.init(); Heading.init(); Pitch.init(); Altitude.init(); FlightData.init(); }
We can call the initDials() function from the initialise() function before the call to ImgMap.load().
A similar drawDials() function follows:
function drawDials(){
    GpsMap.draw();
    Heading.draw();
    Altitude.draw();
    Pitch.draw();
    FlightData.draw();
}
The reDraw() function needs an edit to call the drawDials() function.
function reDraw(){
    Camera.setAngle();
    Viewer.renderView();
    drawDials();
    window.requestAnimationFrame(reDraw);
}
Time for some testing. My fairly basic Windows machine runs this software steadily at 60 frames a second while, at the lower end, my elderly Chromebook and Raspberry Pi 400 run very sweetly at 30 frames a second.
The speed of rotation and velocity in both forward and reverse directions is likely to still be excessive. This can be tuned to your PC by making changes to the values set in the flight object in response to keyboard events.
Why not try some of the other terrain and altitude maps from Sebastian Macke’s github site at https://github.com/s-macke/VoxelSpace They should drop right into this project with just a change to the image file names to be loaded.
The keyboard has limitations when it comes to simulating flight controls. You might like to explore the option of applying a Gamepad to this project. Instructions for collecting gamepad input can be found on the book web site. It would make an interesting extension to simulate flying a helicopter where the nose drops and banking, associated with manoeuvres, could add realism. [Think rotating that pitch indicator as well as the view]. Those instant stops could be replaced with a rapid, nose up then slowing maybe.
Happy flying.
Code downloads for this chapter are available here.