Jumpstart HTML, CSS and Maths
The shortest possible introduction to HTML
This short section is for you if you are new to HTML. It is short, so it is easy to skip if you already have a grasp of the basics and it is also short because it only covers what you absolutely need to know to understand how we will use HTML as our games platform while learning to program in JavaScript. In fact, we hardly use any HTML at all, just enough to give us a visual framework.
If you are keen to take on a thorough introduction to HTML then the materials maintained by Mozilla at https://developer.mozilla.org/en-US/docs/Web are thoroughly recommended. You might care to bookmark the website for future reference.
Hypertext Markup Language (HTML) is the language used to create web pages. Each web page is a text document with HTML markup used to describe to a web browser how the content should be structured and laid out. Modern HTML implementations also use Cascading Style Sheets (CSS) to add styling to web page components but HTML provides the building blocks. The later versions of HTML (known as HTML5) added graphical and multimedia elements to HTML documents among other new features. HTML5 also extends the scope of web browsers by include access to things such as a device’s GPS hardware when available.
A very simple HTML document might look like:
<!DOCTYPE html>
<html>
        <head>
        <title>This is the document title</title>
  </head>
        <body>
        <p>Hello world!</p>
  </body>
</html>
The text between <html> and </html> describes the web page. The section between <body> and </body> is the visible page content. The markup <title>This is the document title</title> defines the web page title. The Document Type Declaration <!DOCTYPE html> indicates the web page is using HTML5 which is what we will be using throughout this book rather than some earlier version.
HTML documents are constructed from nested elements which are identified by HTML tags enclosed within angle brackets. In the example above you can see a paragraph tag <p> at the start of the page content and the paragraph end tag < /p> at the end of that content. One other very common tag pair is <div> and < /div> and these are used to layout regions of a web page and are usually filled with other tags and content.
Some individual tags do not have a matching closing tag as they do not allow for nested content. The one you are most likely to come across is the image tag .
The image tag normally has an attribute set that gives the source address of the image file to be displayed. Something like:
<img src="images/Tile68.png">
The <img> tag marks where in the document the picture file Tile68.png located in the images subfolder should be displayed.
A very common attribute used for many HTML tags is the id. The id is an identifier that can be used to link to an HTML element from our JavaScript.
<div id="dvPlayArea"></div>
When we want our JavaScript to draw on the browser window surface, we will use another HTML5 element called <canvas>.
You will find some common HTML tags below, together with an image showing how they might be rendered with no additional styling applied.
| HTML tag | How it might be rendered |
| <button>Button</button> | |
|
<input type="radio" checked name="choices">First Choice <br> <input type="radio" name="choices">Second Choice |
First Choice Second Choice |
| <label>This is a label</label> | This is a label |
| <input type="text"> | |
|
<input type="checkbox"> <label>This labels the checkbox</label> |
You might have noticed that the two radio button <input> elements shared a common name attribute. This is needed tell the browser to connect the buttons such that only one of a named group should be “on” (or as HTML would have it, checked) at any one time. There was also a <br> tag in there as well. The <br> tag inserts a line break.
We can use JavaScript to insert new HTML elements into a document and this is a common practice when writing games as new characters, backgrounds and game components may need to be added (or removed) as a game proceeds.
Of course, there is a lot, lot more to HTML but this brief introduction should get you through the book – well when we have added a sprinkling of CSS.
The shortest possible introduction to Cascading Style Sheets (CSS)
This is the second section in this chapter dealing with technologies we will need to support the JavaScript we are learning by writing games. Feel free to skip it if you already have a grasp of the subject (as this introduction is very basic) but if you need a refresher or you are new to the topic then it won’t take long.
CSS is a language used to style a web page and its content. It can be used to selectively apply styles to groups of HTML elements or to just an individual element. The “cascading” part comes from the ability to specify a style set for a whole web page or sub-group of elements and to then selectively change specific styles for just some elements with the other styles cascading down through the hierarchy of elements.
CSS is made up of rule sets. A rule set includes a selector which identifies the HTML elements the rule should be applied to. The selector is followed by one or more property name (something that can be styled) and property value. In the example below the selector applies to all <div> elements. The properties are background-color, color (the colour of any enclosed text), the width of the element and the border. The property names and property values are separated by a colon (:) and each property/value pair terminated with a semi-colon (;).
div {
background-color: beige;
color: red;
width: 500px;
border: 1px solid black;
}
There are a range of selectors available, but as an introduction we have:
| Selector type | What it selects | An example |
| element selector | All elements of that specific type |
p would select all <p> |
| id selector | Selects specific elements based upon their id set in the HTML, note the # symbol |
#myDiv would select <div id=”myDiv”> but no other divs |
| class selector | Selects elements where the specific class has been set as an attribute. Note the full stop (period) |
would select <div class=”myClass”> and any other element with the same class. |
| pseudo class | Selects an element but only when in a specified state. |
p:hover would select a <p> when the mouse pointer was hovering over it. |
CSS code can be included in an HTML document between <style> tags but the approach used in this book has been to place the CSS in a separate file and include that file with a <link > tag in the HTML header section. This is intended to simplify and increase clarity by not mixing components up together.
<link rel="stylesheet" type="text/css" media="screen" href="css/main.css" />
You might have wondered about the sample CSS property for the div element setting a width to 500px which you might have guessed was 500 pixels. The pixel density on modern device screens is pretty variable. However, CSS pixels are in fact something called “reference pixels” which are set at the standard windows density of 96 to an inch. That is roughly 37.8 pixels per centimetre in modern units. The pixel value thus translates to a physical screen distance irrespective of the true pixel density on a given device. While originally a “bodge” for backwards compatibility this is a useful feature as it allows us to set HTML element sizes with some confidence in how they will be sized on any screen.
There are a vast array of style properties and perhaps sadly we will only get to use a few working through this book. We are here for the JavaScript and we will have to leave CSS mastery to another day or another book.
Just enough maths and no more.
The games in this book often make use of some fairly straightforward maths that is just a step or two on from basic addition, subtraction, multiplication and division. We will be using some trigonometry and (once or twice) good old Pythagoras.
Both Pythagoras’ theorem and trigonometry arise from the fact that the sides and angles of a right- angle triangle maintain their proportions even as their dimensions change.
Pythagoras is credited with the theorem that says that the square of the length of the hypotenuse of a right-angled triangle is equal to the sum of the squares of the lengths of the other two sides. This is often represented by a simple diagram like the one below. The hypotenuse of course is the longer side and “opposite” the right angle (which is 90 degrees).
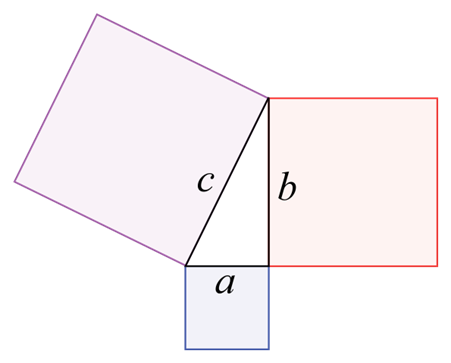
The square of c is equal to the square of a plus the square of b. Or a² + b² = c². This means simply that if we know the length of two of the sides of the right-angle triangle then we can easily calculate the length of the third.
The Greek philosopher Pythagoras lived from 570 to 495 BCE so he preceded the later Greek development of Trigonometry during the third century BCE.
This is my favourite diagrammatic explanation of the trigonometric sine and cosine.
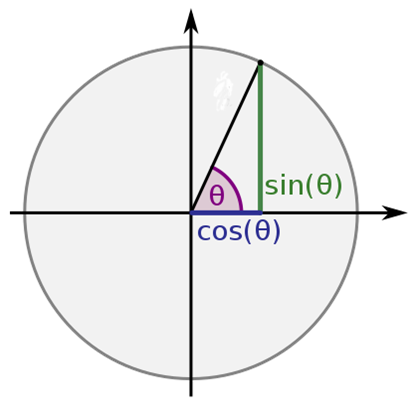
A little thought should confirm in your own mind that the angle marked θ is going to vary in proportion to changes in the point where the triangle hypotenuse intersects with the circumference of the circle. It is also fairly obvious that the lengths of the other two lines would vary in proportion as that angle changes. One will grow as the other shrinks.
The sine is defined as the proportion between the side opposite the angle and the hypotenuse. The cosine is the proportion between the hypotenuse and the third (or adjacent) side.
A little more contemplation (the Greek philosophers were good at that with or without a bath) would indicate that when the angle θ approaches 90 degrees the length of the opposite side will be equal to the hypotenuse and the adjacent side will have a zero length (even if that would make for a very squashed triangle). Also, when the angle θ reaches zero degrees the length of the adjacent side will be equal to the hypotenuse while the opposite side length will have shrunk to zero. Nearly there. The ratio between the hypotenuse and the other sides can vary between one and zero. More importantly, if we know the angle and the length of one of the sides, we can use the sine or cosine of the angle to calculate the length of the other two sides.
Another key trigonometric value – the tangent – represents the relative lengths of the opposite and adjacent sides.
| Sine θ | opposite ÷ hypotenuse |
| Cosine θ | adjacent ÷ hypotenuse |
| Tangent θ | opposite ÷ adjacent |
If you are over a certain age, you will remember carrying a book of tables to and from school maths lessons. Those tables will have included some for looking up the sines and cosines of an angle together with many other trigonometric values. Younger readers will have found those same functions presented on buttons on their school calculator keyboards. Another button on the calculator may have allowed the entry of angles to switch between degrees and radians. It so happens that the JavaScript trigonometric functions want to be fed angles in radians and not degrees. So what are radians?
You will recall that there are 360o in a complete circle. Radians are defined such that there are two times Pi radians in a circle. How did anyone come up with that? Well, another faint echo from the classroom might be that the circumference of a circle is twice the radius multiplied by Pi. So, if you think about the angle represented by the length of the radius of a circle drawn along the curve of the circumference of a circle then you have honed in on a radian.
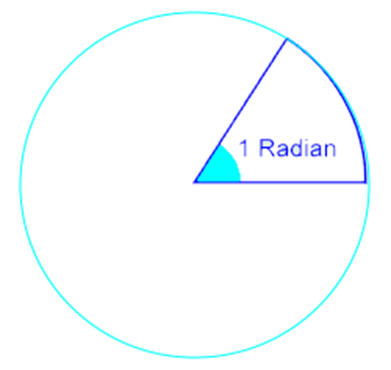
It turns out that the use of radians rather than degrees makes the calculation of sines and cosines and such more “mathematically elegant” and we programmers never argue against elegance.
There is no real reason, within our games programs, to attempt to convert between degrees and radians but just so you get a feel for them, one radian is about 57.296 degrees.