Chapter 10 Extra: Colour Mix
A clever team have tackled the thorny issue of managing colour mixing and produced a multi-platform solution called Mixbox. You can check out their web page here. This excellent software is free for non-commercial use so, if you are inclined, you can try it out with our rather basic touch painting project.
I adapted our final version of this project to use Mixbox just to see how it works. This also gave me the opportunity to use the HTML <input type=”color”> control. While this colour picker has some rough edges it works well enough for testing some subtle colour mixes.
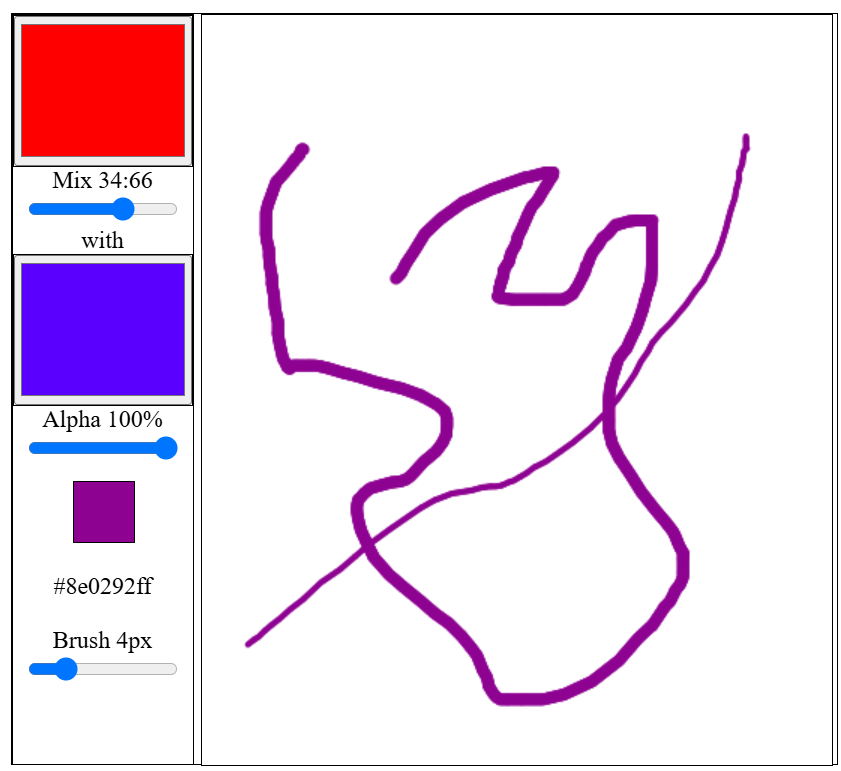
Instead of the limited selection of colours presented in our touch project I used two colour pickers and a slider to set the proportion of each colour to be used to mix the colour to be applied to the painting surface.
The new layout required some changes to the HTML as well as the inclusion of the MixBox JavaScript library. The library documentation is available here (well enough to get you started).
<!DOCTYPE html>
<html>
<head>
    <meta charset="utf-8" />
    <meta http-equiv="X-UA-Compatible">
    <title>Colour Mixing Test</title>
    <meta name="viewport" content="width=device-width, initial-scale=1">
    <link rel="stylesheet" type="text/css" media="screen" href="main.css" />
    <script src="https://scrtwpns.com/mixbox.js"></script>
    <script src="touch.js"></script>
    <script src="paint.js"></script>
    <script src="picture.js"></script>
</head>
<body>
    <div id="dvMain">
        <div id="dvPall">
            <div id="dvPicker" class="pkCOL">
                <input type="color" id="inPicker" class="inCol" value="#ff0000">
            </div>
            <label for="inpMix" id="lbMix">Mix 100:0</label>
            <input type="range" min="0" max="100" value="0" name="inpMix" id="inpMix">
            <label>with</label>
            <div id="dvMix" class="pkCOL">
                <input type="color" id="inMixer" class="inCol" value="#00ff00">
            </div>
            <label for="inpAlpha" id="lblA">Alpha 100%</label>
            <input type="range" min="0" max="100" value="100" name="inpAlpha" id="inpAlpha">
            <div id="dvSwatch" class="pCol">
                <canvas ID="cvSwatch"></canvas>
            </div>
            <label id="lbMixed">#ff0000</label><br><br>
            <label for="inpBrush" id="lblB">Brush 8px</label>
            <input type="range" min="1" max="15" value="8" name="inpBrush" id="inpBrush">
        </div>
        <div id="dvCanv">
            <canvas id="cvMain"></canvas>
        </div>
     </div>
    <script src="main.js"></script>
</body>
</html>
Supported by a minor addition to the CSS.
.pkCol {
    width: 100px;
    height: 100px;
}
No changes were required to the touch.js file of course and the new HTML controls respond to touch events via the browser.
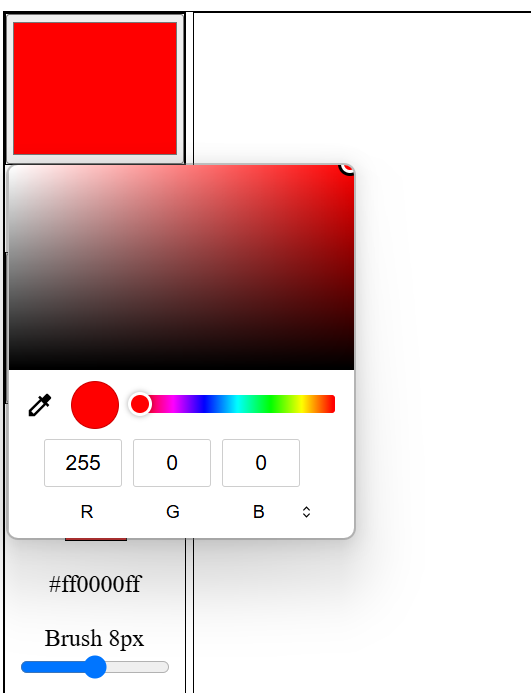 A colour picker in action.
As the project no longer needs to use timing to determine that a colour mix has been selected, I dispensed with the Paint object and adjusted the Colour object and its methods accordingly. The Picture object then needed a reference to the Colour object to replace Paint.
The colour class becomes:
class Colour {
    constructor(val, func) {
        this.red = parseInt(val.substring(1, 3), 16);
        this.green = parseInt(val.substring(3, 5), 16);
        this.blue = parseInt(val.substring(5), 16);
        this.alpha = 1;
        this.callBack = func;
        if(this.callBack){
            this.callBack(this.toString());
        }
    }
    mixColours(main, mix, pcent){
        if (pcent) { // if a mix required
            let rgb1 = new Colour(main);
            let rgb2 = new Colour(mix);
            pcent /= 100;
            let mixed  = mixbox.lerp(rgb1, rgb2, pcent);
            this.red = mixed[0];
            this.green = mixed[1];
            this.blue = mixed[2];
        } else {
            this.red = parseInt(main.substring(1, 3), 16);
            this.green = parseInt(main.substring(3, 5), 16);
            this.blue = parseInt(main.substring(5), 16);
        }
        if(this.callBack){
            this.callBack(this.toString());
        }
    }
    setAlpha(alpha) {
        this.alpha = alpha;
        if(this.callBack){
            this.callBack(this.toString());
        }
    }
    toString() {
        let opacity = Math.round(this.alpha * 255);
        return this.red.toString(16).padStart(2, "0") +
            this.green.toString(16).padStart(2, "0") +
            this.blue.toString(16).padStart(2, "0") +
            opacity.toString(16).padStart(2, "0");
    }
}
The colour mixing method that replaced the “blends” for the Colour class was very straightforward. I rather cheekily had the Colour method create two temporary instances of the Colour class just to show that you can do that. That saved my writing code to “parse” the colour strings passed to the method. But, how does the mixbox method obtain the colour value? It can make use of the Colour.toString() method. You can confirm that by setting a break point on the line that calls mixbox.lerp() and stepping through the code. If you do that you can check out the alternative colour data options that the method can process – great program code and an example for us all.
The mixbox.lerp() method returns a four element integer array with R, G, B and Alpha values.
The Picture object has very minor changes to reference the Colour class instance:
var Picture = {
    canvas: null,
    ctx: null,
    xPos: 0,
    yPos: 0,
    brush: 8,
    colour: null,
    init: function(colour) {
        this.canvas = document.getElementById("cvMain");
        this.ctx = this.canvas.getContext("2d");
        let dv = document.getElementById("dvCanv");
        let rect = dv.getBoundingClientRect();
        this.xPos = rect.left;
        this.yPos = rect.top;
        this.canvas.width = dv.clientWidth;
        this.canvas.height = dv.clientHeight;
        this.colour = colour;
    },
    touchStart: function(id, data){
        let col = Picture.colour.toString();
        Picture.ctx.beginPath();
        Picture.ctx.arc(data.x - Picture.xPos, data.y - Picture.yPos, Picture.brush / 2, 0, Math.PI * 2, false);
        Picture.ctx.fillStyle = "#" + col;
        Picture.ctx.fill();
        Picture.ctx.closePath();
    },
    touchMove: function(id, data){
        let col = Picture.colour.toString();
        let dx = data.x - data.lastX;
        let dy = data.y - data.lastY;
        let steps = Math.max(Math.abs(dy), Math.abs(dx));
        for(let p = 0; p < steps; p++){
            Picture.ctx.beginPath();
            data.lastX += dx / steps;
            data.lastY += dy /steps;
            Picture.ctx.arc(data.lastX - Picture.xPos, data.lastY - Picture.yPos, Picture.brush / 2, 0, Math.PI * 2, false);
            Picture.ctx.fillStyle = "#" + col;
            Picture.ctx.fill();
            Picture.ctx.closePath();
        }
    },
    setBrush: function(val) {
        this.brush = val;
    }
};
The main.js file manages the control events:
var swatch = document.getElementById("cvSwatch");
swatch.width = swatch.height = 40;
var sCtx = swatch.getContext("2d");
var colourPicker = document.querySelector("#inPicker");
var colourMix = document.querySelector("#inMixer");

function testColour(tint){
    sCtx.clearRect(0, 0, swatch.width, swatch.height);
    sCtx.beginPath();
    sCtx.rect(0,0, 40, 40);
    sCtx.fillStyle = "#" + tint;
    sCtx.fill();
    sCtx.closePath();
    document.getElementById("lbMixed").innerHTML = "#" + tint;
}
colour = new Colour(colourPicker.value, testColour);
Picture.init(colour); // here to ensure doc has loaded
function colourChange(){
    colour.mixColours(colourPicker.value, colourMix.value, document.getElementById("inpMix").value)
}
colourPicker.addEventListener("change", colourChange, false);
colourMix.addEventListener("change", colourChange, false);
document.getElementById("inpMix").addEventListener("input", function(){
    colourChange();
    let v = parseInt(this.value, 10);
    document.getElementById("lbMix").innerHTML = "Mix " + (100-v) + ":" + v;
});

document.getElementById("inpAlpha").addEventListener("input", function(){
    colour.setAlpha(this.value / 100);
    document.getElementById("lblA").innerHTML = "Alpha " + this.value + "%";
});
document.getElementById("inpBrush").addEventListener("input", function(){
    Picture.setBrush(this.value);
    document.getElementById("lblB").innerHTML = "Brush " + this.value + "px";
});

Touch.addTouch("cvMain", {onDown: Picture.touchStart, onMove: Picture.touchMove});
The code for this MixBox demo can be downloaded here.
You might like to consider trying out a pallet of simulated paint pigments to practice your JavaScript skills – taking care with the “this” keyword of course.