Chapter 7: Minesweeper
Our second game is another classic but this time an interactive puzzle game. We are going to be using a different set of techniques to manage the graphics and we get to add sound effects.
Building this game will add to your JavaScript knowledge and introduce some animation and HTML manipulation techniques that will stand you in good stead for the future. There is a little less JavaScript code to write although some of the functions will be more challenging.
This game is also an opportunity to try using the jQuery library. Also watch out for the technical bits on closures and recursion. This is a feature packed chapter.
Another change in this project is a move away from simple drawn images to prepared images that may have needed some processing using an image editor like Paint.NET. There will also be some Internet research to find sound files and (if you fancy it) some alternate image files to work from.
<Online Edition Note> You might be thinking that the classic Minesweeper game was a little “old hat” but take a look at Dragonsweeper at https://danielben.itch.io/dragonsweeper which demonstrates a challenging new game based upon the Minesweeper concept. It shows there is a lot of mileage for creative approaches in this game format.</note>
Start off by creating a new folder to hold the game code. You might like to call it something like “mines”. As we are going to be making use of some image files it will help to keep things tidy to create a subfolder – called images. While doing that, you might like to create another subfolder for audio files – call that one audio.
Often, when you decide to make use of a resource from the Internet you can be faced with a choice of options. One likely option would be to download all of the relevant files and store them locally before adding references to the local copies to your HTML. The alternative can be to use a Content Delivery Network (CDN). With a CDN, you reference the resource on a remote server from your HTML instead. Of course, if you decide to use a CDN then you have to be confident that the Internet will be accessible when your code comes to make use of the content stored remotely. Such content is likely to be cached by your browser but it is something to take into account when making a decision. If you are working with a PC with limited file storage capacity you might well lean more towards using a CDN over local storage.
A content delivery network is often a geographically distributed network of servers and data centres. Their goal is to provide high availability and high performance by distributing a given service around the world so that there is likely to be a server geographically near to an end user. CDNs came into existence in the late 1990s as a means to avoid performance bottlenecks. Since then, CDNs have grown to serve a large portion of the Internet content today, including web objects (text, fonts, graphics and scripts), downloadable objects, apps and media.
Your first choice between a local copy and a CDN starts with the jQuery library. You can visit the jQuery download page at https://jquery.com/download/ (or search for “jQuery Download”) and download the compressed production jQuery file to your game folder. Alternately you can visit the jQuery CDN page and click the minified option for the latest version. You will then be presented with the text for a link to that resource that you will need to save so that it can be added to the game HTML. You might want to do that when we get to building the HTML for this game.
Rather than draw all of the visual elements for this game we will be using a range of images stored in individual files. You can download a complete set from the book web site although you might like to adapt some of them or create new images of your own. The book website features an introduction to the key features of the paint.Net and Pinta image editing programs if you want to get started straight away.
My image set started with two images that look a bit like tiles.
 This tile is called Tile68.png. The visible area of the image is about 68 x 68 pixels and there is a transparent border.
 I called this image TileRev68.png to act as a tile back face.
I also created a nice image of a marine mine named Tile68-m.png and a sunk ship image called Tile68-s.png. All these images are the same size.


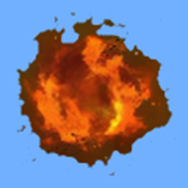
The game needs an explosion or two. You can have a look around the Internet for a good image candidate and then maybe refine it using an image editor. If you are feeling creative, you can start from scratch. Image files describe a rectangular area but explosions are anything but rectangular so the image will need to include transparent pixels to hide the file “shape”.
My explosion file is called bang.png and is 120 pixels square. You can see it below together with a version where the transparent pixels have been shaded so that you can see the shape of the complete image.
I am sure that no-one would object to you appropriating images found on the Internet for personal use within a game but if you have any aspirations to share or publish a game you should look for images that have been suitably licensed or where you have the copyright owner’s permission. There are also lots of libraries out there where you can source images for free or for a small fee. The alternative is to brush up your artistic skills and create your own.
Now for some sound. I found some nice sound effect files free to download from https://www.freesoundeffects.com. There are plenty of web sites offering great audio resources. The license for the file I ended up using does not allow me to make it directly available to you – you will have to go and find a nice explosion of your own and download it to the game audio sub-folder. The one I ended up with was called Explosion+3.mp3 and it is 2 seconds long.
Now to gather all of these elements together to demonstrate some jQuery animation and to make some noise.
The first stage:
Open the Visual Studio Code editor and start by creating an HTML file in the game development folder. This time, I called my HTML file Minesweeper.html but the default name index.html would be just fine. The HTML for the <head> may vary depending upon your decision as to how you will access jQuery (local or CDN). The two options are shown below but (warning) jQuery version numbers may very well be different when you come to download a copy. You need to ensure that the version numbers in the file name are changed to match your copy. This is easy for CDN users as you can copy the required HTML line from the jQuery CDN web page.
First the version for a local jQuery file copy:
<!DOCTYPE html>
<html>
<head>
    <meta charset="utf-8" />
    <meta http-equiv="X-UA-Compatible">
    <title>Mine Sweeper</title>
    <meta name="viewport" content="width=device-width, initial-scale=1">
    <link rel="stylesheet" type="text/css" media="screen
          href="main.css" />
    <script src="jquery-3.7.1.min.js"></script>
    <script src="main.js"></script>
</head>
Now the version using the jQuery CDN:
<!DOCTYPE html>
<html>
<head>
    <meta charset="utf-8" />
    <meta http-equiv="X-UA-Compatible">
    <title>Mine Sweeper</title>
    <meta name="viewport" content="width=device-width, initial-scale=1">
    <link rel="stylesheet" type="text/css" media="screen"
          href="main.css" />
    <script src="https://code.jquery.com/jquery-3.7.1.min.js"
            integrity=
            "sha256-/JqT3SQfawRcv/BIHPThkBvs0OEvtFFmqPF/lYI/Cxo="
            crossorigin="anonymous"></script>
    <script src="main.js"></script>
</head>
In both cases the HTML file continues:
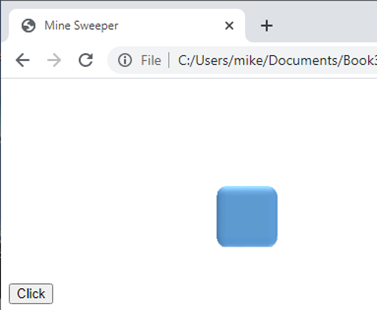
<body>
    <div id="dvGame"
    style="height: 200px; width: 300px; background: white;">
        <img src="images/Tile68-m.png"
        style="position: fixed; top: 106px; left: 216px; z-index: 15"
        id="mine">
        <img src="images/Tile68.png"
        style="position: fixed; top: 106px; left: 216px; z-index: 30"
        id="tile">
    </div>
    <div style="width: 100%; height: auto">
        <button id="btn">Click</button>
    </div>
</body>
</html>
You will also need to create a main.js JavaScript file and a main.css file. At this stage, the CSS file does not need any content (we are going to be replacing most of the HTML within the <body>) but it does need to exist because we referenced it in the HTML. In the meantime, the temporary HTML can demonstrate how CSS styling can be embedded into the HTML tags. We would normally want to separate CSS from HTML so it is always clear where a style comes from but just for the moment, we can walk on the wild side.
The HTML body contains a <div> with the id “dvGame” and this contains two <img> tags that will load two of our prepared images. The styles applied to those images should fix them in position one on top of the other. The CSS z-index value sets their order. The z-index values stack elements from low values (bottom) to high (top). This <div> is followed by another one that contains an HTML button which we will use to trigger the animation trial.
All of the action takes place in the main.js file – and that file certainly packs a lot into just a few lines. Starting in on the JavaScript where you might need to change the audio file name if you downloaded a different one to mine.
var imgM, dvGame, imgT, bng;
$.when( $.ready ).then(function() {
    // Document is ready.
    $("#btn").click(blowUp);
    imgM = $("#mine");
    dvGame = $("#dvGame");
    imgT = $("#tile");
    bng = new Audio("audio/Explosion+3.mp3");
});

function blowUp(){
}
The first line creates four variables that are destined to become jQuery objects. The jQuery $.ready() marks the point when the HTML document has loaded into the browser and it is ready for us to apply some JavaScript to the elements. $.when() waits for $.ready()and then runs a function with no name but that is OK as it is only going to run once when the document loads. It is known as an anonymous function.
The first line in that anonymous function reads:
$("#btn").click(blowUp);
The $(“#btn”) selects the HTML element with an id of “btn” (the button). The statement then goes on to attach a function called blowUp() as an event handler following any mouse click on the button element. This is very similar to the way we attached mouse and keyboard events to functions in the Breakout game but with rather less typing.
The next three lines initialise three of our JavaScript variables with references to a further three jQuery objects each representing one of the HTML elements. Again, we met this concept in the Breakout game but jQuery reduces the amount we have to type to achieve this. The fifth and final line in the function creates a new HTML Audio object, passing in the sound file name and location.
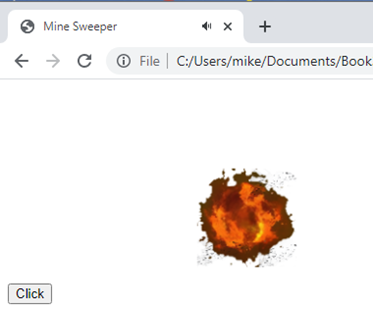
We can next turn our attention to the blowUp() function. This function is going to run the animations and play the sound file – all in response to a mouse click on the HTML button.
The HTML file contains two <img> tags linked to two of the image files in the images folder. The first line to be added to the blowUp() function is going to create a new HTML image when it is triggered by that click event.
let nb = $("<img>");
How easy was that? The next line sets the image source file which is a normal attribute of an <img> tag.
nb.attr('src', 'images/bang.png');
The idea is that we will start the explosion image off very small and then rapidly expand it. The next two lines set the initial size, notice that the size value includes ‘px’ to set the measurements we are using. Notice also how we are setting these values for the jQuery object that represents the new <img> element.
nb.height('1px');
nb.width('1px');
We can next set CSS values to fix the new image position when it is finally rendered by the web browser. As we do not want to see the new image straight away we can use the hide() function.
nb.hide();
nb.css({position: 'fixed', top: '140px', left: '250px', 'z-index': '20'});
Another little thing there. One of those CSS properties (z-index) sat inside quote marks (like the values 140px and 250px) to ensure that it was evaluated correctly.
Just one more thing to do and that is insert the HTML for the new <img> tag into the content of the dvGame <div>.
dvGame.append(nb);
The jQuery library allows us to write code that is short and pithy, packing a lot of action into a single line. One way this is achieved is by something called “chaining”. A sequence of functions can be applied to the same jQuery object by chaining them together separated by “dots”. So, we could have written most of the first lines of that function as a single statement. Like this:
let nb = $("![]() ").attr('src', 'images/bang.png')
.height('1px').width('1px').hide()
.css({position: 'fixed', top: '140px', left: '250px',
'z-index': '20'});
").attr('src', 'images/bang.png')
.height('1px').width('1px').hide()
.css({position: 'fixed', top: '140px', left: '250px',
'z-index': '20'});
That might have been a bit daunting if you had first met all of those steps in a single statement. Once you are used to the idea that the jQuery steps can be chained it is not too hard to follow the sequence and see what is happening. We can try chaining on the next few statements in this function.
The next line in this function starts the animation sequence using a stock jQuery animation “slideUp” that actually shrinks an HTML element towards its top left corner, finally hiding it from view. This, very briefly, makes the image of the mine that was sitting under the tile visible.
imgT.slideUp().attr('src', 'images/TileRev68.png').css('z-index', 10);
You can probably apply your “Breakout” experience to work out how the animation works. In the Breakout game code, we changed the position where the ball was drawn within a function that was called by a JavaScript timer. The small moves every fraction of a second resulted in the illusion of movement. The jQuery animation just has to break the changes to the image width and height down into steps and apply the changes via CSS attributes at small time intervals.
In that same line of code, the image file for the tile was changed on the fly and the z-index changed to push the image to the bottom of the heap when next it becomes visible.
The next line is relatively simple in that it just starts the audio file playing.
bng.play();
Once the sound file starts playing the JavaScript continues with the next line of code. JavaScript does not wait for the play() function to finish so the following line puts in a short delay to let the explosion start before starting an animation that shrinks the size of the mine image to half size (68/2) before hiding it. The line also resets the image position and changes the image source file to the sunken ship.
    imgM.delay(1000).animate({
        width: "-=34",
        height: "-=34"
    },function(){imgM.hide()
        .css({top: '140px', left: '250px'})
        .attr('src', 'images/Tile68-s.png');
    });
As that line illustrated, the animate() function can call another function when it has completed. This is known as a “call-back”. In this case the function includes a further three statements.
The next lengthy line makes the explosion image visible and then runs an animation that expands the image from 1 pixel square to its full size of 120 pixels square. The left and top values are also changed to keep the expanding explosion image centred on the tile. The animation is timed to take 0.8 of a second (eight hundred thousandths of a second) and to then run another jQuery stock animation that fades the image out. Once that is complete, the sunken ship image is displayed overlaid on the grey tile image. Finally, the audio object is reset to the start of the sound file and the audio sound play restarted.
    nb.delay(100).show().animate({
        width: "+=119",
        height: "+=119",
        top: "-=59",
        left: "-=59"
    }, 800).fadeOut(400, function(){imgM.fadeIn();
                                    imgT.show();
                                    bng.currentTime = 0;
                                    bng.play();});
While all of that is going on (timed to take at least 1.2 seconds) the audio file is played again.
Setting the currentTime value for an HTML media object (like our Audio) sets the current play position in seconds. The start of an audio file is zero and the currentTime can be set to any value between zero and the entire play length. Setting a non-zero currentTime will “seek” the media to the requested point in the playback. Subsequently calling .play() will start the media playing from the set position.
    bng.currentTime = 0;
    bng.play();
Give the trial code a run. Switch to the HTML tab in VS Code and select the Run menu. You may have to choose the target browser the first time the run menu is used for this project. Once the page has loaded, click the button and watch the action. To re-run, use the browser reload button or the VS Code toolbar. If you downloaded more than one explosion sound file then try switching the files and re-running the test. Is one a better match than the others? Do the timings need to be adjusted to improve the audio impact?
Thank goodness most of the game code is going to be much less complex to unpick than some of that. However, the testing of sound effects and animations gives an opportunity to select the bits that work best and mix them into the action parts of any game. Writing some code to test out new ideas is always time well spent, before tackling a new project.
A jQuery Cheat Sheet
// selectors
var myImg = $("#mine"); // using an element id
var myBtn = $("button"); // using a tag type
var myDiv = $(".aClass"); // using an element's CSS class

// events
myBtn.click(clickHandler);
myDiv.keydown(keyboardHandler);
$(window).resize(resizeGame);

function clickHandler(e) {}
function keyboardHandler(e) {}
function resizeGame(){}

// effects
myBtn.hide(); // hide an HTML element
myBtn.show(); // make HTML element visible

// animations
myImg.slideUp(); // shrink an element's size upwards and then hide
myImg.slideDown(); // similar but downwards
myImg.fadeOut(); // Fade the element to transparent and then hide
myImg.fadeIn(); // The reverse of fadeOut()
myImg.animate({opacity: 0.5, width: "+=30"}); // animate changes in CSS
// same animation but with time set to 2 seconds and a function
// to call when complete
myImg.animate({opacity: 0.5, width: "+=30"}, 2000, animOver);

function animOver() {}

// HTML manipulation
var newDiv = $("<div>");; //create new element
newDiv.css({position: 'fixed', top: '140px', left: '250px'}); // add CSS styling
newDiv.prop("id", "myNewDiv"); // add a property
myDiv.append(newDiv); //insert new element into an existing element

// read element properties and attributes
alert(newDiv.prop("id")); // jQuery functions can read as well as set
Stage 2:
In the next step we are going to lay out the initial game view. This needs some changes to the HTML file and the addition of some CSS before we start rewriting the JavaScript from a much simpler beginning.
Edit the <body> section of the HTML file to read:
<body>
    <div id="dvGame"
        <div id="dvPlayArea"></div>
    </div>
    <div id="mnuDiv">
        <img src="images/menuBlack.png">
    </div>
</body>
We have retained the <div> dvGame and replaced the previous content with a new <div> to contain the game board area. Below the main div there is another that holds an image file containing a menu icon that we will use later.
The CSS file has a number of CSS classes and then some rules that use id selectors.
.tileDiv {
    position: absolute;
    width: 68px;
    height: 68px;
}
.tileImage{
    position: absolute;
    left: 0px;
    top: 0px;
}
.tileBottom{
    z-index: 10;
}
.tileMid{
    z-index: 20;
}
.tileTop {
    z-index: 30;
}
.pArea {
    position: absolute;
    margin-left: auto;
    margin-right: auto;
    margin-top: 50px;
    border: 1px solid blue;
    display: block;
    left: 50%;
    transform: translate(-50%, 0);
}
Then continues:
#dvGame {
    height: 700px;
    width: 100%;
    background: white;
}
#mnuDiv {
    width: 100%;
    height: auto;
}
#mnuDiv img {
    float: left;
    margin-left: 50px;
}
The .pArea class is going to be applied to the dvPlayArea <div>. Normally, setting the display value to “block” and the left and right margins to “auto” will centre any <div> within its bounding< div>. However, in this instance, the dvPlayArea <div> does not start with any content and so the browser can’t position it centrally when the page loads as its future width is unknown. The transform rule fixes this after the content is inserted.
The JavaScript file content that ran the animation tests should be deleted ready for the game code. The JavaScript now starts with two variables, three constants and a shorter $.ready() function. The const keyword is used instead of var or let when we want to mark a value as unchanging.
var pArea, bng;
const tileWidth = 68, tilesWide = 9, tilesHigh = 9;
$.when( $.ready ).then(function() {
    pArea = $("#dvPlayArea");
    buildTiles();
  });
A function called buildTiles() is being called there, so that is up next.
function buildTiles() {
    for(var row = 0; row < tilesHigh; row++){
        for(let col = 0; col < tilesWide; col++) {
            let nDiv = $("<div>").prop('id', 'dv' + col + row)
            .click(function(){tileClick(this);})
            .addClass("tileDiv")
            .css({left: col * tileWidth + 'px', top: row *
                  tileWidth + 'px'});
            let ttile = $("<img>").attr('src',
                          "images/Tile68.png").addClass("tileTop");
            niv.append(ttile);
            pArea.append(nDiv);
        }
    }
    pArea.css({width: tileWidth * tilesWide +'px',
               height: tileWidth * tilesHigh + 'px'})
         .addClass("pArea");
}
At this stage, when developing a new program, you might not be certain of the final design.
You could set individual values such as widths or the number of rows in the code but it is good practice to set those values as constants at the start of a program. Then if you need to change one, then the change only has to be made once in one place.
For the moment at least, the plan is to go with a 9 by 9 layout. The buildTiles() function therefore needs to create 9 rows of 9 tiles. All of the action takes place inside two for loops. The outer loop controls the row and the inner loop the notional column within the row.
For each tile the function creates a new HTML <div> element. The new <div> has an id constructed as a unique identity (remember the way that string concatenation works). The .addClass() jQuery method applies the CSS tileDiv class that sets the width and height. Then more CSS is added to position the individual div within the 9x9 grid calculating the left and top values from the row and col values. This is a great demonstration of why programmers start counting from zero. In this instance, it simplifies the calculation of the tile location.
The jQuery .click() method adds an event listener to each of those new <div>s and it does something interesting. It adds an anonymous function that itself only calls another function called tileClick(). The value “this” is passed as an argument to the tileClick() function. We have run into the “this” keyword in the chapter introducing JavaScript when it referred to an instance of an object being created. Here it refers to the new div that has just been created. The value is bound up inside the anonymous function forming what is known as a closure so each response to a click event will be passed an object representing the specific div that was clicked.
The code continues by creating a new <img> element, setting the src attribute to the blue tile image. The new image is inserted into the new <div> and then the new <div> is inserted into the main play area <div>.
All of this could have been coded directly in the HTML file but that would have taken a lot more code with an increased chance of error. Plus, making changes to the layout would involve lots of editing. Here we can do it by changing a value or two.
After the 81 new <div>s have been added to the play area CSS is applied to set the width, height and the CSS class.
The Play Area width and height could have been set in the CSS .pArea class. This is a demonstration of the way that values held in JavaScript can be used to calculate and apply CSS values. When writing anything similar in your own code you might decide to just set the values in the CSS file and remember that you might need to change them if the design changes.
All we need now is that tileClick() function. At this stage all we need is an alert() to check things are working.
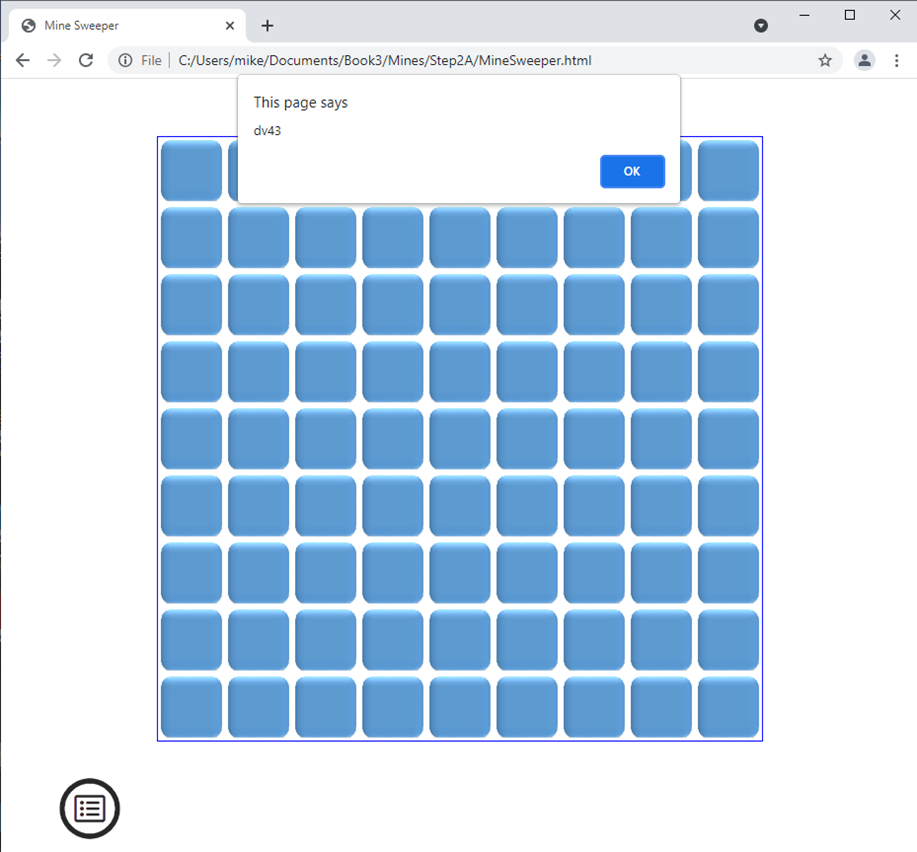
function tileClick(which) {
    alert(which.id);
}
What we expect to see if a tile is clicked is the unique id passed in the object (given the name “which” within the function) that links back to the “this” when the event handler for the tile was created.
Fire up the Minesweeper HTML file in the Chrome browser and you should see the 9x9 tile layout centred (horizontally) in the browser window. Clicking any of the tiles should display a pop-up dialogue showing the id value of the tile div. These should range from “dv00” to “dv88”.
This is a good start. We can create an initial playing board and we can detect any tile being clicked.
Stage 3:
The next step is a small one. In the minesweeper game (like many puzzle games) our clicks are supposed to make something happen. Let’s just use the click to slide the top tile out of the way to reveal a blank tile. We can overlay images on the blank tile later.
No changes are needed to the HTML or CSS and only a couple of changes to the JavaScript.
The change is going to add two tile images to each of the divs in the play area and change the tileClick function to reveal the lower image when the top image is clicked. There are changes to the code creating the first tile as well.
The buildTiles() function should be edited to become:
function buildTiles() {
    for(var row = 0; row < tilesHigh; row++){
        for(let col = 0; col < tilesWide; col++) {
            let nDiv = $("<div>").prop('id', 'dv' + col + row)
            .click(function(){tileClick(this);})
            .addClass("tileDiv")
            .css({left: col * tileWidth + 'px', top: row *
                  tileWidth + 'px'});
            let btile = $("<img>")
                .attr('src', "images/TileRev68.png")
                .addClass("tileImage tileBottom");
            let ttile = $("<img>")
                .attr('src', "images/Tile68.png")
                .prop('id', 'it'+ col + row)
                .addClass("tileImage tileTop");
            nDiv.append(btile).append(ttile);
            pArea.append(nDiv);
        }
    }
    pArea.css({width: tileWidth * tilesWide +'px', height:
               tileWidth * tilesHigh + 'px'}).addClass("pArea");
}
Note the use of the tileBottom and tileTop CSS classes to set the z-order and the fact that the jQuery addClass() method can add more than one class at the same time.
Hang on! you might say, “if I read that code correctly it looks like it is the <div> that has the event handler attached and yet it will be the top tile image that gets clicked”. Which is perfectly correct. Events do something known as “bubbling up”. A click might occur on an image element but the event bubbles up through the HTML hierarchy giving each enclosing element an opportunity to respond through an event handler. In fact, we sometimes need to stop an event continuing to bubble up once it has triggered the code we want it to run.
Now the tileClick() function change:
function tileClick(which) {
    $("#it" + which.id.substr(2)).slideUp();
}
That code line in the tileClick() function uses string concatenation to construct an id value that jQuery then uses as a selector. The .substr() function is a JavaScript feature that is being used here to extract the characters in the tile <div> starting at the third character (remembering to count from zero). This gives us the column and row numbers that are used to create the correct tile image id. The jQuery slideUp() effect can then be applied to the tile.
Give the revised code a run and you should see a simple animated transition from a top tile image to the underlying lower image when clicked.
Stage 4:
This next step is going to add the dreaded mines and the indicators that tell the player how many mines are adjacent to a revealed tile. This though, is going to need some more image files. We need numbers and we are going to need flags and even a question mark (query).
You could create bottom tiles for each of the possible number values (1 to 8) but, as you will see, it simplifies the code a bit to create the numbers as 68x68 pixel images with a transparent background. The numbers can then sit on top of the bottom tile image which will show through the transparent pixels. You may have noticed that the CSS already had provision for a z-order class to place an image between the bottom and top tiles.
Ready for this stage the downloadable image collection includes:

plus

The naming of the number image files, in particular, is important because the code has to be able to find the correct image for a given tile. If you build your own images with different colours or a different font then you might still like to follow the naming convention used in the sample files. File Tile68-1.png displays the number one and Tile68-8.png displays the number eight.
With no changes needed to the HTML or CSS we can turn to the additions to the JavaScript.
If you are familiar with the Minesweeper game then you will probably remember the rule that there is never a mine under the first tile revealed. The simplest way to achieve that is to only add the mines and mine counts on adjacent tiles after the player has clicked that first tile. Sneaky but functional.
Before we add the functions to add mines in random locations and to manage the adjacent mine counting for the other tiles, we should probably gather some variables together into a game object. This will make changes you might later want to make to the game easier and will keep related variables in a single place where they are easier to find.
We can keep the pArea variable and then define a game object. Thus, the JavaScript now starts:
var pArea;
var game = {
    tileWidth: 68,
    first: true,
    mines: 10,
    rows: 9,
    columns: 9,
    found: 0,
    revealed: 0,
    tiles: []
};
The variable tileWidth has been moved to the new object along with the row and column counts – plus a new number for the count of mines we will use to seed the playing area. There is also a Boolean (first) to spot the player’s first click, a count of mines found and an array at the end to keep track of what sits under each tile.
The buildTiles() function needs some edits to use the new game object values and we can take the opportunity to populate the game.tiles array. In fact, that is going to be an array of arrays (like the bricks we saw in Breakout). We can insert a new array for each row into game.tiles for each iteration of the outer for loop. The function should now look like:
function buildTiles() {
    for(var row = 0; row < game.rows; row++){
        game.tiles.push([]);
        for(let col = 0; col < game.columns; col++) {
            let nDiv = $("<div>").prop('id', 'dv' + col + row)
            .click(function(){tileClick(this);})
            .addClass("tileDiv")
            .css({left: col * game.tileWidth + 'px',
                  top: row * game.tileWidth + 'px'});
            let btile = $("<img>")
                .attr('src', "images/TileRev68.png")
                .addClass("tileImage tileBottom");
            let ttile = $("<img>")
                .attr('src', "images/Tile68.png")
                .prop('id', 'it'+ col + row)
                .addClass("tileImage tileTop");
            nDiv.append(btile).append(ttile);
            pArea.append(nDiv);
            let obj = {mine: false, count: 0};
            game.tiles[row].push(obj);
        }
    }
    pArea.css({width: game.tileWidth * game.columns +'px', height:
               game.tileWidth * game.rows + 'px'}).addClass("pArea");
}
For each tile in a row the function adds a new object to the row array to store mine location data. Note that tilesWide, tilesHigh and tileWidth variables have been replaced by game object members.
The tileClick() function now needs to do something special when the first tile is clicked as well as run the reveal of what is below the top tile.
function tileClick(which) {
    let tileNumber = which.id.substr(2);
    if(game.first){
        // add mines and clues
        setTiles(parseInt(tileNumber.substr(0,1)),
                  parseInt(tileNumber.substr(1)));
        game.first = false;
    }
    $("#it" + tileNumber).slideUp();
}
The code first extracts the tile number (column and row) from the div id. The code demonstrates the two ways that substr() can be used. You can pass a single number as an argument and substr() will return any characters in a string from that position to the end of the string. If you pass a second number then that limits the number of characters returned by substr(). In the code above, tileNumber was set to all of the characters from the third to the end of the <div> id. The column number is the first character in tileNumber and the row number is the second character. [Warning, that code will need some thoughtful changes if you decide to go with 10 or more columns or rows in a game board.]
If the variable game.first is true then a new function setTiles() is called and passed the column and row numbers as arguments. The characters in the string tileNumber are converted to integer values using the parseInt() JavaScript function. Finally the game.first Boolean is set false to stop setTiles() being triggered again.
Start by creating the function setTiles and then we can add the function content.
function setTiles(notCol, notRow) {
}
Why are the arguments called notCol and notRow? Well, that reminds us that they identify the first clicked tile where a mine should not be placed.
This is a good point to run a test of the code so far. There is not a lot of change visually so far but it is good practice to test your code as frequently as possible. It is good to catch typos and small errors when they are young. You might also like to use the Chrome developer tools to inspect the HTML you have created (using the “Elements” tab). Contrast that content with the HTML source.
The first task of the setTiles() function is to place a sequence of mines in random locations making sure that the code does not try and place a new mine where there already is one.
function setTiles(notCol, notRow) {
    let setMines = game.mines;
    let tileCount = game.columns * game.rows;
    while (setMines > 0){
        let here = Math.floor(Math.random() * tileCount);
        let col = here % game.columns;
        let row = Math.floor(here / game.rows);
        if(game.tiles[row][col].mine === false){
            if(row !== notRow && col !== notCol){
                game.tiles[row][col].mine = true;
                let iTile = $("<img>").attr('src',
                            "images/Tile68-m.png")
                     .prop('id', 'mt'+ col + row)
                     .addClass("tileImage tileMid");
                $("#dv" + col + row). append(iTile);
                setMines--;
            }
        }
    }
    setCounts();
}
The function kicks off by creating two variables. The first (setMines) will be used to track our mine laying progress and the second (tileCount) is the total number of tiles in our game area. We then have a while loop. A while loop here is a good choice as we can’t be certain that a randomly chosen tile has not already got a mine and is not the first clicked tile. We therefore don’t know exactly how many times we are going to have to run the code in the loop. What we do know is that the loop will end when the value of setMines has finally reduced to zero after it is decremented using the - - operator.
Within the loop, the variable called “here” is set to a random number between zero and the total number of tiles. We then calculate the row and column number for the randomly picked value. The object in the game.tiles array is checked to make sure that the value at that location in the array is false. If it is and the row and column number is not the first clicked then the Boolean value mine is set true. Following that, the mine image is added to the tile div with the CSS class set to place it between the lower and upper tile image. Finally, the counter of mines (setMines) is decremented.
Math.floor() takes a number and returns the lowest integer less than or equal to the value passed in as an argument.
The variable “here” held a random tile number and the column for that tile is calculated using the modulo operator as it is the remainder after the value “here” is divided by the number of columns in a row. The row number is the tile number divided by the number of rows ignoring any remainder.
The while loop will run until all of the mine locations have been decided and the relevant image added to the tile stack. After that, we follow on with some code to locate all of the tiles without mines and count the number of adjacent mines for each. That is managed by the setCounts() function.
function setCounts() {
    for(let row = 0; row < game.rows; row++){
        for(let col = 0; col < game.columns; col++){
            if(game.tiles[row][col].mine == false){
                // count number of adjacent mines
                game.tiles[row][col].count = getCount(row, col);
                if(game.tiles[row][col].count > 0){
                    let pth = "images/Tile68-" +
                               game.tiles[row][col].count + ".png";
                    let iTile = $("<img>").attr('src', pth)
                                .addClass("tileImage tileMid")
                                .prop('id', 'nt' + col + row);
                     $("#dv" + col + row).append(iTile);
                }
            }
        }
    }
}
The setCounts() function is going to check every tile so we can use the two for loops for the rows and columns. We are looking for any tile without a mine (which will include the first clicked tile). Where those tiles are located another function getCount() is called to count the adjacent mines. If the count is greater than zero then the related number image is added to the tile div. The number images have a common name format “Tile68-“ plus the number and then the extension “.png” to make this easy.
The function getCount() is passed the relevant tile row and column number as arguments.
function getCount(row, col){
    let count = 0;
    for(let r = row -1; r <= row+1; r++){
        for(let c = col-1; c <= col + 1; c++){
            if ((r >= 0) && (c >= 0) && (r < game.rows) &&
                           (c < game.columns)){
                if(game.tiles[r][c].mine) {
                    count++;
                }
            }
        }
    }
    return count;
}
The for loops might look a bit strange. The count of adjacent mines has to include the row above as well as below the tile and columns to the left and right of the tile. Of course, when the tile being checked is near to an edge of the tile set then the row or column may not be valid. If the tile exists in the game area and hides a mine then the variable count is incremented. The function ends by returning the value of count. It has been a while since we have had a function that returned a value.
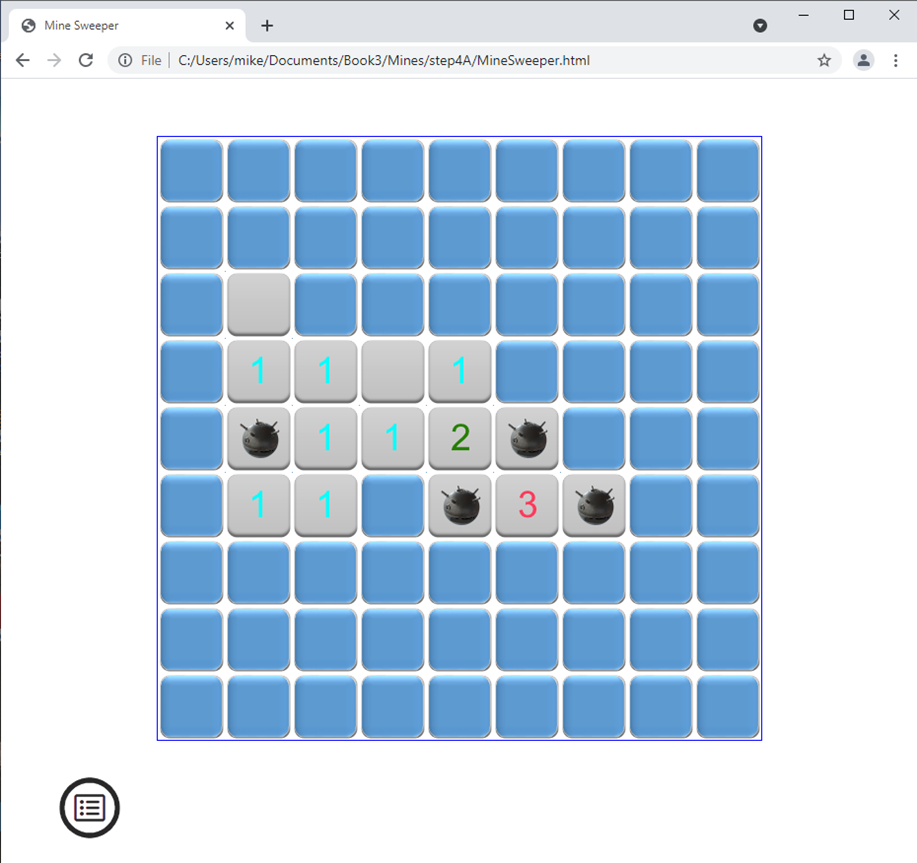
Once all of the new JavaScript has been added you can run the game in the Chrome browser to see how far we have got. Your testing should show that clicking a tile will reveal either a mine or a number or a blank bottom tile. If you have the patience to click all of the tiles you can check that there are the correct number of mines and that the numbers showing the count of adjacent mines are correct for the non-mined tiles.
Stage 5:
When a player clicks on a tile in the Minesweeper game one of several things should happen. If the click is a right click (one using the right mouse button) then a tile that has not been revealed can be flagged as hiding a mine or can have a question mark displayed to indicate that the player thinks it might hide a mine but they are not sure. If it is a left click then the tile will be revealed. If it reveals a mine the player loses. If the click reveals a blank bottom tile, then the game should reveal all adjacent blank tiles and one numbered tile in every direction from each blank tile.
We need to change the line in the buildTiles() function that sets up the click event handler and switch the line to handling a mousedown event. This will allow the code to detect which mouse button is being pressed. To help with that, the tileClick() function is going to be passed an event object along with the object representing “this”.
Find the line and change it from:
.click(function(){tileClick(this);})
To this:
.mousedown(function(e){tileClick(e, this);})
The anonymous function that is the event handler for the mousedown events captures the event argument and then passes it to the tileClick() function along with an object (this) representing the <div> being clicked.
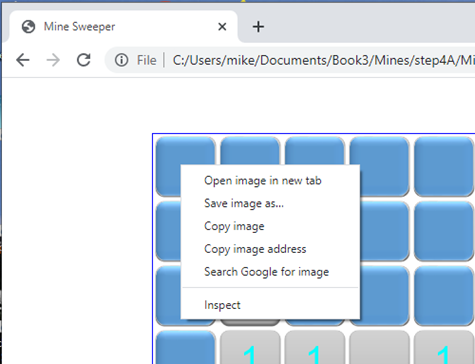
Now there is a small problem when responding to right clicks on HTML elements in a web browser. The problem is that the browser captures the right click and interprets that click as a request to show what is called a context menu. Give it a try on any web page and you will see a context menu offering a range of options depending upon what sort of element was right clicked. The image below shows a right click on one of our tiles.
We need to tell the browser not to display a context menu for right clicked elements in our game. To do that, we need to make a small change to the HTML file. Specifically, we need to add a handler for the “oncontextmenu” event to the body tag in the HTML file. The body tag should now read:
<body oncontextmenu="return false;">
The handler returns false which will suppress the context menu for the game HTML <body> and all elements within that tag, including out tile images.
We can now make some rather extensive changes to the tileClick() function to manage the wider range of responses that we need to allow for. There are so many changes required it probably makes sense to replace the whole function with an empty one and then we can start to build up the new code. There is an extra argument this time. The “e” gives us a name for the event object and the “what” represents the <div> containing the clicked tile (well strictly, the one with the mousedown event).
function tileClick(e, what) {
}
We can then use the conditional (or ternary) operator to check which mouse button was down to trigger the call to the function.
let leftClick = e.which === 1 ? true : false;
This will set the variable leftClick true for a left click and false for a right click.
event.which === 1 for left mouse button
event.which === 2 for middle button (wheel)
event.which === 3 for the right button
The function then continues by setting variables to hold the row and column values for the clicked <div>.
    let col = parseInt(what.id.substr(2,1));
    let row = parseInt(what.id.substr(3));
We know that we still need to respond to the player’s first click by setting the mines and mine counts. However, we should probably only do that for a left click. So, continue with:
    if(game.first){
        if(!leftClick){ return;} // false start
        setTiles(col, row); // add mines and clues
        game.first = false;
    }
Notice that if this is the first click of the game and the player starts with a right click then the click is effectively ignored as the function executes a return statement to bring it to a premature end. The game will wait for the first click to be a left click (OK, mouse down).
    if(leftClick){
        if(game.tiles[row][col].mine){
             alert("Sorry you lost"); // no bang yet?
        } else {
            reveal(row, col);
         }
    } else {
    }
If this is a left click on a mine then the player loses. Clearly, we are going to have to add some code soon to make that a memorable event. If the tile is not a mine then we call a function called reveal() with the row and column passed as arguments. We will get to reveal() later but you can probably guess that it reveals all adjacent blank tiles and any bordering numbered tiles.
Now the else code block that handles any right clicks. We are going to make use of the new value stored for each tile called state. The value of state starts at zero when it is created in buildTiles(). A state of 1 is going to indicate that the tile has been revealed. A state of 2 would indicate that the player has flagged the tile as hiding a mine. Finally, a state of 3 would indicate that the player thinks there might be a mine and so a question mark is shown.
Go back and change the line towards the bottome of the buildTiles() function that sets the tile values to include the new state.
let obj = {mine: false, count: 0, state: 0};
game.tiles[row].push(obj);
As what happens when a tile is right clicked is dependent upon the current value of state it is a great candidate for a switch statement. The switch statement is inserted into the empty else block in the tileClick() function we are working on.
switch(game.tiles[row][col].state) {
    case 0:
        // hide mine (if it is) and show flag. set state 2
        hideMine(col, row);
         break;
    case 2:
        // hide flag and show question mark set state 3
        flagToQ(col,row);
         break;
    case 3:
        // hide question mark and reset top tile state 0
        resetTile(col, row);
        break;
}
There is no case 1 as the game has no need to react to a right click on a revealed tile. Clearly we have another three functions to write (as well as reveal()) but we can end this function with a check to see if the player has won.
  if(game.revealed === game.rows * game.columns){
      // game over the player won
      alert("Winner"); // we can do better than this
  }
The three new functions called from the switch statement are clearly going to be doing some HTML manipulation. We can start with the longest, hideMine():
function hideMine(col, row) {
    if($("#ft" + col + "" + row).length === 0) {
        let ft = $("<img>").attr('src', "images/flag.png")
                    .prop('id', 'ft' + col + row)
                    .addClass("tileImage tileMid");
        let qt = $("<img>").attr('src', "images/Tile68-q.png")
                    .prop('id', 'qt' + col + row)
                    .addClass("tileImage tileMid");
        let dvt = $("#dv" + col + "" + row);
        dvt.append(ft).append(qt.hide());
    }
    $("#mt" + col + row + ", #nt" + col + row).hide();
    $("#ft" + col + row).show();
    $("#it" + col + row).slideUp();
    game.tiles[row][col].state = 2;
    if(game.tiles[row][col].mine){
        game.revealed++;
    }
}
The hideMine() function is passed the column and row of the tile potentially hiding a mine. The first line of the function checks to see if the tile <div> already contains an image of a flag. It does this by constructing a selector for such an image; then, once the selector has been applied, checking the length attribute of the jQuery object to see if it contains anything. If the length is zero then this is the first time this tile has been right clicked and so new images need to be created and appended to the tile <div>.
When jQuery is used to select HTML elements it actually returns an array of objects as it is perfectly possible for a selector to apply to more than one HTML element. If no elements match the selector the object array will have a zero length which is what was tested for above. So far, we have treated all jQuery selectors as if they return a single object but we will see groups of objects being selected later in this game project.
If no flag image was found then both a flag and a question mark image are created and appended to the tile <div>. That will simplify later code. The process should be a familiar one by now.
After that any mine image that might exist is hidden. The flag image is shown and the top tile animated with the slideUp() effect. The tile state is changed to 2 and if the tile does hide a mine, then the revealed count is incremented.
The revealed count is used to check the player’s progress in the game. Once the count equals the number of tiles then the player has won.
Now the case for state 2 where the tile is currently showing a flag and we should switch to a question mark. This is handled by the flagToQ() function which is next.
function flagToQ(col, row) {
    $("#qt" + col + row).show();
    $("#ft" + col + row).hide();
    game.tiles[row][col].state = 3;
    if(game.tiles[row][col].mine){
        game.revealed--;
    }
}
The final state case is where a question mark is displayed and we are going to return the tile to just showing the unrevealed tile image. This time, the resetTile() function does the honors.
function resetTile(col, row){
    $("#it" + col + row).slideDown("fast", function() {
        $("#qt" + col + row).hide();
        $("#mt" + col + row + ", #nt" + col + row).show();
    });
    game.tiles[row][col].state = 0;
}
The code here runs the slideDown() animation on the top tile image and creates a function to run after the animation. That function hides the question mark image and resets any mine or count image that had previously been hidden. Notice the jQuery selector takes two distinct values separated by a comma. It does not matter if one or both does not exist as the show() method is only executed for those that do.
The image changes are followed by a reset of the tile state to zero.
With all of that code for a mouse right click you may have forgotten that a left click called a function if the player had not “found” a mine. This function is going to introduce a programming technique called recursion. Recursion is where a function calls itself. The idea is that a repetitive task is broken down into sub-tasks with the same function managing each in turn.
The process starts by revealing the clicked tile (remember it does not hide a mine). If the tile count value in the game.tiles array is zero then it calls itself in an attempt to reveal the tiles around it as long as they are not mines. The code therefore starts with an if statement that checks that the tile row and column being passed into the function as arguments are valid and not off the game board which they might be if the instance of the function has been called recursively.
function reveal(row, col) {
    if(row < 0 || col < 0 || row >= game.rows || col >= game.columns){
        return;
    }
    if(game.tiles[row][col].state === 0 &&
        game.tiles[row][col].mine === false){
        game.tiles[row][col].state = 1;
        $("#it" + col + row).slideUp();
        game.revealed++;
        if(game.tiles[row][col].count === 0){
            for(let r = row-1; r <= row+1; r++){
                for(let c = col-1; c <= col+1; c++){
                    reveal(r, c); // recursive call
                }
            }
        }
    }
}
After the initial check that the row and col represent a valid tile, the tile state is checked. If the state is zero and it is not a tile with a mine then it is revealed by sliding up the top tile image. If the tile is not a numbered tile (that is, it is not adjacent to a mine) so the tile count is zero then the function calls itself passing the row and column numbers for all of the tiles surrounding this tile.
With that function written we have a game that is nearly playable even if it comes up short at the finish. Give it a run and test that it responds properly to right clicks and that tiles are revealed when you click on a tile that has not been mined.
Stage 6:
Time to work on our big bang, I think. We can start with some CSS to support the explosion image. Add the following class to the CSS file to set the initial image size and z-index. The position absolute property is also set so that we can locate the image at a fixed position within a <div>.
.explosion {
    position: absolute;
    width: 1px;
    height: 1px;
    z-index: 40;
}
As we are going to be concentrating on the more destructive ending of this game we had better add a variable at the top of the JavaScript file for the sound clip and attach the variable to an Audio object in the $.when() jQuery method.
So change the start of the JavaScript file to read:
var pArea, bang;
Then add a line to $.when() remembering to use the name of the audio file you have downloaded which may not be the same as the one shown.
$.when( $.ready ).then(function() {
    pArea = $("#dvPlayArea");
    bang = new Audio("audio/Explosion+3.wav");
    buildTiles();
  });
We can then make a small change to the left click response in the tileClick() function Instead of that feeble alert() we now call a function blowUp() passing in the row and column for the mined tile that has just been clicked by the player. Locate the code section in the tileClick() function and edit it to read:
    if(leftClick){
        if(game.tiles[row][col].mine){
             blowUp(row, col);
        } else {
            reveal(row, col);
         }
    } else {
The new function blowUp() needs to be added and as it has a lot of things to do, some of the steps have been pushed out to other functions. This helps keep the code readable. Nobody likes a long function as they can get difficult to follow.
function blowUp(row, col){
    // slide the tile, blow up, blow the other mines, show wrecks
    let bangs = [];
    let adj = game.tileWidth / 2;
    let mine = $("#dv" + col + row);
    let lpos = parseInt(mine.css("left")) + adj;
    let tpos = parseInt(mine.css("top")) + adj;
    let img = $("<img>").attr('src',
                'images/bang.png').addClass("explosion").hide();
    bangs.push(img.clone().css({left: lpos + 'px', top: tpos + 'px'}));
    pArea.append(bangs[0]);
    setMoreBangs(col, row, adj, bangs, img);
    $("#it" + col + row).hide();
    animateBangs(bangs);
    revealAllTiles();
 }
The first 6 lines of the function create and initialise some useful variables.
The variable called mine becomes an object attached to the HTML <div> where the player clicked the mine. The variables lpos and tpos are then set to the horizontal and vertical mid-points of that <div> by reading the left and top CSS values (using jQuery) and adding half the tile size. This also reveals a feature of the parseInt() JavaScript method. As an example, the css left property would be something like the string “136px” The parseInt() function will convert all of the leading numeric characters into an integer value and ignore the final two non-numeric characters. You may well find this a very useful feature in your future programming.
The next line creates a new <img> HTML object, loads the bang.png image file and (temporarily) hides it.
The plan is to show each of the hidden mines blowing up in response to the first mine triggered by the player. This why the first variable created in this function was an array called bangs. Now we have carefully created a nice <img> object containing the prepared explosion image we can use a new jQuery feature (.clone()) to make copies and add those copies to the array after adjusting the locations to match the hidden mines. Most of that work is done in the setMoreBangs() function. This new function improves the readability of the code
The setMoreBangs() function should read:
function setMoreBangs(col, row, adj, bangs, img){
    for(let r = 0; r < game.rows; r++) {
        for (let c = 0; c < game.columns; c++) {
            if(c !== col && r !== row){
                if(game.tiles[r][c].mine){
                    mine = $("#dv" + c + "" + r);
                    let lpos = parseInt(mine.css("left")) + adj;
                    let tpos = parseInt(mine.css("top")) + adj;
                    bangs.push(img.clone().css({left: lpos + 'px',
                                top: tpos + 'px'}));
                }
            }
        }
    }
}
The next function called by blowUp() is called animateBangs() and that is just what it is supposed to do. The animation for the first explosion (the one under the clicked mine tile) is started first and this followed by the explosion of all of the other mines. The function reads:
function animateBangs(bangs){
    bang.play();
    bangs[0].show().delay(100).animate({
        width: "+=119",
        height: "+=119",
        top: "-=59",
        left: "-=59"
    }, 800).fadeOut(400, function(){bang.currentTime = 0;bang.play();});
    for(let b = 1; b < bangs.length; b++){
        pArea.append(bangs[b]);
        bangs[b].delay(800).show().animate({
            width: "+=119",
            height: "+=119",
            top: "-=59",
            left: "-=59"
        }, 700).fadeOut(400);
    }
}
Our first test program at the start of this project ran through the explosion animation so please refer back to the beginning of this chapter if any of the details need explanation. The only task left to complete the blowUp() function is to reveal the rest of the tiles.
function revealAllTiles(){
    for(let r = 0; r < game.rows; r++) {
        for (let c = 0; c < game.columns; c++) {
            let cr = '' + c + r;
            if(game.tiles[r][c].state === 0){
                $("#it" + cr).hide(); // reveal all tiles
            }
            if(game.tiles[r][c].mine){
                let ss;
                $("#qt" + cr + ", #ft" + cr).hide();
                $("#mt" + cr).show();
                if(game.tiles[r][c].state === 2){
                    ss = $("<img>").attr('src', "images/Tile68-sf.png");
                } else {
                    ss = $("<img>").attr('src', "images/Tile68-s.png");
                }
                ss.addClass("tileImage tileMid");
                $('#dv' + cr).append(ss.hide());
                ss.delay(600).fadeIn("slow");
                $("#mt" + cr).fadeOut("slow");
            }
        }
    }
}
Most of the action takes place when a hidden tile is the location of a mine. The code selects either the sunk ship or the flagged sunk ship depending upon the current state of the tile in question. The selected image fades in as the mine fades out. Tiles without a mine are simply revealed without ceremony.
You can now go mine hunting with the deliberate intent on setting them off to test the code. So, run the program and check that everything happens as it should.
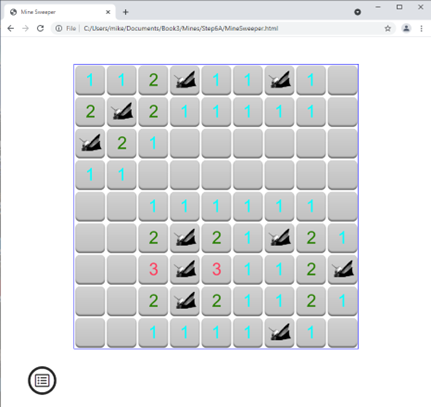
Win or lose, as you need to check all the program code paths.
Final Stage:
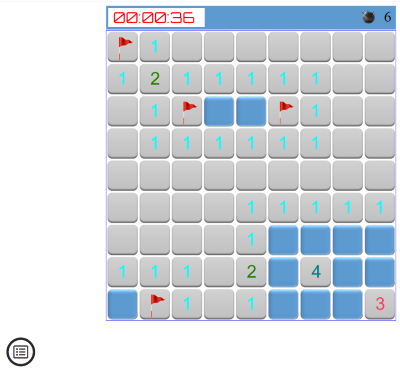
You could stop the project at this point as you have a working game. If you are thinking of showing it off to others though you might like to add some polish to the user experience. Maybe add some user-friendly features like a timer, a mine counter and offer an options dialogue to turn off the sound effects in case someone wants to play without annoying others. It would be nice to be able to restart the game without having to use the browser reload button.
If the game was going to have a timer display, then my preference was for something that looked like an old-fashioned LED display just like the original Microsoft version. I had a look around for a suitable font and came up with Orbitron although you may prefer something different. Using a font that is not universally distributed to PCs raises another new topic. How do we add a font to the game? You might guess, there are options. Appendix 5 has some useful notes on locating new fonts and applying them to your projects.
Your first option is to download the font you choose to your PC, install it and then just use it. The downside of that approach is that if you share your code with someone else, they may not have the same font and that might spoil their experience.
The second option is to download the font as a web font and store the font in your game folder. You would also have to add some supporting CSS for the font as well as referencing the font in the CSS for the HTML element that will use that font. This solves the issue of sharing your code although it can be a faff to get everything in the right place.
Third option would be to use a CDN, in just the same way as you might have chosen to reference jQuery. This is almost certainly the preferred method for readers working on a Chromebook.
All three approaches are covered here using Orbitron as the example font. First though we had better add to the game HTML so that we have an object to use the font. So, starting there, insert another <div> and content into the dvGame <div> before dvPlayArea.
<div id="dvGame">
    <div id="dvInfo" class="info">
        <div id="dvTimer" >00:00:00</div>
        <div id="dvCount">
            <label id="lblMCount">0</label>
            <img src="images/Tile68-m.png">
        </div>
    </div>
    <div id="dvPlayArea"></div>
</div>
Using an <img> in the mnuDiv area was not looking perfect (did you notice?) so switch the image to a new <div> that can use the same image file as a background. Plus add a “restart” button. The <div> should now look like:
<div id="mnuDiv">
    <div id="iSet"></div>
    <div id="dvBtn">
        <button id="btnStart">Restart >></button>
    </div>
</div>
The purpose of the game menu icon was to present the player with one or more options in a dialogue box. We might as well build the dialogue in HTML ready to be displayed on demand. Add a final block of HTML at the bottom of the <body> that can be hidden and displayed when required.
<div id="dvSetOuter">
<div id="dvSet">
<div style="width: 100%;position: relative;">
<div style="float:left;">
<label style="font-size: 32px;">
Game Settings</label>
</div>
<div id="iClose"></div>
</div>
<div id="dvSounds">
<label style="float: left;">Play Sounds:</label>
<input type="checkbox" id="cbSound" checked>
</div>
</div>
</div>
Note: the characters “ ” insert what is known as a non-breaking space into the HTML. This stops the browser from choosing to ignore what it would otherwise see as unused white space. The new additions to the HTML are all going to need CSS support so the following changes and additions to the CSS file will be needed.
Start with a change to the top margin in the .pArea class.
.pArea {
    position: absolute;
    margin-left: auto;
    margin-right: auto;
    margin-top: 1px;  /*  was 50 */
    border: 1px solid blue;
    display: block;
    left: 50%;
    transform: translate(-50%, 0);
}
The same support for the <div> that replaced the menu icon <img> tag. Notice that the background image changes in response to a mouse “hover”.
#iSet {
    float: left;
    margin-left: 50px;
    width: 64px;
    height: 64px;
    background-image: url("images/menuBlack.png");
}
#iSet:hover {
    background-image: url("images/menuGreen.png");
}
Then some CSS to support the new button in that same <div>:
#dvBtn {
    float: left;
    margin-left: 30px;
    margin-top:10px;
}
#btnStart {
    font-size: 36px;
}
Then the CSS for the newly added timer display and mine count. Notice that the font for the timer display has been set to “Orbitron”. Just where the browser finds the font has yet to be decided.
#dvTimer {
    float:left;
    margin-left: 5px;
    margin-top: 5px;
    font-family: Orbitron;
    color: red;
    font-size: 32px;
    background: white;
    text-align: left;
    padding-left: 10px;
    width: 194px;
}
#lblMCount {
    font-size: 32px;
    float: right;
    margin-left: 10px;
    margin-right: 10px;
    margin-top: 5px;
}
#dvCount img{
    height: 48px;
    width: 48px;
    float: right;
}
Next the CSS to support the settings dialogue.
#dvSetOuter {
    background: white;
    width: 264px;
    height: 224px;
    display: none;
    position: absolute;
}
#dvSet {
    display: block;
    background: white;
    border-style: outset;
     border-color: #5D9AD0;
     width: 250px;
     height: 210px;
     margin-left: auto;
     margin-right: auto;
     position: relative;
     top: 5px;
}
Notice that the dvSetOuter <div> has a display rule of “none”. This will hide the <div> and its content. We can use jQuery to display the div in response to a click on the menu icon.
Finally for CSS, we have some support for the items within the dialogue:
#iClose{
    width: 31px;
    height: 31px;
    margin-right: 1px;
    margin-top: 1px;
    float: right;
    background-image: url("images/Close.png");
}
#iClose:hover{
    background-image: url("images/CloseRed.png");
}
#dvSounds {
    top: 30px;
    left: 10px;
    width: 80%;
    position: relative;
}
Before getting to the JavaScript, we will need to support the new HTML objects it is decision time for the font source.
If you downloaded the font to your PC then there is nothing else that needs doing. I did this before testing on my Apple Mac.
On my Chromebook I simply added a line that linked to the font CDN to the HTML <head>. The line wraps badly on this page but was a single line in the Chromebook HTML. Again this technique will work with all PC types if you fancy it.
<head>
    <meta charset="utf-8" />
    <meta http-equiv="X-UA-Compatible">
    <title>Mine Sweeper</title>
    <meta name="viewport" content="width=device-width, initial-scale=1">
    <link href="https://fonts.googleapis.com/css?family=Orbitron&display=swap" rel="stylesheet">
    <link rel="stylesheet" type="text/css" media="screen"
          href="main.css" />
    <script src="jquery-3.7.1.min.js"></script>
    <script src="main.js"></script>
</head>
On my Linux machine I installed the web font files downloaded from the Google repository and then added references to those files to the game CSS. I edited the default list a bit as support for old versions of Internet Explorer and iOS did not seem necessary.
@font-face {
    font-family: 'Orbitron';
    font-style: normal;
    font-weight: 400;
    src: local('Orbitron Regular'), local('Orbitron-Regular'),
         url('../webfonts/orbitron-v9-latin-regular.woff2')
             format('woff2'),
         url('../webfonts/orbitron-v9-latin-regular.woff')
             format('woff'),
         url('../webfonts/orbitron-v9-latin-regular.ttf')
             format('truetype'),
  }
Now we have sorted out the font it is time for JavaScript again.
Start with a couple of new variables at the top of the file (one for a timer and another for the mine count HTML) plus some additions to the game object. Note that the found member is now initialised to 10.
var pArea, bang, timerVar, lblMines;
var game = {
    tileWidth: 68,
    first: true,
    mines: 10,
    rows: 9,
    columns: 9,
    found: 10,
    seconds: 0,
    revealed: 0,
    sound: true,
    tiles: []
};
The $.when() function needs some new lines to add event listeners for new HTML objects and to initialise the mine count label.
$.when( $.ready ).then(function() {
    pArea = $("#dvPlayArea");
    lblMines = $("#lblMCount");
    lblMines.html(game.found);
    $("#iSet").click(showSettings);
    $("#dvBtn").hide();
    $("#btnStart").click(reStart);
    $("#iClose").click(function() {$('#dvSetOuter').hide();});
    $("#cbSound").change(function() {game.sound =
                             $("#cbSound").prop("checked");});
    bang = new Audio("audio/Explosion+3.wav");
    buildTiles();
  });
The “click” and “change” events for the settings checkbox and close icon are dealt with by defining short anonymous functions. Mind, there are two new functions to add; showSettings() and restart().
Starting with showSettings:
function showSettings() {
    let offset = pArea.offset();
    let dvs = $("#dvSetOuter");
    let wd = parseInt(pArea.css("width")) - parseInt(dvs.css("width"));
    dvs.css({left: (offset.left + wd/2) + 'px', top:
                   (offset.top + 100) + 'px'}).show();
}
This function starts by asking jQuery for an object called offset() relating to the playArea <div>. The offset object holds values for the top and left positions of the <div> relative to the browser window. The function needs these values to place the settings dialogue nicely over the game play area. The dialogue <div> is positioned using CSS and then displayed with the .show() function.
function reStart() {
    $("#dvBtn").hide();
    $(".tileTop").slideDown(); // slide all top tiles down again
    $(".tileMid").remove(); // removes all images with this class
    game.revealed = 0;
    game.first = true;
    game.found = game.mines;
    game.seconds = -1; // as timerTick adds a second
    timerTick();
    lblMines.html(game.found);
    game.tiles = [];
    for(let row = 0; row < game.rows; row++){
        game.tiles.push([]);
        for (let col = 0; col < game.columns; col++){
            game.tiles[row].push({mine: false, count: 0, state: 0});
        }
    }
}
Did you notice the clever way all of the mine and count images were removed from the HTML with a single jQuery line as they all share the same CSS class?
That function also made a call to timerTick() that looks like it displays the game elapsed time.
function timerTick(){
    game.seconds++;
    let tstr = padToTwo(Math.floor(game.seconds / 3600)) + ":" +
               padToTwo(Math.floor(game.seconds/60)%60) + ":" +
               padToTwo(game.seconds % 60);
    $("#dvTimer").html(tstr);
}
That function increments the game.seconds value (must remember to add code for a timer to call this) and then creates a string representing that time in hours, minutes and seconds. The jQuery .html() function then injects the string as content into the dvTimer object. The function pads each of the time elements to two characters using a padToTwo() function. As an example, this would mean that ‘2’ minutes would be displayed as ‘02’. The padToTwo() function is next:
function padToTwo (num) {
     return num > 9 ? "" + num : "0" + num;
}
The function is passed a number and returns a formatted string constructed by the ternary operator. Concatenating a string with a number (even an empty one) will produce a string.
You will have figured out that we need to get a timer started and the best place to do that would be when the first tile was clicked. We can add a line to the code that responds to the first click in the tileClick() function. The new line will call timerTick() every second.
if(game.first){
      if(!leftClick){ return;} // false start
      setTiles(col, row); // add mines and clues
      timerVar = setInterval(timerTick, 1000);
      game.first = false;
}
The built in JavaScript setInterval() function will call the timerTick() function every thousand milliseconds. The timer is not quite precise in all circumstances but it will manage counting whole seconds just fine. We also need to stop the timer and display the restart button when a game is over, win or lose.
Locate the code section in tileClick() that deals with a left click on a mine and add the two new lines in the order shown.
  if(leftClick){
      if(game.tiles[row][col].mine){
          clearInterval(timerVar);
          blowUp(row, col);
          $("#dvBtn").show();
Then locate the section of code at the bottom of tileClick() that is designed to spot a win. We need to do something better than just display an alert so change the code to call a function called gameWon().
if(game.revealed === game.rows * game.columns){
    // game over the player won
    gameWon();
}
We can then create a minimalist gameWon() function:
function gameWon() {
    clearInterval(timerVar);
    alert("Winner"); // we can still do better than this
    $("#dvBtn").show();
}
The code needs to maintain the display of mines yet to be found by the player. This needs an extra two lines at the very end of the hideMine() function:
    game.found--;
    lblMines.html(game.found);
Plus two similar (but not quite identical) lines at the bottom of the flagToQ() function:
      game.found++;
      lblMines.html(game.found);
We have a settings dialogue that the player can use to turn sound off and on but not yet any code to manage that when a mine is clicked. The code lines that call bang.play() are in the animateBangs() function.
The start of the animateBangs() function should be edited to include a check on the value in game.sound in two places as follows:
function animateBangs(bangs){
    if(game.sound){
        bang.play();
    }
    bangs[0].show().delay(100).animate({
        width: "+=119",
        height: "+=119",
        top: "-=59",
        left: "-=59"
    }, 800).fadeOut(400, function(){
        if(game.sound){
            bang.currentTime = 0;
            bang.play();
        }
     });
Definitely time to run some tests on the sound setting, the mine count and the restart button (if you have not already run some on the changes as they were made).
For me, that just leaves the game winner.
I thought it might be a nice wrap up to do the whole thing using jQuery. Well not quite, I also went hunting for an MP3 sound effect for applause. I leave you with showWin() called from gameWon() after the timer was stopped. No reason why you can’t merge the two functions though.
function showWin() {
    let dv = $("<div>").html("Winner").css({color: 'red',
          'font-size': '64px', 'position': 'relative', 'z-index': 100});
    let ap = new Audio("audio/applause4.mp3");
    pArea.append(dv);
    ap.play();
    dv.animate({
        'font-size': "+=64",
        top: "+=64",
        left: "+=100"
    }, 1500).fadeOut('slow', function(){dv.remove();});
 }
Now all you have to do is win the game to test it out. Or, can you think how to add a cheat to ensure you can always win?
Once again, getting from a working game to a playable game was a fair bit of extra last-minute effort but I hope that you will agree it was worth it.
The next game is almost completely different.
Code downloads for this chapter are available here.