Chapter 8: A Flappy Bird
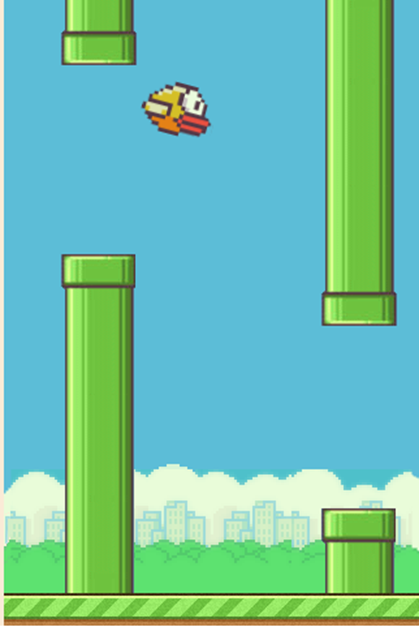
The Flappy Bird game was a cultural phenomenon in 2013 and early 2014. It was developed by the Vietnamese artist and programmer Dong Nguyen. It was an addictive side scroller game where a bird had to be flown through a succession of gaps between pipes. It combined total simplicity when it came to user control with fiendish difficulty in actual play. I can’t think of a better introduction to using sprites and sprite sheet animation.
A sprite, in computer graphics terms, is a two-dimensional image that is drawn into a composite scene. Generally, we use the term sprite for images that move about a scene while representing an object or character. In our version of “Flappy Bird” we will use sprites to represent the pipes, plus part of the scene to help add to the impression of forward movement and of course the bird. We will implement sprites by extending the capability of JavaScript objects to include functions.
Start by creating a new game folder with a subfolder (called images) for images. You will probably want to download the image set for this game from the book website and save the files in that new images sub-folder. As you will see, there are not many and they are all pretty simple. The repetitive bird image will be explained once we get the basics of sprites up and running.
We only need a very simple HTML file to act as game scaffolding.
<!DOCTYPE html>
<html>
<head>
    <meta charset="utf-8" />
    <meta http-equiv="X-UA-Compatible">
    <title>All In A Flap</title>
    <meta name="viewport" content="width=device-width, initial-scale=1">
    <link rel="stylesheet" type="text/css" media="screen"
                                          href="main.css" />
 </head>
<body>
    <div id="dvMain">
        <canvas id="cvGame"></canvas>
    </div>
    <script src="main.js"></script>
</body>
</html>
The <body> contains a <canvas> element set within a <div> plus a link for the JavaScript file. The JavaScript file link needs to sit at the bottom of the HTML body section as we are not using jQuery and we don’t want the JavaScript to start running before the HTML is fully loaded. jQuery is a brilliant library when you need to do a lot of HTML manipulation. In this game all the action again takes place on the <canvas> object.
Save the HTML file to the game folder as index.html (this may prove important).
We can then create a short CSS file (called main.css). The CSS rules simply set a colour for the <div> background and size the <canvas> element while positioning it centred horizontally. The canvas element also gets a background image.
#dvMain {
    width: 100%;
    height: 100%;
    background-color: antiquewhite;
}
#cvGame {
    width: 320px;
    height: 480px;
    background-image: url(images/flappyback.png);
    background-repeat: no-repeat;
    display: block;
    margin-left: auto;
    margin-right: auto;
}
It should be mentioned that if an image is used as the background for an HTML element, then if the element size is greater than the image size then the image is repeated and not scaled. In this instance, the image is slightly shorter than the canvas height and the CSS no-repeat option is set. In fact, any repeat would not have been visible but it is something to bear in mind.
You will have spotted that the shape of the game area fairly well approximates a smart phone in “portrait” mode. This is fundamentally a phone game although it is just as much fun to play on a larger screen. Frustratingly fun.
The HTML and CSS files should not need any further changes as everything to come is in the JavaScript.
The JavaScript file starts with two variables familiar from the Breakout game plus one more to contain the first of the sprites.
var canvas = document.getElementById("cvGame");
var ctx = canvas.getContext("2d");
var runway;
The game will have multiple sprites and each sprite will be represented by an object. As each object will have the same basic structure, we can define a function to create them on demand.
var Sprite = function(imgSrc) {
    this.x = 0;
    this.y = 0;
    this.moveX = 0;
    this.moveY = 0;
    this.img = new Image();
    this.img.src = imgSrc;
    this.continuous = false;
    this.visible = false;
};
The function is passed the name and location of the sprite’s image file as an argument. The sprite will also have an x/y position on the game area. There are also values for movement in the x and y directions (just like the Breakout ball). The image source file is used to set the object Image. There are two Boolean variables. One will be used to set the object visibility and the other will be an attribute of our first sprite.
Managing the drawing of multiple sprites could become a cumbersome task. It would be great if we could get the sprites to manage their own movement and to draw themselves.
We can do that by attaching a function to the sprite object. We do that through the prototype property of objects. The prototype property allows us to add a new function (method) to an object constructor that can be used by any instance of the object that gets created.
Add the following code to the JavaScript file after the Sprite function:
Sprite.prototype.animate = function() {
    if(this.visible){
        ctx.drawImage(this.img, this.x, this.y);
    }
    if(game.state == game.states.running ||
                    game.state == game.states.over){
        this.x += this.moveX;
        this.y += this.moveY;
        // allow for continuous display of horizontal sprite
        if(this.continuous && this.x < (canvas.width - this.img.width)){
            this.x = 0;
        }
    }
};
The new function (technically called a method, as it belongs to an object) will now be attached to any new sprite object. The method uses the visible property to decide if the object should be drawn onto the canvas. If the sprite object is visible then the <canvas> drawImage() method is used to draw a bitmap image at the sprite’s x/y position. Once again, we see some code using the “this” keyword. In this context the “this” points to the individual sprite created by the Sprite object constructing function.
The new method then checks the current game state to see if the x/y values should be altered by applying the moveX and moveY properties. Then there is a check on the individual sprite’s continuous Boolean property. If this is true then a check is made on the position of the right-hand edge of the sprite. If that edge would now be visible then the x value is reset to zero so that the sprite can restart on its track across the play area canvas. Remember this is a side scroller game and most of the sprites move right to left.
Notice that the sprite animation was able to refer to the width attribute of the sprite image.
As the sprite animate method referred to a game object, we had better add that next.
var game = {
    states: Object.freeze({"start": 0, "running":1, "over": 2,"end" : 3}),
    speed: 40,
    move: -2,
    runwayHeight: 25,
    state: null,
    tmr: null,
    width: 320,
    height: 480
};
The first member of the game object is set to another object with some new syntax. The object contains a list of attributes that describe the game state. The game might be ready to start, or running, or coming to an end or finally at an end. The freeze() method applied to the object means that no new elements can be added. This is the way that you can set up a fixed list of values in JavaScript objects without any danger of accidentally adding to the members. This is also the closest that JavaScript gets to having an “enum” type.
In many programming languages, an enum (or enumerated type) is a list of named values that behave as constants. Usually, a variable defined as having an enumerated type can be assigned any of the values in the enum. Individual language rules differ on how the enumerator is treated for syntax checking and compilation. At the very least, an enum improves the readability of a program.
The game object also includes that familiar speed value to run a game timer to manage the canvas drawing. There is a value for runwayHeight which we will use shortly. This is followed by a value for the current game state, set to null. Then a value for the timer when it gets initialised and finally the width and height of the canvas element. These values match the relative pixel values used in the CSS file. There is also a value called move. This is the default movement in the x (horizontal) direction for the sprites. In this game, all but the bird move towards the left hand edge of the game play area.
Next write a short function to create our first Sprite instance.
function setRunway(){
    runway = new Sprite("images/runway.png");
    runway.x = 0;
    runway.y = canvas.height - game.runwayHeight;
    runway.moveX = game.move;
    runway.continuous = true;
    runway.visible = true;
}
Just as in the Breakout game we can use a function called initialise() to set the game up.
function initialise() {
    canvas.width = game.width;
    canvas.height = game.height;
    setRunway();
    game.state = game.states.running;
    game.tmr = setInterval(drawFrame, game.speed);
}
The initialise() function sets the canvas width and height and then calls the function that creates the runway sprite. So that we can run a quick test, the game state has been set to “running”. A timer is then created and set to call a function called drawFrame(). We had better write that next:
function drawFrame() {
    ctx.clearRect(0, 0, canvas.width, canvas.height);
    runway.animate();
}
Finally (for the moment) we need to add a call to the initialise function right at the bottom of the JavaScript file.
initialise();
When all of the file additions have been saved, you can run the first test. Make the HTML code tab the “current” tab in VS Code and use the Run Menu to start a debugging session in Chrome.
What you should see is:
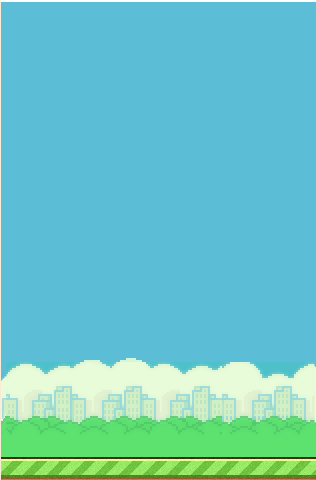
A distant cityscape with definite movement right to left at the bottom of the play area. If not, then open the Chrome developer tools window and investigate.
If all is as it should be, then you have your first sprite running.
It was obviously premature to have the game state set to “running” in the initialise() function so perhaps we should add some event listeners to accept input from the player and use that to get things started. Edit the line before last in initialise() and then add two new lines, thus:
    window.addEventListener("keydown", playerControl);
    window.addEventListener("pointerdown", playerControl);
    game.state = game.states.start;
    game.tmr = setInterval(drawFrame, game.speed);
That code change introduced the “pointerdown” event that allows the listener to respond to mouse buttons and (if you have a touch sensitive screen) to touch (including pen or stylus tap).
We now have event listeners for a keyboard key or mouse button being pressed and (maybe) a listener for a touch on the screen. We had better write at least a minimalist playerControl() function. The first response to an event should be to start the game.
function playerControl(e) {
    switch (game.state){
       case game.states.start:
           game.state = game.states.running;
           break;
       case game.states.running:
           break;
       case game.states.end:
           break;
   }
}
With those additions in place, try running the game again. You should see the game loads in a stopped state but the runway animation starts with a click or key tap. It would improve things a bit if the game let the player know that’s how the game starts.
Create a function called showPlay() to display a message passed as an argument.
function showPlay(txt) {
    ctx.font= "24px Arial";
    ctx.fillStyle= "blue";
    ctx.textAlign="center";
    ctx.fillText(txt, canvas.width / 2, canvas.height / 2 + 60);
}
As the drawFrame() function clears the <canvas> roughly every forty thousandths of a second we had better call this function from there. Edit drawFrame() to add that call as follows:
function drawFrame() {
    ctx.clearRect(0, 0, canvas.width, canvas.height);
    runway.animate();
    if(game.state === game.states.start){
        showPlay("Click, touch or key to start");
    }
}
If you run another quick test, you should see the new friendly blue message when the game is ready to start.
So far the JavaScript code has rather casually introduced two new drawing functions for the canvas object. They deserve a little more explanation.
There are three forms of .drawImage()
ctx.drawImage(image, cx, cy);
ctx.drawImage(image, cx, cy, width, height);
ctx.drawImage(image, sx, sy, sWidth, sHeight, cx, cy, width, height);
cx and cy set the coordinate for the top left hand corner of the image on the target canvas.
The width argument sets the width to draw the image on the canvas. If this value is different to the image file width then the image will be scaled to fit.
The height argument sets the height to draw the image and can be scaled in the same way as the width value.
The sx, sy, sWidth and sHeight values can be set to select a rectangle from within the image to draw onto the canvas.
.fillText(text, x, y, [maxWidth])
The text argument is the text to paint. The x,y values set the position on the canvas and the optional parameter (maxWidth) can set the maximum number of pixels to be used to display the text. Using that optional parameter can result in a font change and/or scaling to fit.
The fillText effect is influenced by the choice of font and text alignment values.
Before we introduce our heroic bird, we should probably add some sprites to represent the pipes and get them animated. The pipes come in pairs with a gap between them through which we will later hope to fly our bird. We should add some properties to the game object to help out with the pipes. Don’t forget a coma after the height value then please add:
    pipeHeight: 392,
    pipes: []
The pipeHeight property holds the pipe image height in pixels and we also have an array which we will use to hold the pipe sprite objects. As the pipes come in pairs a function to create the sprites should probably deal with them a pair at a time.
function addPipePair(x, gapTop, gapHeight) {
    let topPipe = new Sprite("images/pipet.png");
    topPipe.x = x;
    topPipe.y = gapTop - game.pipeHeight;
    topPipe.moveX = game.move;
    game.pipes.push(topPipe);
    let bottomPipe = new Sprite("images/pipeb.png");
    bottomPipe.x = x;
    bottomPipe.y = gapTop + gapHeight;
    bottomPipe.moveX = game.move;
    game.pipes.push(bottomPipe);
}
The function takes the x position of the pipe pair, the y position of the top of the gap between the pipes and the gap size as arguments. The function leaves the Boolean property “visible” as false for the time being as the pipes are all going to be initially placed off the playing area so we would not want to waste time and computer power drawing them.
We now need some code to set the pipe pair values and call addPipePair() for each. It will keep things tidy if we wrap that code up into another function which can also add a finish line to the game following the pipes – well you never know, you might get there.
function createPipes(){
    addPipePair(500, 100, 145);
    addPipePair(800, 50, 145);
    addPipePair(1000, 250, 140);
    addPipePair(1200, 150, 125);
    addPipePair(1600, 100, 125);
    addPipePair(1800, 150, 120);
    addPipePair(2000, 200, 120);
    addPipePair(2200, 250, 120);
    addPipePair(2400, 30, 105);
    addPipePair(2700, 300, 105);
    addPipePair(3000, 100, 85);
    addPipePair(3300, 250, 85);
    addPipePair(3600, 50, 65);
    // add finish bar here to keep things tidy
    let finish = new Sprite("images/finish.png");
    finish.x = 3900;
    finish.moveX = game.move;
    game.pipes.push(finish); // as finish must move with pipes.
}
We could have set the pipe numbers up in an array and looped through that but the above code has the benefit of clarity and probably helps any later tweaking you might want to do to adjust the difficulty of the game.
Add a call to createPipes() to the initialize() function. Place it somewhere before the line that sets the timer.
To manage the pipes we need a process that decides which pipes are visible and we also need something to call the animate() method for each of the pipe sprites. We could combine both activities into a single function. Call it drawPipes().
function drawPipes(){
    for(let p = 0; p < game.pipes.length; p++) {
        //only draw pipes we can see but advance them all
        if(game.pipes[p].x > -(game.pipes[p].img.width) &&
                           game.pipes[p].x < canvas.width){
            game.pipes[p].visible = true;
        } else {
            game.pipes[p].visible = false;
        }
        game.pipes[p].animate();
    }
}
We can then add a call to that function into drawFrame(). Place it just before the call to runway.animate().
Time for another test. Once you trigger the game start you should now see a succession of pipe pairs scrolling left and, if you are patient, finally a finish line.
Stage 2:
Now for our feathered friend who will lead to some new tricks for our sprites.
The downloadable image set for this game included a file called flap.gif. This is an animated gif file so, if you double click it, you should see the animation running. The pixilated bird appears to flap its wings.
On an Apple Mac you would need to right click the flap.gif file and select “Open with” and “Chrome” to see it animated. The default OSX app, called “Preview”, does show that the gif is constructed from four distinct images; but does not run the animation.
If you now turn your attention to the flapping.png file you will see that it is also made up from 4 separate images of the pixilated bird. The images are near identical except that the “wing” is alternately in a raised middle or down position. If we were to rotate through these images as if they were frames of a cinema film then the bird would appear to flap. This would be just like the .gif file which automates just such a sequence.
If we want the bird sprite object to be able to do this sort of animation then we will have to make some additions. Add a line to main.js to create the bird sprite and place it after the definition of a Sprite object as JavaScript will need to know about those before it creates our bird. We can then follow that line with a function that adds some new members and values to the bird Sprite instance but not to any other sprites.
var bird = new Sprite("images/flapping.png");
function setBird(){
    bird.x = Math.floor(canvas.width / 3);
    bird.y = canvas.height / 2;
    bird.visible = true;
    bird.frames = 4;
    bird.frame = -1;
    bird.frameWidth = 57;
}
We can then create a special animate() method for just the bird instance of Sprite. This method will be used rather than the default Sprite animate() method. The changes to the new animate method are reasonably straightforward as the drawImage() method has a handy alternative set of arguments that lets us specify that just a part of the source image should be drawn on a <canvas>. The idea is that on each successive call to the animate method, the frame number should be incremented and that frame number used to work out which section of the image should be drawn.
bird.animate = function(){
    if(game.state === game.states.start ||
        game.state === game.states.running){
      this.frame += 1;
      this.frame %= this.frames;
    } else {
      this.frame = 0; // stop animation at end
    }
    if(game.state === game.states.running ||
            game.state === game.states.over){
        this.y += this.moveY;
    }
    let clipx = this.frame * this.frameWidth;
    ctx.drawImage(this.img, clipx, 0, this.frameWidth,
                    this.img.height, this.x, this.y,
                    this.frameWidth, this.img.height);
};
There is a stand out line of JavaScript code there:
this.frame %= this.frames;
That line uses the modulo operator to reset the frame number to zero when the value equals the total number of frames. It could have been written as:
if(this.frame >= this.frames){
  this.frame = 0;
}
The drawImage() method is being passed the image, the x position of the image subsection, the y position of the image subsection, the width of the subsection, the height of the subsection, the x coordinate on the canvas, the y coordinate on the canvas, the width to draw and finally the height to draw. While lengthy, this format allows for quite a bit of flexibility.
We can now add a line to the initialise() function to create the bird sprite ready to test out our modified animate() method.
setBird();
If we now add a call to bird.animate() to the drawFrame() function. Put it between the call to drawPipes() and runway.animate(). Then run another test. You should see a bird in level flight completely ignoring the pipes.
Stage 3:
Now all we have to do is add some control over the bird and then we can start detecting the inevitable collisions between bird and pipes.
The only input that the player has to this game is to give the bird an upwards trajectory by pressing a key or clicking with the mouse or touching a touchscreen (as appropriate). The bird otherwise slows and then falls under the influence of gravity. Any object falling in air reaches a terminal velocity (when air resistance counteracts the acceleration from gravity). We are on the verge of applying some very simplified real-world physics to manage this. Starting with a handful of additions to the game object.
We might as well also add a couple of values to keep score, while we are at it.
    jump: -10,
    maxGravity: 10, // terminal velocity
    gravity: 1,
    score: 0,
    highScore: 0
The game.jump value sets how far the bird moves upwards in response to the player’s input. We can apply that in the playerControl() function when the game state is “running”.
function playerControl(e) {
    switch (game.state){
       case game.states.start:
           game.state = game.states.running;
           break;
       case game.states.running:
            bird.moveY = game.jump;
            break;
       case game.states.end:
           break;
   }
}
What goes up, should also come down. We must therefore apply some gravity to the bird. The effect of gravity on a falling object is to accelerate the falling speed up to (in an atmosphere anyway) a terminal velocity. Also, the game ends if (when) the bird hits the ground.
The simplest time to do that is when drawFrame() is executed but it will keep the code tidier if we add the changes to a new function. That we can call from drawFrame().
function birdMove(){
    if(game.state === game.states.running ||
        game.state === game.states.over){
        if(bird.moveY < game.maxGravity){
            bird.moveY += game.gravity;
        }
    }
    if(bird.y > (canvas.height - (bird.img.height +
                                game.runwayHeight))){
        game.state = game.states.end; // game ends here
        clearInterval(game.tmr); // stop the action
    }
}
The bird in the original game did not just bob up and down but changed its angle of flight. The bird swooped upwards and then dived down. Adding optional rotation to our sprite would allow us to replicate that and could be very useful in any future use of a similar sprite object in other games. Not everything in life is square and horizontal.
We need to store some values for the rotations to be applied to our bird. Ask yourself where they should be stored. As they are likely to be unique to this game, they could be added to the game object. Maybe the better approach would be to apply them to the bird instance by adding the new values in the setBird() function.
    bird.rotation = 0;
    bird.angleUp = -15*Math.PI/180;
    bird.angleDip = 5*Math.PI/180;
    bird.maxDip = 70*Math.PI/180;
That sets a value of angleUp at 15° (degrees converted to radians), a downward change in angle angleDip of 5° and a maximum dive angle maxDip of 70°. The angles in degrees are all being converted to radians. The angleUp value is negative because zero radians on the <canvas> drawing area is at the three o’clock position with values increasing clockwise. Thus, an upwards angle facing right (2 o’clock in fact) would be a negative value. [We could have set that angle as (360 – 15) * Math.PI / 180 with the same result by going all around the clock.] We could have set (say) the angleDip value directly to the result of the calculation (0.087266 in that instance) but that would be much harder to make sense of when reviewing the code. Sometimes we write code for humans to read as well as computers to execute.
We could apply the rotations in the birdMove() function alongside the other adjustments to the bird values. Add the new case statement after the existing lines in that function.
    switch(true) {
        case bird.moveY <= -7:
            bird.rotation = bird.angleUp;
            break;
        case bird.moveY <=-4:
            bird.rotation = bird.angleUp + bird.angleDip;
            break;
        case bird.moveY <= 0:
            bird.rotation = 0;
            break;
        default:
            bird.rotation += (bird.rotation < bird.maxDip) ?
                                bird.angleDip : 0;
            break;
    }
How about that switch statement? How does that work? The value passed to the switch() is the Boolean constant true. So, the statement looks for the first case that evaluates to true and if it does not find one then it executes the code following the default case.
Next, we are going to implement the rotations back in the bird animate() method. I am sure you will be glad to know that the canvas drawing facilities include support for drawing things at an angle and that will save what would otherwise have been a lot of trigonometry or the preparation of multiple bird image sets.
bird.animate = function(){
    if(game.state === game.states.start ||
        game.state === game.states.running){
        this.frame += 1;
        this.frame %= this.frames;
    } else {
        this.frame = 0; // stop animation at end
    }
    if(game.state === game.states.running ||
            game.state === game.states.over){
        this.y += this.moveY;
    }
    ctx.save();
    let xAdj = this.frameWidth / 2;
    let yAdj = this.img.height / 2;
    ctx.translate(this.x + xAdj, this.y + yAdj);
    ctx.rotate(this.rotation);
    let clipx = this.frame * this.frameWidth;
    ctx.drawImage(this.img, clipx, 0, this.frameWidth,
                    this.img.height, -xAdj, -yAdj,
                    this.frameWidth, this.img.height);
    ctx.restore();
};
Take care with the changes and check you are using the new xAdj and yAdj values in the drawImage() method. Then the code calculates the x and y position for the centre of the image to be drawn. The centre point is used to reset the co-ordinate system for the canvas. Then a rotation (which can be zero) is applied and the image drawn. After the image has been drawn the saved settings of the canvas object are restored.
Time for some more testing before dealing with the bird and the pipes.
Stage 4:
We met collision detection in our first game where we used trigonometry to calculate various points around the perimeter of the “ball” and then checked to see if any of those points sat on or inside the perimeter of any of the bricks in the Breakout wall. We can start collision detection for sprites with a more general approach. The sprites are rectangular bitmaps and we can write some code to see if the rectangle surrounding the bird image overlaps any of the pipe image rectangles. The code required to decide if two rectangles intersect is pretty straightforward and can be neatly placed inside a function that returns a Boolean.
function intersect(rectA, rectB){
    return Math.max(rectA.x, rectB.x) <
        Math.min(rectA.x + rectA.width, rectB.x + rectB.width) &&
        Math.max(rectA.y, rectB.y) <
        Math.min(rectA.y + rectA.height, rectB.y + rectB.height);
}
We can see how that works with the next illustration. Take the upper pair of rectangles.
The left (x position) of the right-hand rectangle is greater than the left hand one so the first calculation results in 6. The least of the rights (x + width) is 5 which is not less than 6 so the function would return false (no need to check the other comparisons).
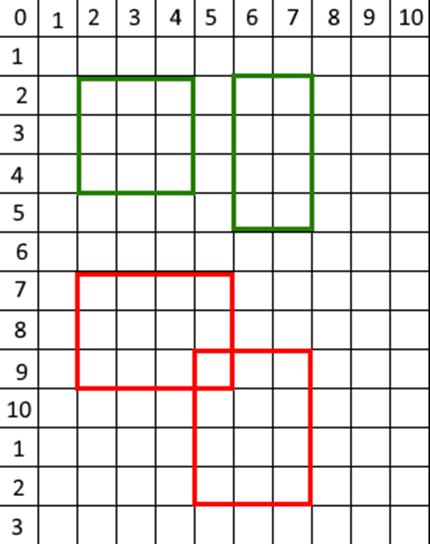
For the second pair we end up with a test that says (5 < 6 and 9 < 10) which is true so the function has detected that the two rectangles overlap. In some circumstances we might want to change the comparison to less than or equal to (touching but not yet overlapping) but we can go with this for the moment.
We could write a “helper” function that can return an object representing the bounding rectangle of a sprite passed as an argument.
var Rect = function(sprite){
    this.x = sprite.x;
    this.y = sprite.y;
    this.width = sprite.img.width;
    if(sprite.frames){
        this.width = sprite.frameWidth;
    }
    this.height = sprite.img.height;
};
Notice how the function checks for a “frames” value to differentiate between the bird (where a different width rule applies) and a Sprite representing a pipe. With that available, a short new function called birdStrike() can check for collisions with the pipes. This function is not now cluttered by code calculating sprite bounding rectangles.
function birdStrike(){
    let bRect = new Rect(bird);
    for(let p = 0; p < game.pipes.length; p++){
        if(game.pipes[p].visible){
            let pRect = new Rect(game.pipes[p]);
            if(intersect(bRect, pRect)){
                game.state = game.states.over;
                return;
            }
        }
    }
}
We obviously need to add a call to the birdStrike() function somewhere. Pop the following lines into drawFrame() just before the call to birdMove() .
birdStrike();
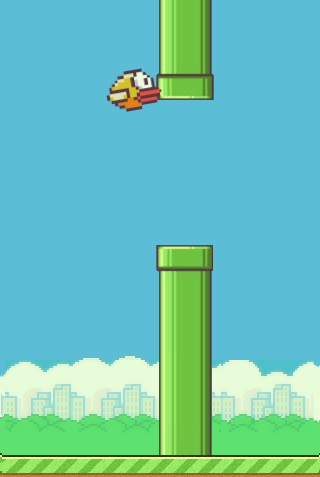
Try another test run. With a bit of practice, you should be able to get the bird through the first pipe pair. The bobbing is tricky though and the angular rotations make it more difficult somehow. If you run the current game a few times you will probably start to notice that the collision detection is not perfect. The bird rotation means that using a rectangle square on to the screen is going to be wrong a lot of the time. Also, the pixels of the bird image do not fill the rectangle corners so our code might detect a collision at an “empty” corner.
In many games that you might come to write in the future, the simple rectangle intersection test will suffice for effective collision detection. In other instances, the game actually needs to inspect individual pixels to check for a collision.
The illustrations below demonstrate the challenge. The first image shows the bird as it is stored in a frame from the image file. The black box around the bird identifies the dimensions of the bounding rectangle. The white area around the bird and within the rectangle is one problem area as we might record a collision for a section of the rectangle with a distinct absence of bird. When the bird is rotated (as in the second image), then any new bounding rectangle has even larger areas that are not inhabited by the bird.
We would like to take any bird rotation into account when doing collision detection but we also do not want to make the problem worse.
The full solution to our collision detection problem will require the project to be run from a web server as Chrome (and other browsers) will raise security issues if we start to read pixel values to spot just where a bird is being drawn and where it is not. We can make use of nodejs to provide a lightweight server for this project but this will add maybe 40 megabytes to the project plus a considerable number of files. You can skip ahead to Stage 5 of this project and stick with the current collision detection if you prefer. Otherwise, there is some interesting JavaScript to explore.
We know that when the bird is rotated that it is somewhere inside the larger bounding rectangle. As this is a good start point, we had better come up with a way of calculating the dimensions and position of that rectangle. We can use trigonometry again and keep it all within the Rect object constructor function.
var Rect = function(sprite){
    this.x = sprite.x;
    this.y = sprite.y;
    this.width = sprite.img.width;
    if(sprite.frames){
        this.width = sprite.frameWidth;
    }
    this.height = sprite.img.height;
    if(sprite.rotation && sprite.rotation !== 0){
        let rot = (sprite.rotation < 0) ? 2 * Math.PI -
                   sprite.rotation : sprite.rotation;
        let w = Math.ceil(Math.sin(rot) * this.height +
               Math.cos(rot) * this.width);
        let h = Math.ceil(Math.sin(rot) * this.width +
               Math.cos(rot) * this.height);
        this.x -= Math.ceil((w - this.width)/2);
        this.y -= Math.ceil((h - this.height) / 2);
        this.width = w;
        this.height = h;
    }
};
The function calculates a new width and height for the bounding rectangle and then positions it centrally over the midpoint of the sprite image. Note the use of Math.ceil() to round the calculated values up to an integer to ensure our rectangle is a whole number of pixels wide and high. The function includes an if statement which nicely illustrates how it can be used to test a value that does not exist for most Sprite instances. It starts “if(sprite.rotation” and, as if statements are evaluation left to right, if there is no such sprite member then there is no check on the actual member rotation value.
An alternative approach to calculating a bounding rectangle might be to calculate the dimensions of a square that would encompass the entire rotation of the image (or frame). This would give you a larger rectangle but it could be calculated once and used each time your code needed to do a collision check although an adjustment might need to be made for the x/y position of your sprite moved around the screen. The dimensions of the square could be simply calculated as the square root of the sum of the squares of the height and width (Pythagoras).
Square sides = √(heightx^2+widthx^2) .
The new rectangle will allow for the rotation of the sprite but will increase the likelihood of a collision when navigating the small gaps between the pipes. The first step in improving that situation is to calculate the smaller rectangle that is the area where the bounding rectangles of the bird and pipe intersect. This would need a change to the intersect function to get it to return the intersection rectangle instead of “true”. It might be simpler to create a new function and use that in our code.
function getIntersect(rectA, rectB){
    let rA = rectA.x + rectA.width, rB = rectB.x + rectB.width;//right x
    let bA = rectA.y + rectA.height, bB = rectB.y + rectB.height;//btm y
    let ix = Math.max(rectA.x, rectB.x),
        iy =  Math.max(rectA.y, rectB.y);
    let rect = {
        x: ix,
        y: iy,
        width: Math.min(rA, rB) - ix,
        height: Math.min(bA, bB) - iy
    };
    if(rect.x < (rect.x + rect.width) &&
                    rect.y < (rect.y + rect.height)){
        return rect; // intersection
    }
    return null; // no intersection
}
Now we know where the two rectangles intersect, we can inspect that area to see if it contains any bird pixels or if they are all transparent. To do that we will need to create a new canvas object and re-draw the bird image onto that so that we can inspect the individual pixels. We could start with a collision object to contain that canvas and context.
var collision = {
    canvas: document.createElement("canvas"),
    ctx: null
};
We can size and initialise the new canvas context alongside sizing the main game canvas in the initialise() function. Edit the first three lines to read:
function initialise() {
    canvas.width = collision.canvas.width = game.width;
    canvas.height = collision.canvas.height = game.height;
    collision.ctx = collision.canvas.getContext("2d");
Now we need a process to draw a sprite onto the collision object’s canvas. The least complicated addition to the Sprite object would be a new function to repeat the last frame drawn.
bird.repeatFrame = function(ctx){
    ctx.save();
    let xAdj = this.frameWidth / 2;
    let yAdj = this.img.height / 2;
    ctx.translate(this.x + xAdj, this.y + yAdj);
    ctx.rotate(this.rotation);
    let clipx = this.frame * this.frameWidth;
    ctx.drawImage(this.img, clipx, 0, this.frameWidth,
                    this.img.height, -xAdj, -yAdj,
                    this.frameWidth, this.img.height);
    ctx.restore();
};
As you can see, the code here is a near repeat of the main bird animate() code but skipping anything that is not about the drawing. The target <canvas> context is passed in as an argument to the method.
The next function we need is one that can check the pixels within the intersection rectangle after the bird has been drawn onto the collision object canvas.
function checkPixels(rect){
    collision.ctx.clearRect(0,0,canvas.width,canvas.height);
    bird.repeatFrame(collision.ctx);
    let pixels = collision.ctx.getImageData(rect.x,
        rect.y, rect.width, rect.height);
    let pixelData = pixels.data;
    for(let p = 3; p < pixelData.length; p+=4){
        if(pixelData[p]!==0){
            return true; // found a bird pixel
        }
    }
    return false;
}
The function clears the <canvas> and calls the repeatFrame() method on the bird sprite. Once the bird has been re-drawn onto the collision <canvas> then the pixels within the area of the intersection rectangle are extracted. The extracted pixels data returned by getImageData() takes the form of an array of numbers. Each pixel in the extracted array is represented by four numbers. You probably guessed these are the Red, Green, Blue and Opacity values. The function loops through the pixel array checking the fourth number for each pixel. If it is transparent, it should be set to zero. If it is not zero then we will assume that it is one of the visible pixels of the bird sprite image. If one of those is in the rectangle then we have a collision.
The function returns true if it detects a collision and false if not. We can call it from the birdStrike() function.
The function now stores the value returned by the intersect() function. If the value is an object (which means that there is an intersection between the bird rectangle and the pipe rectangle) then a check is made on the collision detection method. The checkPixels() function is called and passed the rectangle object as an argument. The checkPixels() function will return a Boolean. If the Boolean is true, then the game state is set to “over” and the player loses control over the bird.
#function birdStrike(){
    let bRect = new Rect(bird);
    for(let p = 0; p < game.pipes.length; p++){
        if(game.pipes[p].visible){
            let pRect = new Rect(game.pipes[p]);
            let strike = getIntersect(bRect, pRect);
            if(strike){
                if(checkPixels(strike)){
                    game.state = game.states.over;
                    return;
                }
            }
        }
    }
}
If you try testing the project at this stage, then the code will hit a snag the first time that the checkPixels() function is called. Chrome will signal a potential security breach when the getImageData() method is called. We deal with that issue by running this version of the game using the lite web server which we need to install.
The following assumes that you have node.js installed. If not, then you might like to try looking around for a simple server – one that was available at the time of writing was “200 OK Chrome Web Server” and you will find instructions on using that Chrome app available on the book website.
For the node enabled; first create a new file in the project folder named package.json with the following content:
{
    "name": "flappy",
    "version": "1.0.0",
    "description": "demo project.",
    "scripts": {
      "lite": "lite-server --port 10001",
      "start": "npm run lite"
    },
    "author": "",
    "license": "ISC",
    "devDependencies": {
      "lite-server": "^1.3.1"
    }
 }
That json file says that we will be using the “lite” server and that a “start” command will run the program. We now need to install the server. Click the Terminal tab at the bottom of the VS Code window and then enter the following command:
npm install
Once the installation is complete you can start the server which will automatically load Chrome with the index.html page. The command is:
npm start
The server will automatically load the index.html file for this project ready for you to test the changes. All debugging will have to be confined to the Chrome Developer Tools but if you save any changes to the main.js JavaScript file then the server will detect this and reload the page to include your bug fixes and enhancements. If you shut the web page then you can restart the server with the “npm start” command at any time.
Now is the time for some testing.
Stage 5:
We now have a nearly working game. As always, a little polishing will make it truly playable.
The book web site included some sound files for this game ready to download and store in a subfolder of the game as these appear to be in the public domain. Call the new sub-folder “audio”. Then add another object to the game code. This one illustrates a neat way of grouping and giving short names to some related objects.
var sounds = {
    hit: new Audio("audio/sfx_hit.wav"),
    die:  new Audio("audio/sfx_die.wav"),
    wing: new Audio("audio/sfx_wing.wav"),
    swoosh: new Audio("audio/sfx_swooshing.wav")
};
We can apply another trick to these Audio objects. Add the following lines towards the bottom of the initialise() function (but before the timer is started).
for(let aud in sounds){
    sounds[aud].onended = function() {
        this.currentTime = 0;
    };
}
This is a new form of the “for” statement. It can loop through the members (properties) of an object. In this instance the value of the variable aud will (probably) start at “hit”, then proceed through “die” and “wing” to end on “swoosh”. Those values are then being used as if they were array index values and the sounds object was an array. The point being that you can loop through an object’s content. Here the “onended” event that is fired when an Audio object runs to end is having a function attached to it. The function simply resets the currentTime value (which we used in the Minesweeper program). This means that if a sound is triggered with the .play() method then it will automatically rewind to the beginning once it has finished.
We can now sprinkle some sounds through the game play.
Add one to the playerControl() function for when the game state is “running”:
function playerControl(e) {
    switch (game.state) {
        case game.states.start:
            game.state = game.states.running;
            break;
        case game.states.running:
            if (bird.y > game.jump) {
                sounds.wing.play();
                bird.moveY = game.jump;
            }
            break;
        case game.states.end:
            restart();
            break;
    }
}
There was another addition there. A call to a function yet to be written called restart() plus a test to limit the bird.y value to stop it flying off the top on the play area.
In the birdStrike() function, add a sound when a collision is detected along with a check to see if the bird has reached the winning post (unlikely I know). First the version with pixel checking collision detection (running from a web server).
            if(strike){
                if(p === game.pipes.length - 1){
                    gameOver();
                    return;
                }
                if(checkPixels(strike)){
                    sounds.hit.play();
                    game.state = game.states.over;
                    return;
                }
            }
Then the version using rectangle collision detection only.
if(intersect(bRect, pRect)){
    if(p === game.pipes.length - 1){
        gameOver();
        return;
    }
    game.state = game.states.over;
    sounds.hit.play();
    return;
}
Another sound in birdMove() when the game comes to an end with a crashed bird:
if(bird.y > (canvas.height - (bird.img.height +
                            game.runwayHeight))){
        sounds.die.play();
        gameOver();
        return;
}
I snuck in another new function name there and removed the code lines that stopped the timer and changed the game state. Those lines have moved to the new gameOver().
The gameOver() function is short and sweet:
function gameOver(){
    game.state = game.states.end;
    clearInterval(game.tmr);
    showScore();
}
The showScore() function does what it says by writing to the game <canvas> once the timer has stopped.
function showScore(){
    game.score = 0;
    for(let p = 0; p < game.pipes.length; p++){
        if(game.pipes[p].x + game.pipes[p].img.width < bird.x){
            game.score += 0.5; // as they come in pairs
        } else {
            break;
        }
    }
    ctx.font="30px Arial";
    ctx.fillStyle = "red";
    ctx.textAlign = "center";
    if(game.score == Math.floor(game.pipes.length / 2)){
        ctx.fillText("Winner", canvas.width/2, canvas.height/4);
    } else {
        ctx.fillText("Game Over", canvas.width/2, canvas.height/4);
    }
    ctx.fillText("Score: " + game.score, canvas.width/2,
                                   canvas.height/4 + 30);
    if(game.score > game.highScore){
        game.highScore = game.score;
    }
    ctx.fillText("High score: " + game.highScore,
                                  canvas.width/2, canvas.height/4 + 60);
    showPlay("Click, touch or key to restart");
}
Which just leaves restart() to get things going again:
function restart() {
    bird.y = canvas.height / 2;
    bird.moveY = -1;
    bird.rotation = 0;
    game.pipes = []; // clear pipes array
    createPipes();
    game.state = game.states.running; // we are off
    game.tmr = setInterval(drawFrame, game.speed);
}
Adding a “round of applause” for a winner is left as an exercise for the reader. In fact, there is a lot of potential for tweaks here. You might want to adjust the pipe positions and the gaps between them, at least in places. You might want to experiment with the game.jump value for a more level flight or even the gravity value to allow the bird to glide a bit.
I hope that you enjoyed this introduction to sprites and the additions to your JavaScript knowledge.
 woops!
Online edition edit
There is a blogpost here that explores some ways of checking intersections between lines and circles or rectangles. These could be useful algorithms for a number of games.
If you want to recover the file storage space taken up by the nodejs web server you might have trouble deleting the node_modules folder. There are instructions here for the trick that solves that problem.
Take a look at this “duck shoot” game. I suspect that you could combine what you learned writing the Breakout game with some of the elements used for our Flappy Bird to write something similar. It could be a lot of fun.
Code downloads for this chapter are available here.